

My first time staining something was a little over a year ago. Prior to that, the only experience I had wielding a brush involved off the shelf paint by the gallon in generic white, grey and greyer grey that went on a wall. My wife tasked me with replacing the rickety floating shelves she picked up on sale at Target a few years ago. I can’t count the number of times we’ve sent them careening to the floor with a casual inattentive bump on a weekly basis. Determined to fix something to the wall that neither moved and had the capacity for more than a couple of towels, I set out to design a shelf that, short of a tornado tearing our house down to its foundation, would support additional weight, match a mirror frame and shrug off even the most brutal bump. Naturally, I built them out of pine and poplar.
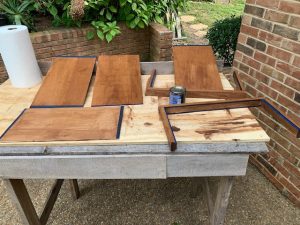
I used the pine to build a three-pronged support that stuck out from the wall like the devil’s pitchfork. I built the shelf carcass using the poplar, leaving one side open that would slide over the pine support. Oh, and for the top and bottom of the shelf I used pine plywood that sits in rabbets run along the poplar frame. I’m sure by now some of you see where this is going. Once everything was assembled, it was time to stain. I looked around YouTube and Pinterest for the sagest of staining advice and ended up going with a blog titled ‘How to Stain in 5 Easy Steps’. In hindsight, it could have just been shortened to three easy steps – open stain, brush on wood, repeat 2 times. By this time, I had put an embarrassing number of hours into this project so I could not wait to see how much these shelves would pop once the stain dried. The next morning, I inspected my handiwork and, once I laid eyes on it, heard Brando muttering ‘The horror, the horror’ at the end of Apocalypse Now.
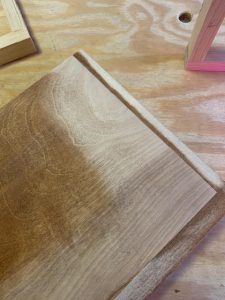
What went wrong? Well, everything. The only thing that popped was the dried glue I did a miserable job of cleaning up. The pig tail swirls from sanding proudly announced their presence and the belle of the ball was how different the pine plywood took the stain against the poplar. Ready to be done with this project, I slotted the shelves on their supports, dejectedly called my wife in for her inspection, whereupon she whispered ‘what happened?’ I had no answer. Thankfully, she left it at that and there they hang to this day obfuscated by bright linens. Over the following months I simply avoided doing anything that would be better off stained or sealed and convinced myself natural always looks better anyway. Needless to say, I brought the barest of experience to Len Reinhardt’s ‘Making Wood Pop with Color’ online class, which is available through The Highland Woodworker Online Classroom.
I rated the first class in the two part finishing series as soft maple. This one has earned purpleheart; it’s quite a bit harder, it has a beauty that can be appreciated today, and what you get from it will change with time. Len does an excellent job of shattering any illusion that coloring wood can be summed up in a series of easy steps. That’s not to say that there isn’t a series of steps, rather that the steps will only become easy with a serious commitment to trial and error. I see years of fleeting success and rampant failure if I plan on taking my projects beyond wooden curiosities shared with family and friends to pieces that reside in the permanent collection at the High Museum. Measuring, cutting, assembling have a trick or two that can be learned, but finishing appears to be the real struggle and art of woodworking. As Dr. Strange would say ‘we’re in the endgame now.’
I like to wait a week after watching a course before I sit down to write these reviews so that what I really learned (if anything) has an opportunity to percolate from short lived enthusiasm to long term ardor. Frankly, I need to watch the class again. It’s not because I learned nothing, rather, so much of it was completely new to me that my smooth brain only retained a handful of fragments. What stands out as most important to me is that accurate coloring is achieved in layers. Layers of stain, layers of binders, layers of shellac, layers of cake for texture. Len’s examples of the layering process changed how I thought about coloring my projects.
Instead of thinking in terms of tedious and laborious coats, I now think of it in terms of the layers I use when building a design in Illustrator or the skin of a citrus fruit that when peeled back reveals a much sweeter layer lurking below the bitter skin. Each layer alone has some value but it’s only when they are well combined that an orange can travel a thousand miles without so much as a dent or a series of circles, triangles and squares can come together as a mandala. While my current projects could best be compared to the assembly of a series of lines to make a stick figure, I am beginning to see how I can give that stick figure a green top hat and a pair of brown shoes to bring out its beauty.
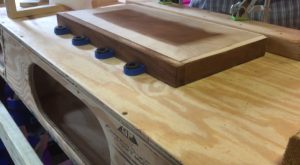
The second thing I got out of the course was to keep a record of the layers I use to color a project. I can’t recall if Len gave it a specific name, so I’ll just call it a layer board. To build it, you take a piece of wood from the project you are working on, cut lines every 2-3 inches, then use that to build your layers. The first square gets layer 1, the second layer 1+2, and so on. What you end up with is basically a tombstone for a project. It accounts for what wood was used, what color and in what order it was applied, and so on. Each square comes together as the epitaph for a finished project. I readily see the value of making this a habit, even if I use no coloring at all. If you leave a project natural, it will be a board with the screws, dowels, dimensions, etc. on it. At the moment, I don’t really keep any notes about my projects so I can’t begin to tell you how they came together without a good hard look and a tape measure.
Finally, and something I’m particularly excited to learn more about, mixing acetic acid with iron (or was it rust?) will give you a rich red color. What was fascinating to me wasn’t the formula for composing this color, but the fact that coloring wood has options beyond what’s found in the paint aisle at the local hardware store. Earlier, I joked about having a layer of cake for texture in a project, but the reality is that if you seal it on with shellac it might very well add that something special that’s missing! Probably not, but the point remains that coloring is really open to experimentation, and I see it becoming something that I will enjoy mucking around with. I’m getting ahead of myself. For now, I think I’ll re-watch the class and give staining a piece of poplar and a piece of pine a more deliberate shot. Perhaps, when called for floating shelves again, I will be ready to make the wood pop this time.
Based in Atlanta, Travis can’t draw a straight line, cut a board or drill a hole without a healthy flow of electrons. Follow along as this lifelong video game enthusiast, professional introvert, and one time IT virtuoso leaves behind cyberspace for a hybrid world where binary fuses with boards to create a digital woodspace. You can contact him at digitalwoodspace@gmail.com.