

Welcome to “Tips From Sticks-In-The-Mud Woodshop.” I am a hobbyist who loves woodworking and writing for those who also love the craft. I have found some ways to accomplish tasks in the workshop that might be helpful to you, and I enjoy hearing your own problem-solving ideas. Please share them in the COMMENTS section of each tip. If, in the process, I can also make you laugh, I have achieved 100% of my goals.
Regular readers know that cedar is my favorite wood to work. Redwood is a very close second.
A while back one of my birding friends posted photos of a screech owl who had occupied the nest box he’d just put up in his backyard. It was the cutest thing you ever saw, the adult owl’s round face perfectly fitting the round opening. Brenda immediately said, “I want one.”
I did, too. However, there is a complicating factor in our yard, which is that the yard is full of trees, and our trees are full of squirrels.
If you have squirrels, or you know anything about squirrels, you know that they are incredibly destructive. Put a nest box anywhere a squirrel can get to it, and it’s probably toast.
Oh, they will nest in it. all right. But, like the rats they are, they will trash the very place they live. The first thing they will do is chew the 3″ opening larger. Not that they need it larger; they can fit through a hole 1″ in diameter. No, they just do it because they’re rats.
Experts recommend that there be no trees within 20 feet of the box. Our yard looks like a tree farm.
For a couple of years, I told Brenda that it was just out of the question for us to raise baby birds in a box, until, one day, I saw the place where I thought it might work. If I mounted a box on top of a 20 foot 2 x 4, then attached it to the handrail at the end of the boat ramp, we might have a shot. I’d still have to put a metal predator guard on the post, but it just might work.
No time was wasted, because I’d already scoped out plans at the Cornell and Audubon web sites. Now, I just needed some wood.
A while back we had to replace some rotted cedar on a screened area we call our cedar deck. It’s framed in cedar and I made a cedar picnic table for it. As you might imagine, I didn’t throw any of it away, just in case.
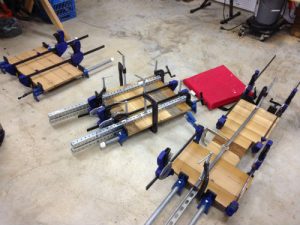
To make the most of it, I planned ahead. I wanted 3/4″ material and the plans specify the dimensions of each panel. You’d never do this in furniture building, but I cut my materials to length before I resawed. I had 4 x 4s that would yield three pieces each with a sliver left over, and 2 x 4s that would make two boards when sawn in half. If you’re thinking I saved the sliver, you’re getting ahead of me.
It can be a challenge to glue up a panel and get all of the edges square right off the bat (which is why you don’t normally cut your pieces to length in advance). But, when you commit to a length, you have to make it happen. If your edges are already square, it’s not too hard if you’re gluing on a flat surface. I’m addicted to crutches, so I used some old biscuits I had left over before I bought the Festool Domino 500, and no one wants to buy my DeWalt biscuit jointer, so I figured this was a good opportunity to cut into my supply. After the glue is applied, squeeze the panels together and place the edges onto the flat worktop. If everything lines up, your panel’s edges will be aligned in the final project. You might sacrifice perfection because you gave up the opportunity to trim to final length, but you saved a limited resource in the process.
Knowing the exact dimensions you need in advance, and being tolerant of slight imperfections means the wastefulness of “cut long and trim later” is avoided. This technique might not work in fine furniture, but a screech owl occupant won’t complain.
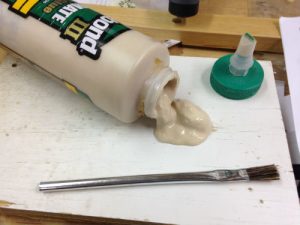
I’m keeping the budget as tight as possible. I had some Titebond III that coagulated, but I skimmed the cured layer off the top and went right on. The triangular cutoffs from the sides that gave the roof its slope included glue joints. I abused the cutoffs, and the wood broke; the glue joints didn’t.
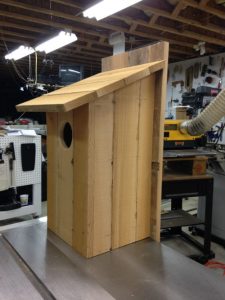
I thought the final box turned out pretty nice. A drainage dado that had been in a floor plate shows in an edge board. I filled the defect with epoxy dough.
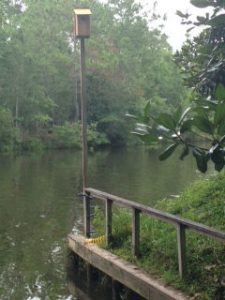
Winter, 2019, we’re hoping for a screech owl pair to take up residence and raise babies. Sorry, there won’t be a web cam.
Jim Randolph is a veterinarian in Long Beach, Mississippi. His earlier careers as lawn mower, dairy farmer, automobile mechanic, microwave communications electronics instructor and journeyman carpenter all influence his approach to woodworking. His favorite projects are furniture built for his wife, Brenda, and for their children and grandchildren. His and Brenda’s home, nicknamed Sticks-In-The-Mud, is built on pilings (sticks) near the wetlands (mud) on a bayou off Jourdan River. His shop is in the lower level of their home.Questions and comments on woodworking may be written below in the comments section. Questions about pet care should be directed to his blog on pet care, www.MyPetsDoctor.com. We regret that, because of high volume, not all inquiries can be answered personally.
Very cool. I love owls. We had one as a kid that lived in our backyard. When growing up it would bring a huge smile to my face if we were coming home late and you would see it sitting on the tv antenna getting into hunting mode.
Can you please tell me a bit more as to what it is like to work with redwood? It looks like it might be very soft. Sort of like working with pine from a hand tool perspective. I’ve always wanted to make something like a wall clock out of it and put a lot of coats of tung oil on it. Do you have any tips about redwood wood working? Thank you.