

Molly Bagby is an employee at Highland Woodworking who recently finished up a 2 Week Basic Woodworking course at Center for Furniture Furniture Craftsmanship (CFC). Although she grew up at Highland Woodworking from a mere 1 week old, her knowledge of woodworking skills is limited. With this class, she intends to change that. You can follow her on Instagram @HighlandWoodwoman.
As I mentioned in my previous blog, we delved right into Sharpening on Day 1. I quickly learned why Highland Woodworking has an entire section of the store dedicated to sharpening supplies. A lot of work goes into getting tools sharp, but a sharp tool really makes all the difference, especially when making joinery.
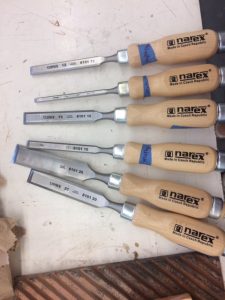
Peter Korn has an entire section on Sharpening in his book Woodworking Basics, which discusses each step of the process in detail. What he taught us in class are the same methods he discusses in his book, but here are the main steps I picked up from the process (as a side note, I had brought up a brand new set of 6 Narex Chisels, which in their description say “like most edge tools, they’ll need sharpening before use”…they forgot to mention the words “A LOT” but apparently that is the case for almost all new chisels, and even if they do come “pre-sharpened” you’ll still want to do a little bit more yourself to get them in “perfect” working condition.
Flattening the Back – Your goal in this part of the process is to flatten the back of the chisel.
- On the two sides of a 5×12 piece of glass, stick a long piece of 220 grit adhesive sandpaper.
- Rub the back of the chisel flat on the sandpaper by holding it down at a slight angle and move it back and forth to remove the factory marks from the top 1-2 inches of the chisel (I found that I had a hard time keeping the chisel flat…this necessity was stressed time and time again).
- Switch to a 1000 grit waterstone and continue flattening the back of the chisel, taking out the 220 sandpaper scratches.
- Switch to a 6000 grit waterstone and continue flattening until the back of the chisel has a shiny, mirror finish to it (i.e. once you can see your reflection in the back of the chisel).
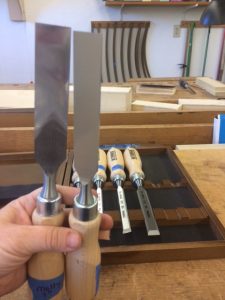
One of these chisels has been sharpened and one of them hasn’t…can you tell which is which?
-When sharpening on stones make sure you are using the whole length of the stone and are holding the chisel on the steel portion of it so that you are less likely to lift the handle and round the chisel back.
-Once you have flattened the back, you will no longer need to use the sandpaper or 1000 grit waterstone on the back of your chisel.
Honing the Front
Once the back is flat, it is time to hone the front of the chisel. First you want to make sure your chisel is ground down to a 26-30 degree bevel angle. Anything less than 25 degrees will fail. I found the grinding process on the electric grinder to be very technical and won’t go into the details of the grinding process, but there are some great YouTube videos that show this process.
After you have the proper angle from grinding, go back to the waterstones to get the perfect edge:
- Start on the 1000 grit waterstone and make sure the bevel edge is flat on the stone, with only the front edge making contact with the stone.
- Again, keeping the chisel as flat as possible on the stone is key in order to keep from misshaping the edge.
- Move the chisel back and forth on the stone (making sure to use the entire surface of the stone), applying downward pressure when pushing it forward and no pressure on the return back. I found that I had to go back and forth for several minutes and sometimes counted my strokes to help pass the time (I think I got to over 100 one time).
- Remove the burr that has been created on the back of the chisel on the 6000 grit stone.
- Repeat Steps 1-4 on the 6000 grit stone.
- Once your chisel is sharp enough to remove hair from your skin, it’s sharpened.
Congratulations! You now have a sharp chisel….maybe. Unfortunately, this was not the case the first few times I was going through the sharpening process and I found the entire process to be very frustrating, detail-specific, and I felt like I had no idea what the perfectly sharpened chisel was supposed to look like.
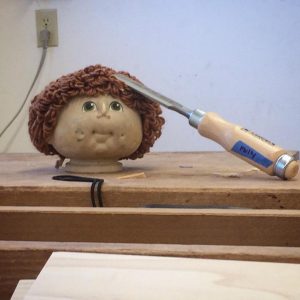
I was so frustrated by sharpening that I tried to stab my benchmate’s mascot with my “sharpened” chisel…it clearly wasn’t sharp enough
I compared the process to making a magic wand work. If it wasn’t perfect made, no magic would come out of it. If the chisel wasn’t sharp, it was not going to cut wood the way you wanted it to. I don’t actually believe in magic, which is why I found this comparison to be true…a magic wand will never actually work, and the sharpening process was so arduous that at times I felt like I was never going to get my chisel sharp enough.
But with a little lot of patience, time, and wet/flattened waterstones, eventually you will get your chisels sharp enough to start making joinery. Keyword=eventually. It wasn’t until midway through week 2 that I handed one of my chisels to Peter who was showing me a dovetail technique and he specifically said “wow, you’ve actually got a really sharp chisel!” That was probably one of the highlights of my time at CFC.
Sounds like a great experience! A good, fairly recent film about craftsmanship is Jiro Dreams of Sushi – – – your experience with Peter Korn praising your sharpening job will resonate with the moment one of Jiro’s apprentices earns a bit of praise for finally beating the eggs properly after 18 months of trying! I recommend watching it.
The upside to all this is that once you get it “really” sharp, you will never go back. Also, once they are sharp it is really easy to keep them sharp. Don’t be discouraged, sharpening is a learned skill, and like all learned skills just takes practice, practice practice. Fortunately, in woodworking, sharpening is a comon element so you will always have practice opportunities!!!.