

No Southern-fried Southern boy wants to be called a Yankee, but we share the characteristics of shrewdness and thrift. Thus, each month we include a money-saving tip. It’s OK if you call me “cheap.”
A few days ago I was looking for a big piece of paper to trace an outline on. I didn’t have any paper that big, so I found some 8 x 10 advertising sheets that came with a product I’d ordered, taped them together and that worked fine. When I’m putting newspaper into a cage at work, if I run across the funny papers, I’m inclined to stop and read a few strips before moving on. When I picked up these sheets, I couldn’t help noticing that a company was selling sawdust for you to use to color your glue and epoxy.
Don’t fall for that! You’re already making sawdust just about every time you’re in the shop. All you have to do is collect it. Here’s how I do it.
First, I get a zipper-locking bag. No, not a brand new one! You do have a collection of free used bags, or bags that came in tools or parts that you saved, don’t you? Using a Magic Marker, label one red oak, one white pine, redwood, cedar, etc. Before you start collecting for your collection, vacuum the dust bag on your random orbit or vibrating sander. It doesn’t have to be sterile, you just don’t want a contrasting color of sawdust diluting your specimens.
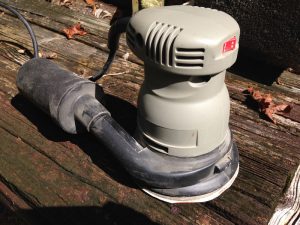
Clean the bag on your sander thoroughly before beginning to collect for sanding dust to use for future coloring.
Sand normally.
Continuing to wear your dust mask, pour the sanding dust into the plastic bag.
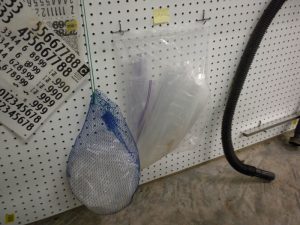
Don’t be wasting your woodworking budget on Ziploc bags…find a used one in your collection.
The natural question arises, “Why not just take the dust from the vacuum or dust extractor?” That might work, if you use your dust extractor for nothing but sanding. But, if you’re like me, and you clean your shop with it, too, there is a high likelihood of “stuff” being in the mix you wouldn’t want on your project.
Be prepared to do some experimentation prior to using sanding dust on a project. For example, when you add this, or any other foreign material into epoxy, it changes the curing behavior, and you don’t want surprises on an actual project.
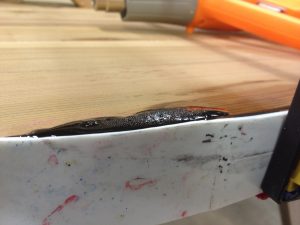
I like coloring epoxy, but there are challenges to determining how the coloring, the wood and the epoxy will all gang up against you. Some wood, for example, makes epoxy produce more bubbles. Some additives make the epoxy cure very rapidly.
Jim Randolph is a veterinarian in Long Beach, Mississippi. His earlier careers as lawn mower, dairy farmer, automobile mechanic, microwave communications electronics instructor and journeyman carpenter all influence his approach to woodworking. His favorite projects are furniture built for his wife, Brenda, and for their children and grandchildren. His and Brenda’s home, nicknamed Sticks-In-The-Mud, is built on pilings (sticks) near the wetlands (mud) on a bayou off Jourdan River. His shop is in the lower level of their home.Questions and comments on woodworking may be written below in the comments section. Questions about pet care should be directed to his blog on pet care, www.MyPetsDoctor.com. We regret that, because of high volume, not all inquiries can be answered personally.