

Welcome to “Tips From Sticks-In-The-Mud Woodshop.” I am a hobbyist who loves woodworking and writing for those who also love the craft. I have found some ways to accomplish tasks in the workshop that might be helpful to you, and I enjoy hearing your own problem-solving ideas. Please share them in the COMMENTS section of each tip. If, in the process, I can also make you laugh, I have achieved 100% of my goals.
Rules.
There are a lot of rules in woodworking, and most of them exist for good reasons.
Wear eye protection. Use hearing protection. Don’t start the table saw until you take off your tie.
Some rules, however, are about protecting equipment. One of those is bandsaw blade tensioning. Don’t leave the tension on when not using the saw, lest you cause flat spots on your tires. Apply proper blade tension before starting the saw, lest your blade go flying.
These are important rules, but how many of us follow them? Some woodworkers risk flutter-inducing tire flat spots rather than remove tension at the end of the day.
Why? You can blame it all on that frustrating little handwheel most manufacturers provide for tensioning.
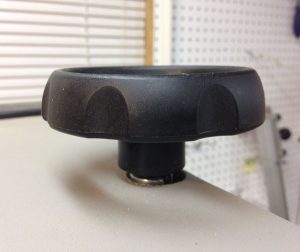
This is the culprit. Who has the time, the arm stamina or the patience to crank this knob until the bandsaw blade is tight?
Let’s put a stop to that.
And, of course, not spend a lot of money in the process.
I’ll even give you two choices, and neither involves buying a new saw.
The quickest fix, if it will fit your equipment, is to purchase the Quik Crank Bandsaw Tensioner. Just compare the parts in the product description to the components on your saw to know if it will work.
If not, you can do what I did, and make your own. My Craftsman saw’s knob engages a slotted end on an adjusting rod. I cut a 7/16″ bolt to a length of 1-1⁄2″ and drilled a hole perpendicular to the long axis, the same distance from the end of the original. A drift pin engages the adjusting rod, and the original 5/8″ hex head on top of the bolt faces up.

Check the opening in your saw’s adjusting rod, but a 7/16″ bolt fit mine perfectly. Accurately drill a perpendicular hole for a tight fit for a pin. Drive in the pin. You’re almost there.
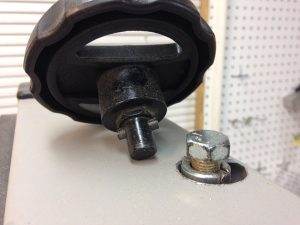
Your modified bolt should fit much like the original equipment handle’s shaft.
Initially, I used my good Craftsman speeder handle, just to prove that the concept was going to work. I left it like that for several months, then replaced it with an inexpensive brand of handle and socket I could just leave in place all the time.
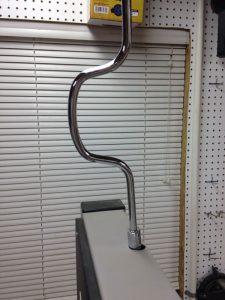
From a distance, no one can even tell this speeder handle came from “that” store, but the price was right, and, just how good does it have to be to tension and de-tension the bandsaw blade?
A discarded milk crate close by allows me to safely get up to a good working height.
Jim Randolph is a veterinarian in Long Beach, Mississippi. His earlier careers as lawn mower, dairy farmer, automobile mechanic, microwave communications electronics instructor and journeyman carpenter all influence his approach to woodworking. His favorite projects are furniture built for his wife, Brenda, and for their children and grandchildren. His and Brenda’s home, nicknamed Sticks-In-The-Mud, is built on pilings (sticks) near the wetlands (mud) on a bayou off Jourdan River. His shop is in the lower level of their home.Questions and comments on woodworking may be written below in the comments section. Questions about pet care should be directed to his blog on pet care, www.MyPetsDoctor.com. We regret that, because of high volume, not all inquiries can be answered personally.