

Let The al fresco Dining Begin!
When our youngest grandchild, Sara Riley, was only a few years old, I got some rough-sawn cedar, planed and sanded it, and built the cutest miniature picnic table with two separate benches. A few years later our second grandchild, Charlie, came along, and his big sister now graciously allows him to sit with her.
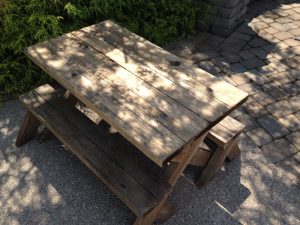
After I finished this table, a lady saw it and said she wanted one for her grandchildren. She asked me, “How much?” I said, “For one exactly like this? Five hundred.” I put a lot of sweat and love into this little project. Unfortunately, I didn’t take any pictures while it was being built. Here, it shows the effect of aging in ten Kentucky summers and winters.
I wanted to make a picnic table for our two youngest grandchildren, Audrey and Owen, but I didn’t want it to be the same. When I found the plan for a round table with curved benches, I knew all I had to do was scale it down to their size.
The kernel of the project came from an old project book copyrighted 1970 titled, Wood Projects for the Home Handyman, by the editors of the Home Handyman’s Magazine. Its asking price was 60¢ at newsstands, 75¢ by mail. There is a collection of projects that you can make from the “durable, decorative and workable woods of the western lumber region.” To encourage the timid and the tightwad, the book proclaims “The table with benches can be easily constructed by the average home craftsman and will cost far less than comparable units available in retail outlets.”
I was shocked when I picked up the Western red cedar. So much for this project costing “far less.” Cedar had roughly doubled in price since the first table. But, so what? It was for the grandbabies. That’s always good justification.
Memorial Day weekend, 2014, I had the wood, the shop was clean, Brenda was out of town, the Forrest Woodworker II was sharp, and I thought, “I can start Friday night after work, go all day Saturday plus Monday and probably be finished by the evening of Memorial Day.”
I’m writing this January 25, 2017, and I just loaded the pieces onto the trailer last week. It was not a long-weekend task.
It was a fun project, though. One of the great things about having young grandchildren as your “customers”… they don’t keep track of time.
In fact, a serendipitous thing happened between 2014 and now. Granddaughter Audrey learned the term, al fresco, an Italian phrase that means “in the fresh air,” and she loves dining outside on the deck whenever she can. She and her little brother, Owen, will love sitting at their new al fresco table.
There were some interesting experiences during the two-plus years of this build, and I’d like to share some of them with you.
First, I learned that, although cedar’s price was up, the quality went down. Knots, on the one hand, are simply part of working with cedar. I knew that when I chose the medium. Other defects were not so expected.
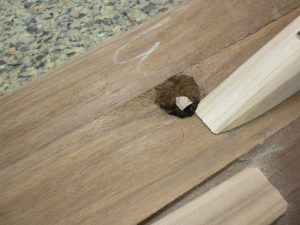
Like the giant void that appeared in the edge after circle-cutting the top with a router.
I suppose that black epoxy is going to become a “trademark” for me, as I seem to find a way to incorporate it in nearly every project, much like Ernie Conover uses ebony plugs in the center of his drawer pulls. But, I’m used to having a defect to fill that provides its own retaining wall, such as a knot that has fallen out. To fix this edge, I was going to have to provide a wall. As Steven Johnson would say, I “noodled” on it for a while, and came up with this plan. Start with a curved retaining wall. As someone who finds roadside buckets nearly every time he gets in the car, I wasn’t shy about cutting a bucket to pieces. The shape is already curved, and, even though it isn’t the same diameter as the 48″ top, it is flexible. I cut enough of it to go well beyond the defect, stretched it tight with clamps, then put pan-head screws through pre- drilled holes in the bucket-dam, into the edge of the table, applying even more tension. The defect was bad enough that it went all the way through, so I needed another dam on the bottom of the table. For that, I used some off-brand Play-Doh. Building up epoxy in seven layers, I gradually filled the void. I was hoping that I’d avoid bubbles by using thin coats of epoxy. Alas, there were some, but they were small and not terribly noticeable. Epoxy is sandpaper-friendly, so no techniques have to be changed to accommodate it.
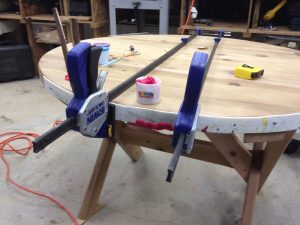
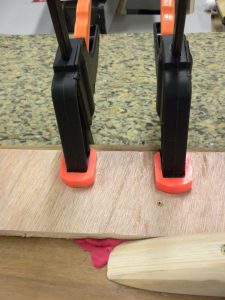
The bucket strip is stretched tight against the wooden edge with clamps and screws. Dollar-store Play-Doh is acting as a dam against uncured epoxy dripping out, and we’re ready for the first layer.
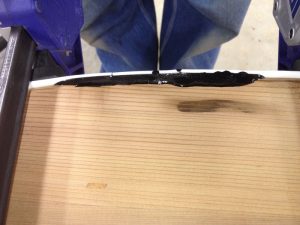
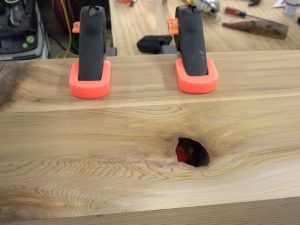
Several layers have built up the epoxy.
The first two of seven coats of finish are on, and the repair looks more like an accent than a mistake of nature.
Some of the bench boards had defects that went all the way through.
Repair of these through-knots started with fake Play-Doh, reinforced with plywood clamped in place.
Then, the defect is ready to be filled. I use “charcoal” concrete-coloring powder in my epoxy to make it black.
Sometimes you get lucky and two defects are right across from each other. Before filling, I used a Dremel tool with a burr to clean out all the loose material.
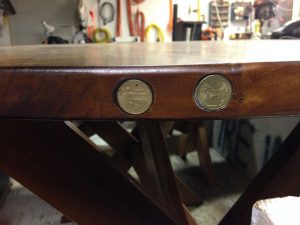
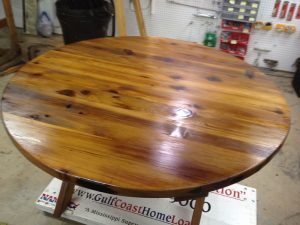
During the project I read about a home builder who epoxied a penny into the framing of houses he built. The year of the penny matched the year of the build. I expanded that idea and put state-specific quarters in the edge of the table. A “Kentucky” quarter from the years Audrey and Owen were born, a “Mississippi” quarter for the year the table was made, and a Texas quarter to represent the state of my birth. My Texas coin couldn’t be year-appropriate. Quarters hadn’t been invented yet.
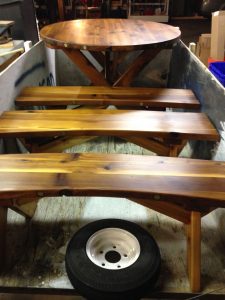
Loaded and ready for delivery. The finish is two coats of CPES: Clear Penetrating Epoxy Sealer, topped with three coats of gloss Epifanes and two coats of matte Epifanes.
Return to March 2017 Wood News Online
Jim Randolph is a veterinarian in Long Beach, Mississippi. His earlier careers as lawn mower, dairy farmer, automobile mechanic, microwave communications electronics instructor and journeyman carpenter all influence his approach to woodworking. His favorite projects are furniture built for his wife, Brenda, and for their children and grandchildren. His and Brenda’s home, nicknamed Sticks-In-The-Mud, is built on pilings (sticks) near the wetlands (mud) on a bayou off Jourdan River. His shop is in the lower level of their home.Questions and comments on woodworking may be written below in the comments section. Questions about pet care should be directed to his blog on pet care, www.MyPetsDoctor.com. We regret that, because of high volume, not all inquiries can be answered personally.