

Wood storage is a challenge for nearly every woodworker.
It takes up so much room.
It collects dust.
And insects.
And it’s rarely organized sufficiently that one can quickly and easily access the exact material they want.
My wood storage evolved from a structural feature in our new-20-years-ago house. The heavy, concrete front porch needed the support of a wall, which had to be, you guessed it, in my garage. Our builder said it could be four to six feet from the front concrete-block wall, a row of studs about 19 feet long.
That made it too small to be a room, too narrow to store a boat, but nearly perfect for storing lumber and plywood.
The first iteration was all wood. That system worked fine until.
Until Katrina.
Hurricane Katrina’s eye followed the Mississippi-Louisiana state border, and our Hancock County, Mississippi, home lay in the right front quadrant. As hurricanes are most intense in that quadrant, and they push the most water in that quadrant, we got her full complement of a 35-foot storm surge. Our entire garage was flooded, just shy of the ceiling joists. We are still thanking God that the water stopped 18″ from our living level.

One can get the idea of what the wood storage was like before Katrina’s waters rose. Plywood was stored on the top, and all of that plywood was originally for storm protection, except that many of the openings had rollup shutters by 2005, so the plywood was just waiting to be used in projects. The wood storage construction was simple, a 2×4 on edge nailed to the wall on one side and a vertical sleeper on the other. The soaking-wet plywood couldn’t be budged. One end was jammed into the ceiling joists and there was no way to pull any out. I had to cut a foot at a time off of the pile with a chain saw, as if it were a big log.
Wood tends to become plastic when it gets wet, which is why woodworkers wet it with steam when we want to bend it. Though Katrina’s floodwaters were cool, the effect of soaking beams and studs was dramatic. With the garage’s interior structures carrying the weight of two floors above, there was a lot of sagging.
The wall for the porch support didn’t fail, but it drooped, and needed to be replaced.
As it happened, a pet owner in the construction business had sought our clinic’s services while his regular veterinarian’s hospital was recovering from Katrina damage. Steel construction was the man’s specialty, and we struck up a conversation about replacing our sagging wall with steel track and studs. Within a few minutes we agreed on terms for materials, a teaching session and a helper.
At the planned time the construction boss showed up at our house with his man, Hollywood, a load of track and studs, a loaner metal-cutting chop saw and all of the screws, lead anchors and other things we needed for steel construction.
The boss got us started by helping us build the wall, teaching us the basics of steel stud construction, then he left.
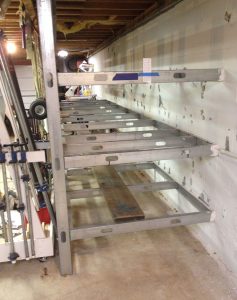
This was the setup after Hollywood and I finished. Three levels and crossmember studs on edge for lots of strength.
Hollywood and I had the hang of the process, and all that was left was to keep repeating the steps until all of the track and crossmembers were installed.
I was measuring lengths to 1/32 and splitting hairs with the bubbles on the level.
Hollywood remarked, “We aren’t building furniture here,” to which I replied, “No, but we are storing the building blocks of furniture here, and if the supports are crooked, the wood in the furniture will soon be crooked, too.”
We had that conversation more than once. Hollywood was not a fast learner.
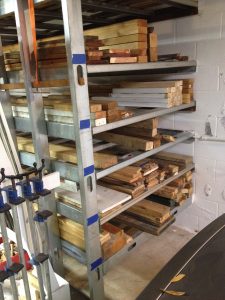
The three-level system worked well, except that wood with “character,” the kind I like best, often has twist, warp and bend along with its other defects. That makes it nearly impossible to store the wood flat and makes tall stacks fall over. Also, being restricted to three levels makes it difficult to conveniently segregate lumber by species. At best, two or more species had to share a level, often with species rubbing shoulders.
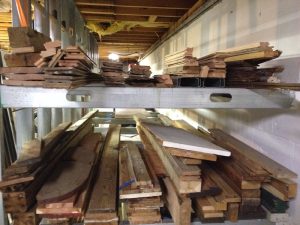
As you can see, little of the lumber here is “prime.” There was a lot of wasted space above the top crossmember. The twisted and bent lumber refused to be stacked neatly, and fell over if the stacks were too high.
On the bottom two levels, several species are crammed together and few of the boards are “cooperative.”
One day I got inspired (read “fed up”), and took every single piece of wood and plyboard out of storage and stacked it neatly in the middle of the garage. I made a plan to split each existing level in half, and double the number of levels. Vertically, I’d have less room, but isolating species from each other would make it worthwhile.
My first trip to the steel building supply store resulted in a mistake.
26 gauge steel is thinner than newspaper, and I worried that it might not be rugged enough to last a lifetime. I went back and got 20 gauge. The cost was almost quadruple, but the peace of mind was worth the extra expense.
My original plan was to put the crossmembers on edge, like Hollywood and I had installed the originals. While I was explaining my plan to Brenda, she said, “Aren’t you going to lose a lot of storage space?”
That made me reconsider an alternative I’d already thought of, then rejected: laying the crossmembers flat. I knew that would cost me some strength, but figured I had more strength than I needed anyway. To test, I installed one piece, then put one foot on it. So far, so good. I put my full weight on it. No ER visit yet. I jumped up and down on it. It had plenty of strength.
Hollywood’s boss had us attaching the studs to the track with self-drilling, Phillips-head screws. With their round heads they had a fairly low profile, but it occurred to me that a rivet, with its even smaller head, would be even less likely to scratch the stored wood so I went with those. Each crossmember would require four rivets.
Self-drilling screws are fast. And one step. Rivets, not so much. A pilot hole must be drilled, followed by a slightly larger hole the size of the rivet’s outside diameter. Then, you insert the rivet, slide a pop-rivet tool’s head over the pin, and squeeze. And squeeze. And squeeze.
A 3/16″ pop rivet is fairly easy to, well, pop. But, I was using 1/4″ rivets, and the chore became massive. It was so hard to squeeze the gun that it left my hands hurting. And weak.
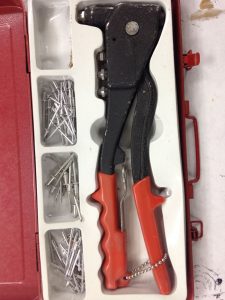
This is the basic, Chinese version of the generic pop rivet gun. Fine for little rivets. Too hard to squeeze for the 1/4″ size.
Seeking relief, I put cheater bars on the gun handles. That made the action easier, but now, when the rivet popped, the gun and both pipes went flying.
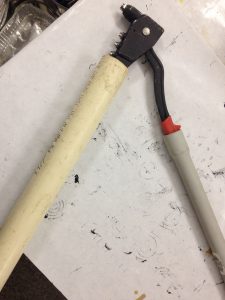
To give the little pop rivet gun more leverage, and make pin-popping a little easier, I used these cheater pipes. It wasn’t a perfect solution.
Annoying. And time-consuming, but better than the pain I was experiencing.
However, as time went on, the pain went up my arm, into my shoulder, and all the way to my neck. Between straining the ulnar nerve and aggravating an existing right rotator cuff injury, I was hurting, nearly to the point of quitting.
I had already searched online for a machine that would pop the rivets for me. The cheapest one I found was $500. But, when Brenda and I went to a celebratory dinner with her youngest sister and brother-in-law, the subject of pop rivets came up, and my Brother-in-law, Norman, said he bought one for under $100. He suggested I check Harbor Freight, which I did that very night.
A trip to Biloxi, a 20% off coupon, and $55 later I was the proud owner of a 1/4″ air- powered pop rivet gun! It sure made me wish I’d had it at the beginning of this project!

This little Harbor Freight jewel may have saved my right arm. Popping 1/4″ rivets is a dream now.
I finished the remaining crossmembers in no time, cleaned up the metal shavings and scattered pins and loaded the now space-efficient storage.
I’m happy with the board storage, and expect little change to it over time.
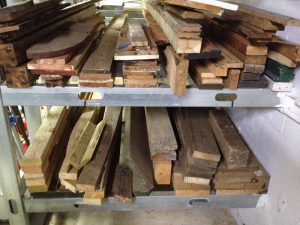
Board storage is now terrific. Species are discretely stored, no overlap, and no tall stacks falling over.
I expect the plywood storage area to be more fluid. I won’t be stockpiling; rather, I’ll buy plywood as I need it for a specific project and mostly be storing cutoffs.
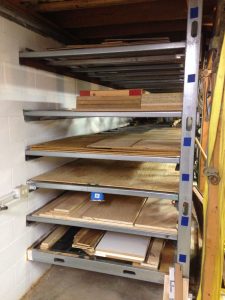
Plywood storage is sufficient for full sheets as well as cutoffs varying from oak to CDX to hardboard and pegboard.
Thus, the plywood storage is a bit of a hodgepodge. It’s organized by species and size: 1/2″ oak is all together with 3/4″ oak, 1/2″ and 3/4″ CDX on the same level, etc.
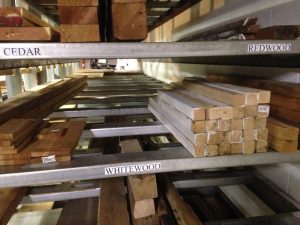
Each section of boards is labeled, and those labels can be easily changed if the system needs to be rearranged.
Mission accomplished.
Jim Randolph is a veterinarian in Long Beach, Mississippi. His earlier careers as lawn mower, dairy farmer, automobile mechanic, microwave communications electronics instructor and journeyman carpenter all influence his approach to woodworking. His favorite projects are furniture built for his wife, Brenda, and for their children and grandchildren. His and Brenda’s home, nicknamed Sticks-In-The-Mud, is built on pilings (sticks) near the wetlands (mud) on a bayou off Jourdan River. His shop is in the lower level of their home.Questions and comments on woodworking may be written below in the comments section. Questions about pet care should be directed to his blog on pet care, www.MyPetsDoctor.com. We regret that, because of high volume, not all inquiries can be answered personally.