

 This month I’m taking a closer look at Lie-Nielsen’s Mortising Chisels. While most woodworkers, and even many non-woodworkers, will quickly recognize a basic chisel like the bevel-edged style, the mortising chisel looks a little different. So what’s different about the mortising chisels compared to the bevel edged chisels that are more common? The shape of a Lie-Nielsen mortising chisel is somewhat rectangular, with the width less than the depth from the chisel’s back to its top surface. This creates a very strong chisel capable of handling the unusual stresses applied regularly to a mortising chisel. The mortising chisel is used to evacuate wood, while creating a rectangular void in a board, whose name likely isn’t much of a surprise, a mortise. This allows another board with a tenon of the same size on its end to fit precisely, creating a very strong and long lasting joint, the mortise and tenon joint. With this evacuation process, the mortising chisel is pounded (and I do mean pounded, at least after you get going) down vertically into the wood (a square is really useful to test the chisel is truly vertical) and then used to lever out the waste. Both the levering actions and the strong impulse driving are very tough on tools and a normal bevel-edged chisel would likely chip or possibly even snap under the stresses that are common for a mortise chisel. This is why the mortising chisel is made so stout.
The mortising chisel’s width can be used to determine the size of both the mortise and tenon. This is due to the tight tolerances required to create a proper fitting mortise and tenon joint. As you may have experienced, other woodworking techniques allow you to use chisels smaller in width than the final working area, and a smaller tool may work just as well or even better than one that precisely fits the opening. For example, when you are cleaning out the waste wood between the tails and pins on dovetails, you’ll almost always use a chisel that is narrower than the opening. Using a narrower chisel in this scenario is beneficial as a wider chisel requires more pressure to move through the wood, and this operation is one of surgical precision. This is certainly one example where it might be detrimental to use a chisel the same size as the opening. For a mortise and tenon joint, I find it much easier to obtain repeatable results using a mortising chisel that is the width of the final mortise (at least up to ½” or so), rather than trying to use a smaller mortising chisel, which would require multiple passes along the mortise’s width (for example, using a ¼” mortising chisel for a ½” mortise), and hoping to end up with the consistency in the mortise for a solid fit with a tenon.
The sides of mortising chisels come in two basic varieties: those with parallel sides and those where the sides are cut at angles, so the back of the chisel is slightly wider than the face of the chisel. The concept behind the angled sides is that you can twist the chisel slightly when it is down in the mortise to aid in removing it when it gets stuck. The Lie-Nielsen mortising chisels are designed and made with parallel sides, which I find much more useful and easier to control the direction and overall shape I’m evacuating. I’ve used both styles of mortising chisels and personally found the angled wall version felt like it occasionally had a mind of its own. What I mean is after lining it up with my intended direction it would still end up twisted slightly in the cut, and ultimately off line with my intended mortise. Obviously, the chisel shape can be a personal preference sort of thing, but I am absolutely sold on the parallel side version being the easiest and most accurate in use.
Lie-Nielsen’s mortising chisels are made from A-2 Tool Steel and have Maine harvested Hornbeam handles. The chisels have a socket design where the handle fits snugly into the socket with a friction fit. As the wood in the handle can move, it is always a good idea to pick the chisels up by the socket area, so your sharp tool doesn’t find its way to the hard floor. Usually a quick rap of the handle against your bench will seat the handle so it is nice and solid. Some prefer to use glue to make certain the handle never falls out, but there is another choice that is more middle-of-the-road: Hairspray! I know you’re probably thinking I’ve just lost it, but if you test it out you will find it is amazing what a little bit of hairspray will do to keep the handle in the chisel’s socket. And it isn’t so long-term like glue, as you can still give the handle a sharp smack sideways against a bench to remove it from the chisel.
Sharpening mortise chisels is very similar to other chisels with a caveat or two, but it ultimately works best when shaving sharp like all other woodworking chisels. Lie-Nielsen mortising chisels come with a 30 degree flat bevel to which I add a micro bevel of an additional 5 degrees. This both increases the strength of the tip of the chisel as well as allows you to rapidly hone to a razor-sharp edge. When honing these chisels, there are a number of choices of guides, of which I personally own three and I’ll share my thoughts on each. The side clamping honing guides are simple and can work, but I would make a quick test to verify it is holding and presenting the chisel both square and with no twist, before moving forward. If you already own one, place the chisel in the guide and apply clamping pressure, and with the bevel down on a 1000-grit stone, pull straight back away from the cutting edge once! Take a look at the bevel edge of the chisel and see if the micro bevel is reasonably equal across the width or if the edge might only be hitting on one corner. If the latter is the case, you may wish to look at my next honing guide suggestion. My personal side clamping honing guide provided surprisingly acceptable results.
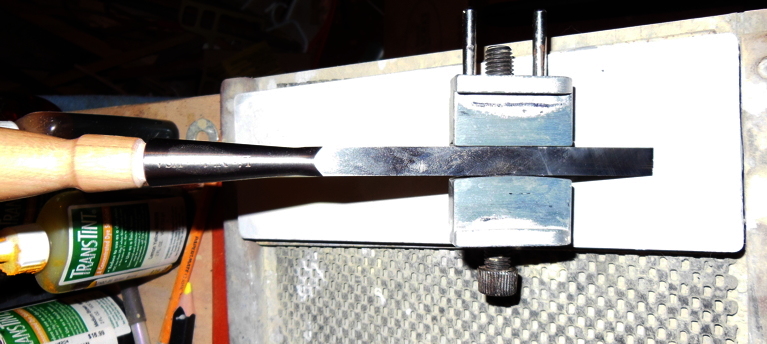
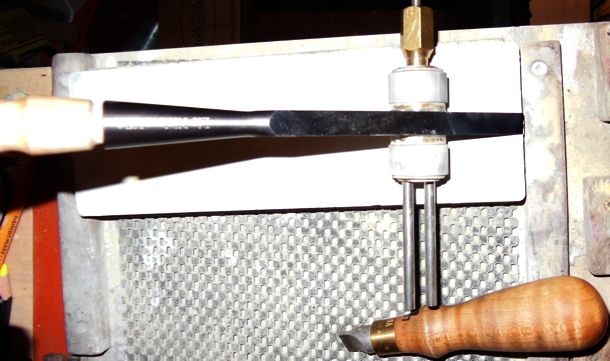
While this guide worked decently, the narrow wheel does require some focus so you don’t accidentally take the chisel out of square. The guide in my collection that I prefer to use for these chisels is my Kell honing guide, which has vertical walls that clamp against the chisel and the parallel design of Lie-Nielsen’s mortising chisels allows for a nice solid connection, with very little chance to move away from square.
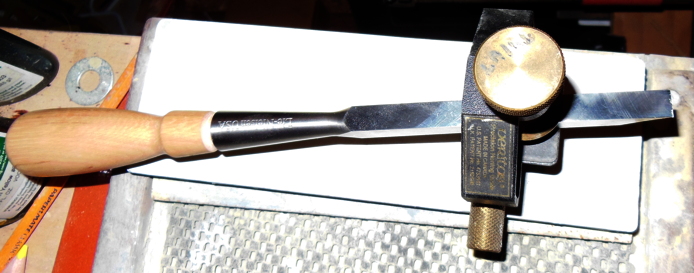
The last honing guide I own is one by Veritas, which clamps down on the back of the chisel, applying force straight down. I’ve had this honing guide for 20+ years, so it doesn’t have some of the bells and whistles of their newer versions, and in mine the chisel can shift away from square if I’m not extremely meticulous.
No matter what honing guide you decide to use, whether purchased or made, taking a single pass on the bevel side, on your most coarse stone, is useful to verify everything is good. I tend to do this regularly, rather than forging ahead, removing a decent amount of material, only to find my micro bevel huge on one side and barely touched on the opposite. Why waste time and then spend more in recovery mode, when its so quick and easy to verify before moving forward?
While I’ve talked about the bevel side of these chisels, as if it was the only portion of the tool requiring attention, this is certainly not the case. I always hone the backs of my chisels up through 8000-grit, too. It is important to remember that the definition of a sharp edge is two equally honed surfaces meeting at as close to zero radius as you can obtain. If you decide to omit honing the back, since it arrives looking nice and smooth, just remember this will limit the ultimate sharpness of your chisel.
When creating a mortise and tenon, based on the size of the mortising chisel, I always start out with the mortise. I scribe the two end positions of what will be the mortise, as well as mark for one side. There is really no reason to mark the opposite side of the mortise, as the chisel will ultimately remove the material from the mark to its full width. The first few passes with the chisel, you’ll apply a much lighter blow with the mallet, so you can really focus on the placement of the chisel and keeping it as dead vertical as possible. You’ll also stay away from the very ends of the mortise layout, which you save until the remaining mortise is at full depth, since you end up using this portion to leverage up chips from the bottom. After the beginning passes, the walls of the mortise will start to give the chisel support, helping to maintain the vertical nature you worked so diligently to establish early on. Just make sure to keep your focus, so you strike straight down with the mallet and only lever in the straight forward and back. When laying out the tenon, I use a mortising gauge (some have two pins or blades, that are adjustable, while others are of set widths), which I set to the width of the mortising chisel. When setting this gauge, I’ll lean towards being just slightly thick rather than possibly thin, as I can more easily rasp away a little material rather than trying to add some back on. A good fitting mortise and tenon will go together without pounding, but just a gentle push. You want to have a solid fit, but need enough room for the glue in the joint, too. One thing to remember when using the mortising gauge is to mark which face of the board the fence will ride against. As many mortises are not dead center on the board, but slightly offset, so marking from the wrong face could end up with wasted materials or at least extra work. The board(s) that will have a tenon(s) should also get marked for orientation (which face out and also which tenon goes with which mortise) so the fence of the mortising gauge again is against the correct side.
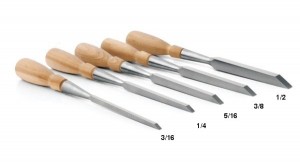
Lie-Nielsen makes their mortising chisels for joinery in a range of sizes from 3/16” to 1/2”, as well as the 1/10″ size, generally used for making traditional European wooden woodworking planes. If you want to make extremely small scale pieces, or just want to have an area of small components in a full-sized piece, you could utilize this smaller chisel in that manner.
I believe all woodworkers should at minimum make a mortise and tenon frame with hand tools, as the focus and skills required can easily carry over on a range of future builds. You may just find you prefer creating your mortise and tenon joints by hand, rather than using your power tools/machines.
I hope you enjoyed the article and please let me know if you have any questions or comments.
CLICK HERE to return to the September 2015 issue of Wood News Online.
Lee Laird has enjoyed woodworking for over 20 years. He is retired from the U.S.P.S. You can email him at lee@lie-nielsen.com or follow him on Twitter at twitter.com/is9582