

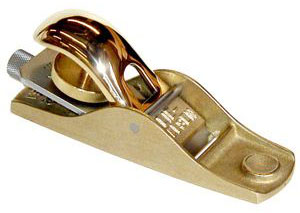
 The Lie-Nielsen No. 102 is a low-angle bevel-up Block Plane, with the body available in Manganese Bronze. The bronze body will not rust. The blade is made from A2 Tool Steel hardened to Rockwell 60-62, which holds a sharp edge for a long time. The No. 102 is 5 ¼” long and the blade is 1 ¼” wide and 1/8” thick.
The size of this block plane is one inch shorter than Lie-Nielsen’s No. 60-1/2 Adjustable Mouth Block Plane, and is a perfect fit in my hand, which could account for at least one of the reasons I reach for it so often. The No. 102 is amazingly solid and works wonderfully. I enjoy the added heft of the Manganese Bronze, as
I’ve observed that heavier planes have a much greater tendency to run on what I might call autopilot. Obviously, adding extra weight to a plane presumes the design is nicely balanced, or the additional weight could easily be counter-productive, but that is certainly not an issue on the No. 102. The extra mass helps keep the plane moving through the cut, with seemingly less effort once you get it started on its path. On planes with as small of a body as the No. 102, the added weight from the Manganese Bronze will have less of an effect than on the larger frames, but it is still an added benefit.
The low-angle Block Plane was originally designed for endgrain work, so it is no surprise that the Lie-Nielsen No. 102 is exceptional working on endgrain. To prevent accidentally chipping out or splintering the far edge of a board when working the endgrain, I always make sure to create a small chamfer on that edge. The chamfer is a very effective method to prevent these issues, without much work or loss of material. Start small, as you can always apply a bit more chamfer if you need to take more shavings, but it is hard to remove one that is too deep.
The small format of the No. 102 is also good for touching up a small isolated spot, even if the surface isn’t completely flat, as the length and width of the plane body can sometimes allow access that other planes could not reach. I even used my No. 102 on some of the outside curved edges on the Les Paul guitar I built, as some areas of those edges were endgrain, and also on the back side of the neck.
As with most bevel-up planes, the No. 102 has a great deal of flexibility relative to adjusting the cutting angle the wood will “see”. I’ll explain what I mean by providing a short example: The blade on the No. 102 comes from the Toolworks with a 25 degree bevel and is bedded at 12 degrees, which provides an effective cutting angle of 37 degrees. If you find the wood you’re working doesn’t respond well to this angle, you could apply a micro bevel from 1 degree all the way up to just shy of 53 degrees (since that added to the earlier 37 degrees would put it at 90 degrees), although I’d work my way up starting with a 10 degree microbevel and adding a slightly higher angle incrementally until I found the “sweet spot” for a specific wood. As info, this level of adjustment is not easily obtained on standard bench planes that have the blade’s bevel down. If you regularly transition between easier to work woods and woods that behave best with a higher cutting angle, it would make a great deal of sense to purchase a spare blade to leave with the higher microbevel, rather than repeatedly changing the angle from low to high and back.
There is also another replacement blade available, which is the Toothing Blade. This blade has small .030” teeth spaced .030” apart. This is very useful when working extremely figured wood that needs a decent amount removed. When dealing with wood of this type, it is extremely likely a regular blade will cause heavy tearout, if set to take even a somewhat heavy cut. With the Toothing Blade, the wood fibers aren’t allowed to work together against the blade, since each of the small teeth separate the sections from each other, ending with what looks like a lot of very small chips. The ending surface is very ridged and not at all like you might otherwise expect, but it is still very close to perfection. Reinstall a freshly sharpened regular blade and set for a very light shaving by using a thin piece of wood to verify the intended shaving thickness at each edge of the plane. Remember to trust your blade setting when you start to take passes over the toothed board, as it can seem like there is less happening initially, and a tendancy is to start advancing the blade. If you do that, you may end up overshooting and again have unintended tearout.
The Lie-Nielsen No. 102 is a great addition to any kit and I think you’ll find yourself using it perhaps even more than you might have anticipated. With the reasonable pricing for such a nice plane, you might want to get a second one for that friend that likes to borrow your tools, so yours will always be at hand.
I hope you enjoyed the article and please let me know if you have any questions or comments.
Lee Laird has enjoyed woodworking for over 20 years. He is retired from the U.S.P.S.
I have just purchased my very first plane, the Lie Nielsen No. 102 Low Angle Brass Block Plane. I know nothing about planes but have watched about 100 YouTube videos on the different sizes, types and their uses. I have not been able to find any videos on the No. 102 Low Angle Brass Block Plane specifically. I’m hoping it comes with an instruction book on it’s use and maintenance. I have purchase a set of 3 DMT diamond sharpening stone in addition to a larger 4000 grit diamond stone for my chisels and any plane blades I may buy. I also purchased the Veritas standard honing guide as well as the clamping chisel head for it. Any links or advice you may have on my specific plane would be appreciated. – Bob
Hi Bob,
Sounds like you made a nice purchase. I have the 102 in my arsenal, and it works beautifully.
This plane (and many of similar dimensions) are primarily used to take very fine shavings in either a focused area (only need to touch up an area of a larger piece) or where you want to work with a plane you can control with one hand. I regularly choose my 102 when I’m chamfering or softening edges on a board, or the same on a small box. It has nice heft for such a small plane, which helps keep it in the cut without you needing to apply much pressure.
For sharpening, I always use either a Norton 1000-grit / 8000-grit, or my Shapton Glass-stone 1000-grit, then to the Norton 8000-grit, both ways lead to a razor sharp blade which is what you want. I can’t tell, but it sounds like you also just bought the diamond stones. I see the diamond stones as having some positives and some negatives. The positives are they are very flat (as long as they are very flat from the maker, which I’ve experienced many that were not, so check with a good straight edge), last a pretty long time (some last much longer than others, due to the type of diamond they choose, and some not too terribly long), and there isn’t as much mess since the stones don’t break down to provide a new sharp surface. The negatives (other than those already covered) and perhaps the main issue to me, is the surface they leave on the blade is usually small grooves in the metal. Other stones do this to some extent, but most are friable to at least some level, which means the grit breaks down providing in essence a higher grit. For instance, my 8000-grit stone starts at that grit and removes some metal, and as the particles break down, the slurry on the stone acts more like a 10000-grit or 12000-grit. If you wipe or wash it off, you are back to the base grit. The water stones do require repeated flattening, and I do use a special diamond stone for this, which is the Dia-Flat plate. It is flat to .0005″, and has a coating over the diamonds so it is made to handle just this type of work.
My first purchase for a honing guide was the Veritas (the original first version) and the hardest thing was to really get my blades squarely in the guide. It came with a aluminum plate with a pentagon shaped device that rotated for different angles. On almost every sharpening situation, I prefer to use a side-clamp guide, which can be $15 for low cost ones (info on doing the work to make them work correctly on Lie-Nielsen’s YouTube channel, or my website) on up to Lie-Nielsen’s new honing guide that is made extremely well and will never rust. I struggled with sharpening when I first started, and I came close to giving up, thinking I’d never be able to get a blade sharp.
Remember that both sides of the blade must be equally razor sharp, in order for the plane to work as intended. When you sharpen the bevel, if you never feel a wire edge (or burr) on the back side, you haven’t worked it to the very edge of the bevel yet. I teach by applying black sharpie to the bevel, to show it is easy to do a lot of work, without reaching the edge. For the back, I use David Charlesworth’s ruler trick (a very thin metal ruler laid onto the stone, lengthwise on the edge away from where the blades cutting edge will touch. The middle of the blade rides on the ruler while the cutting edge is on the stone. The helps make sure you only sharpen the back-side of the blade, at the cutting edge. No reason to waste you time and efforts polishing the whole back.
I usually set the shaving thickness from .001″ – .003″ or so, which the plane e can handle, and it provides a wonderful surface. Please let me know if you have any further questions.
Lee Laird
Also wanted to add that the plane does come with a small info pamphlet (for lack of better terminology), which describes the parts of the plane and provides general info. You can reach out to me directly, at LeeLairdWoodworking@gmail.com if a question arises that isn’t covered.
Great write up and a valuable tool for the arsenal. Thanks for the info.
My 102 has quit cutting
I have sharpened over and over with
No improvement
Any ideas?
Thanks
We suggest emailing techsupport@highlandwoodworking.com with pictures of your blade.
I find this plane very disconcerting to use. The sides are smooth, with no textural features to improve the grip, so that it constantly feels like it is going to slip out of my hand at any moment. It is well made and looks good, but I take no pleasure in using it.
I’d love to know what type and brand sandpapers as well as the grit you recommend to use to sharpen the plane irons. I use them on glass.
Here is the Highland Woodworking article on sharpening plane irons: https://www.highlandwoodworking.com/sharpeningchiselsandplaneirons.aspx
In reference to Mike Levy’s comment about the plane slipping from his hand because it’s polished like a seal.
The salutation is to just put a warning sticker on it saying (Slippery When Sweat!)
And we all know we don’t swear while woodworking.