I was working on a future guitar body, and decided I wanted to remove about 3/8” of wood, taking the top wood down to about 1/2” thick. The top is highly figured and already glued up to the body, so I wasn’t sure what I was going to use to make this happen. First up, I decided I should mark the edge of the top, to set the final dimension. For this, I used a Titemark gauge, leaving the mark just a bit proud of the final dimension. After the mark up, I decided to examine a couple of new additions to my personal toolbox. I recently bought two Lie-Nielsen Boggs spoke shaves (one with the flat bottom and the other with the curved bottom) as well as a 3/16” bed float. I’d just put the initial sharpening on both the shaves and the float, so they were ready for action. First thing that went through my mind was “I wonder how fast this float would remove this excess curly maple”. I hadn’t tried the bed float on any wild figured wood, so it was yet to be seen. Just to be clear, the bed float was originally designed for plane makers, but I enjoy finding additional usages for my tools.
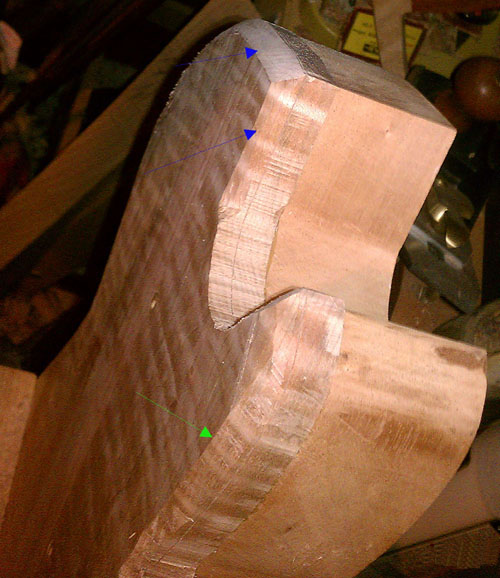
The first couple of strokes were a bit bouncy, but that was just the wood and tool giving me feedback, and telling me I was pressing too hard. I backed off of my pressure and found the float was just zooming through the wood. I decided I’d work a bevel on the edge, removing almost the full 3/8” of material, so I could test it for potential future usage. I worked the forward edge of the guitar top until it had a nice consistent bevel. This only took a couple of minutes. The wood didn’t blow out or splinter, which was one of my concerns. Certainly different than if I’d decided to use an aggressive toothed rasp. After checking out the surface, I thought I’d follow it up with my flat bottom spoke shave. Again, it was like a dream, even across the end grain surface on which I was focusing. So even though I’m still going to excavate the whole surface down to the lowest level of this bevel, I used a current project and its excess dimensions to assess the new tools in my inventory. I like testing them in a situation similar to what I’m expecting in real life. It’s just not the same picking up a 2” x 4”, or other wood completely different than what you’d normally use for projects, to try to get used to a new tool.

- The arrows in the above picture point to the two focused surfaces, where I removed the gross volume of wood with the float, followed with a few passes with the shave.
I’d suggest this type of “live fire” practice for anyone who is adding a new tool to their repertoire. I know I won’t have any worries when it comes time to integrate these tools with future projects.
I hope to see some of you at our events this season, listed on the Lie-Nielsen website.
Lee Laird has enjoyed woodworking for over 20 years. He is retired from the U.S.P.S. and works for Lie-Nielsen Toolworks as a show staff member, demonstrating tools and training customers. Follow him on Twitter at twitter.com/is9582.


