This is the third post in a series – to go back to the first entry in the series, click here. If you just want to go back to the most recent entry, click here.
Did I say yesterday was a sanding marathon? I think I was confused, and actually meant to save those words to describe today.
And while I’m mentioning words like ‘yesterday’ and ‘today’, I should clarify that these are casual words I’m using to distinguish the different days I’m writing about, but in no way are they connected to the real-life flow of time. I was originally planning to build this chair in a single week shop marathon, but it turns out that due to some traveling and a packed work schedule, I’m going to have to finish the chair in a series of shorter sprints. Which is probably better anyway, given my lack of endurance training in the workshop. Is it reasonable to think that you have to train for woodworking in the same way you do for a sport or athletic event?
I think it is, but before I stray too far on this tangent, I’m going to set it aside as a topic for another blog post down the road, and get back to assembling my Windsor Chair Kit.
So, the sanding. There was a lot of it to be done! Luckily I was armed with a Festool RO-90 that can make some pretty quick work of it, relatively speaking. The challenge as a beginner seems to be finding the balance between sanding thoroughly but also sanding carefully. Occasionally I found myself getting drawn into the lull of the sander and forgetting to keep it moving around the seat so it would sand evenly. I had the same problem while sanding the floors in my house last summer, and there is still a small divot (that only I can see) to show for it. I am trying to take a bit more care with this chair.
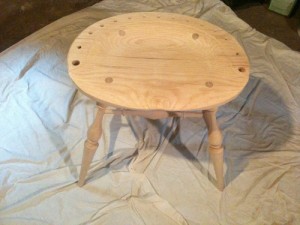
 The instructions say to work down the legs that are currently sticking through the top of the seat first, as they are a much harder wood. So, I dutifully sanded the legs down until they were even with the rest of the scalloped part of the seat, and then proceeded to sand the rest of the seat top to remove the router lines. Once the whole seat was sanded down, I took a few minutes to admire the color contrast of the tops of the legs to the rest of the seat. And I made a mental note to pay attention to this in other windsor chairs I see in the future. It’s starting to feel like a chair is becoming much more than just a chair, despite Willie Nelson’s assertion to the contrary.
The next step after I decided I was done sanding was leveling the chair. And this is where my brain stopped working. This part confounded me. I read and re-read and re-re-read the instruction page and still didn’t quite understand what I was doing or why I was doing it. I think all the sanding I just finished really did numb my brain over. I did understand that having a level chair was important, but the process for measuring the height and figuring out how to cut off each leg still confused me. Luckily I have an engineering expert in the house, and after a short discussion, he was able to make it clear to me. Let’s see if I can pass on the favor for anyone else who is as confused as I was.
So you start by leveling across the seat, and stick the spare spindle wedges under each leg as needed to make the base sit level. This part made sense. What confused me was where it asks you to measure from the surface the chair is resting on (in this case my workbench) to the bottom of the level. I don’t know why, but even after taking this measurement several times, I couldn’t figure out why this is how one would measure the height of the seat. Something about measuring from the surface to the top of the chair, and including in that measurement things like the spare spindle wedges is what was really driving my confusion. My live-in engineering expert explained that, because the seat itself is an inconsistent height from front to back, the only way you can know for sure how much to cut off the legs to make the seat the correct height and level is to measure it from the seat (or the level sitting on the seat) to the floor, determine how much excess height you’ve got, and then trim that amount off from the legs themselves.
The next step in the instructions makes this much more clear – use a pencil laying flat on an appropriately sized chunk of wood to mark the cut on each of the legs. So with the wedges in place, I marked where each leg should be cut, and amazingly, when I actually finished trimming each leg to the line with my handsaw and sander, I put the chair down, and it sat perfectly level! I checked the height on the front and the back from the seat to the floor and it was correct. Incredible how that worked out exactly as the instructions said it would.
I imagine this leveling and measuring process must make quite a bit more sense to someone who has done a lot of woodworking, and it was a great lesson for me that I will surely use again in future projects. Being a visual learner sometimes makes it difficult to figure out conceptual steps like this one, but I’ll never get better at it if I don’t attempt it!
I also realize that my explanation above might still not make sense to someone who was in my shoes (i.e. about my experience level!) so if you would like me to break it down further, leave a comment and I’ll be happy to elaborate.
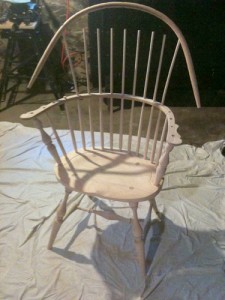
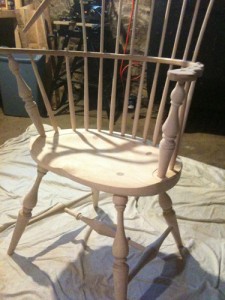
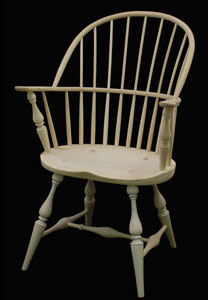
 After the brain-bending leveling step was over and done with, I decided to try something fun and dryfit all the remaining parts, just so I could see how they would all go together. I put all the spindles in through the arm and into the back of the seat, and even was able to sort of put the bow in place. Then I took a seat and pretended that I had finished the rest of the chair. Of course, were I to lean back, the cold, hard truth of the work I have yet to do would become abundantly clear. So I stood up, took a picture, and headed upstairs, leaving the next step for another day.
And speaking of another day, my new timeline plan is to do approximately one update a week until I finish this chair. Each update will represent a few hours of work in the shop, and regarding this, I wanted to note specifically for beginners and inexperienced woodworkers: don’t worry about how long it is taking me to finish this. I don’t believe the time I am taking to complete this chair is necessarily representative of how much time it would normally take, so please don’t be scared away!
 I’d love to hear your thoughts in the comments! Has anyone else suffered from that same brain bending feeling I did while approaching a woodworking problem? How did you get through it? And what do you think about my idea of ‘training’ for woodworking? Is it something you build up strength for, in the same way you train for a running race or some other athletic event? And do you train your brain similarly, so those mindbending problems are little more than bumps in the road in the future?
Thanks for reading!
This is the third post in a series – to read the next entry, click here. To go back to the first entry in the series, click here.


[…] the first entry in the series, click here. If you just want to go back to the most recent entry, click here.It’s been awhile since my last day in the shop with my windsor chair kit, so I take the […]