This article is a continuation of a two part post. To read part one, click here.
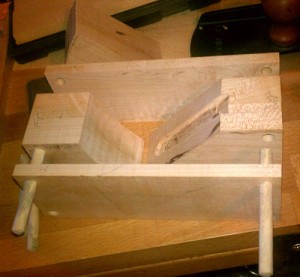
Now it’s time to glue the pieces back together. I use standard yellow glue for my planes, and it works great. Before applying glue, I use the dowels to line up the heel and toe on one of the side-pieces. I then draw a line against the core pieces, so I know where not to apply glue. Repeat the process on the opposite side. Get all of your clamps together, so you’re not scrambling around at crunch time. Now it’s time to apply the glue. Apply a very thin layer of glue on all mating surfaces, making sure not to get into the non-glue area. Remember, if you put too much glue on the pieces, you’ll struggle with all of the squeeze-out. After applying the glue, push the dowels into place, so everything is aligned properly. It’s a good idea to remove the squeeze-out in the throat opening before it hardens. I use a small putty knife that I’ve ground to a point on one side, so it gets right into the corner. After applying your clamps, let it cure for a couple of hours, or even overnight. That way you’ll come back to it good and rested.
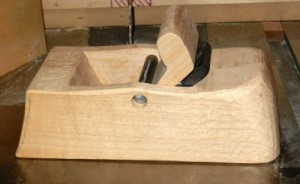
When the glue is cured, cut the dowels off flush with the body. Now it’s time to drill the hole for the cross bar. I bought some 3/8” mild iron rod at the local big box store to use for my cross bar. It’s easy enough to cut and work with, using either a hack saw or a jig saw. I use a scrap piece of hard wood when determining which drill bit matches best for the cross bar. After finding the right bit, I go to the drill press so I can drill the hole for the cross bar. To determine where to drill, find the intersection of the sole and the bed. Draw a light line up approx 1-25/32”, then approx 23/32” towards the bed. This is a decent approximation, which can be modified on future builds, if desired. Make sure you clamp the plane body to your drill press table. You don’t want it spinning around and either hurting you or damaging your project. On my planes, I want the cross bar to slide into place with very slight friction. This is so I can remove it, and re-install it while working on the final build, so I can cut the body to shape without worrying about hitting the cross bar. I drill completely through the first side (with the leftover triangular piece stuffed into its original opening) and about half way into the other side. This method allows me to “hide” the cross bar entry point, if I wish, by plugging the entry hole.
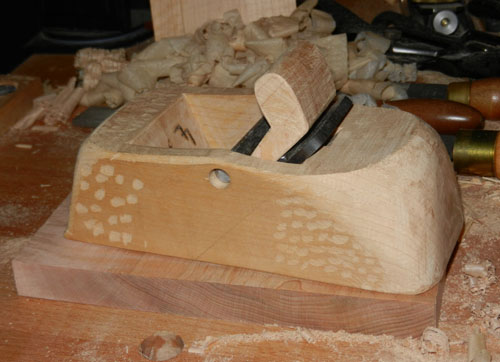
 Now it’s time to cut your plane into your desired shape. Remember, it’s a good idea to have the back of the plane iron at least slightly above the top edge, so it’s easier to set or adjust the iron. After cutting to shape, you can use rasps, files, chisels, sandpaper, and anything else you desire to finish your plane’s surface the way you like. Some prefer a very smooth outer surface, where others like it to have texture so it’s easier to hold onto. This is personal preference. I usually use a chisel to put a bevel on all edges, so they are both stronger and feel better to the hands. If you don’t feel comfortable with this, sandpaper will knock off the edges, too. Now that the shaping is completed, you’ll need to make a wedge out of the left-over triangular piece. The fitting process can take a while, but it is another skill learned. Slide the cross bar into place, put the iron onto the bed and then put the wedge between the cross bar and the iron. Tap the wedge with a little force, so the cross bar marks the wedge where it makes contact. This will show you which portion is making contact, and which area is too low. Use your preferred method to remove material from the area on the wedge where it made contact. Reinsert the wedge, and repeat until the wedge is showing signs of contact with the cross bar, all the way across, or at least on both edges. (If it is making contact on both edges, it will apply equal pressure across the iron) It’s a good idea to work the fitting until the wedge reaches down past the cross bar about an inch or an inch and a half. Remember to take the fitting process slowly, as you can always remove more, but it’s more difficult to add material to the wedge.
If all things have gone well, your iron will not show through the sole of your plane. This may sound like a problem, but in actuality, it allows you to slowly work the plane until you have an extremely tight mouth. This is important, if you intend to take extremely fine shavings and work figured woods. To remove the excess wood, you can take fine shavings on a powered jointer, use a jointer plane, or even tape sandpaper down on a flat surface. Whichever way you choose, just work gradually, so you can sneak up on it. When you get close, you can also use a small file to open up the mouth, so you are removing less material and don’t end up with too large of a mouth.
Now that you’ve completed all of the build and setup, there is one last thing to remember. Sharpen the iron so it is razor sharp. Dull irons just don’t ever give good results. If you aren’t comfortable with sharpening, this video provides some great tips.

I hope to see some of you at our events across the country. Feel free to come up and say hello.
Lee Laird has enjoyed woodworking for over 20 years. He is retired from the U.S.P.S. and works for Lie-Nielsen Toolworks as a show staff member, demonstrating tools and training customers.

