

With the long weekend coming up, we thought it might be a good idea to reprint this section of The Down to Earth Woodworker – might be a good excuse to spend a little time in your shop, even with all the family visiting! And who knows, maybe while you are taking inventory, you’ll discover all the tools you still need, and can add them to your wishlist just in time for holiday shopping!
Time to Take a Workshop Inventory
Killjoy, buzz-kill, party-pooper? Me? Never! But I am a pragmatist. We all need to occasionally contemplate the unthinkable, if for no other reason to be prepared. “What would happen if my shop burned to the ground, was burglarized, or flooded?”
Put that chilling thought aside and conduct this simple experiment now. Go into your shop, pick one cabinet or drawer, and without opening it, make a list of everything in it. Try to remember everything. Done? Now compare the list to what is actually in the cabinet or drawer. How close did you get? Did you miss anything?
In the event of a catastrophic loss, would you be able to list everything in your shop for insurance purposes? I know I couldn’t. I tried the experiment above and missed almost half the stuff in one drawer!
Most homeowner’s insurance policies provide for replacement of articles at “actual cash value” (ACV) or “replacement cost.” But if you are unable to identify all items and provide substantiation for the value of each, you may not be reimbursed fairly or accurately. Documenting your workshop inventory does not have to be an overwhelming or unsavory task. Here’s how to make it easy…
Take a Workshop Inventory
First, if you are not already practicing “5S” to keep your shop neat, clean, organized, and safe, re-read the article 5S Your Workshop. Once your shop is organized and you have shed the tools and supplies you never use, creating an inventory list will be easier.
 Rename and label photos. |
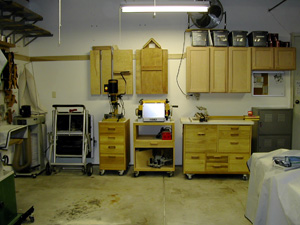
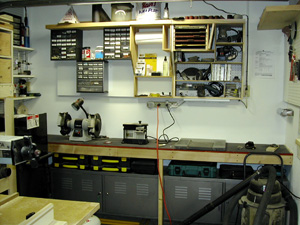
Use a digital camera and take a minimum of four pictures from the center of the space. If you cannot capture the whole shop in four pictures, take more. The idea is to create a virtual 360-degree panorama of the space.
 Make the names descriptive. |
Before going any further, transfer the pictures to your computer and/or print them (best to do both), and name/label them, for example: North Wall, West Wall, West Wall Alcove, etc. With pictures in hand, go back to the shop and start with one photo/view. Are there cabinets, drawers, or other concealed spaces? Zoom in and take more pictures, capturing details. Open drawers and cabinets and photograph what is inside. “NW Cab 2” would be a good label for the North Wall photo, second cabinet from the left.
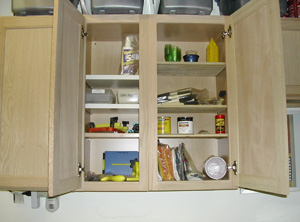 Take detail photos of the insides of cabinets. Name them so they tie to the main pictures, like "NW Cab 2.jpg" |
Continue this process until you have created a complete photo “album” of your shop. Work methodically, transferring a few pictures at a time to your computer, printing as you go. Just remember, if you spread this task over a few days and stop in the meantime to build a cat house or a cabinet, make sure you put everything back where it was when you started — you do not want to duplicate, or worse, miss an important or expensive tool when you resume your inventory.
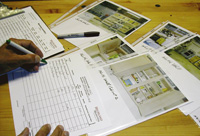
When all the photographs are done, fill in an inventory form. Your insurance company may provide one (check their web site), you can create your own in Excel, or just download the free form we have provided (click here to download). However you choose to proceed, make sure to include at minimum the information we have provided for on our form.
Be sure to match each item’s location to the photographic record (the downloadable form includes additional hints and instructions). If you cannot remember the purchase date of an item, estimate. If you cannot remember where you acquired a tool, find a current seller. If the exact item is no longer available, find as close a match as possible. Fill in the actual or estimated cost to replace. Attach receipts wherever possible.
 |
If you have built anything in your shop (jigs, cabinets, shooting boards, benches, etc.) indicate “self” as the source under “Where Acquired” and enter a number in the box labeled “sub-schedule.” Using the sub-schedule form, calculate the cost to replace the item. The form will guide you, but don’t forget things like hardware, finish, and especially your own labor when calculating the cost of an item. Be accurate. No insurance company will believe that your three-board bench hook is worth a thousand dollars just because you are such a talented woodworker!
Use the other sub-schedule form provided to list the contents of cabinets, drawers, or other “hidden” areas. Organize your inventory into a file or a binder. Transparent sheet protectors are useful for storing the inventory forms, receipts, and other documentation.
Soon you will have a record that will save you time and money should a catastrophe ever occur. Remember to store a copy of your shop inventory list somewhere off-site (a safe deposit box, a fire-resistant safe, your daughter’s house — anywhere besides in the shop!). Keep your inventory up to date. Each new addition to your shop will only take a minute to photograph and add to the inventory list. While you are at it, call your insurance agent and do a little “check-up” on your policy. Make sure you have adequate coverage for your growing tool collection. Now, go build something! Peace of mind is priceless!