

For those of you whom are not already familiar with the router plane, I’m sure the name could easily paint a picture of a tool with a spinning bit, possibly propelled by a hand crank. In actuality, the router plane is a tool with a flat base and a fixed blade. The blade extends down below the base, so it can remove material at a chosen depth, which is ultimately parallel to the surface of the wood.
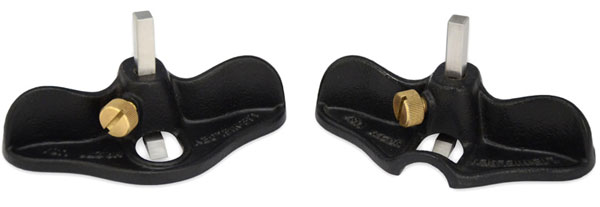
Until recently, Lie-Nielsen offered a single small router plane, the #271 (above right). There is now an additional version in their arsenal, the #271-CT (above left). The difference between the original design and this new addition is in the base shape, in front of the cutting side of the blade. The original design has a section of the base that raises up in an arch shape on the “open throat” version, from one side to the other, providing additional view of the intended cutting area. The new addition, which augments the lineup, has the base continuing from side to side, without the arch, which is considered a “closed throat” design.
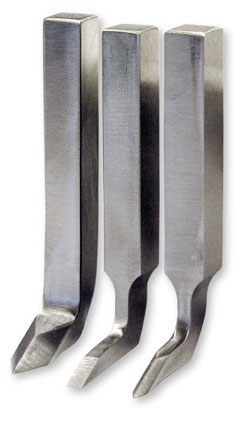
The router planes, with smaller footprints, are very useful in smaller scale work, both in small joinery or inlays. There are a variety of blades available for the smaller router planes. From the factory, the #271 and #271-CT each come with a 1/4” square blade, but you can also purchase a 1/4” pointed blade (left), a 3/32” square blade (center) and a 3/32” pointed blade (right). All of these blades are made from O-1 steel, and are hardened to RC 60-62. If you still need a different sized blade, as long as it is not wider than 1/4”, you can buy a stock sized blade to modify. For instance, if you are working an area for some banding, that is narrower than 3/32”, I’d suggest removing a little material from each side of the blade, until the required size is reached. I would only remove steel from the portion of the blade below the bend, leaving the shank original sized. It is easy enough to modify one into a needed shape, or size, for a job. While it’s certainly not hard to do, I would suggest working carefully, and taking you time, so the temper of the steel isn’t accidentally lost. If you need help sharpening these blades, please look back at the article relating to the Large Router Plane setup.
Setting the depth of cut, on the small router planes, can be a bit more touch sensitive. They are not equipped with any mechanical advancement on the blade, like is used on the larger versions, so a different approach is needed. I personally like to start with the blade out a little less than my final needed depth of cut, for each pass. I set the adjustment knob firm enough to keep the blade from moving on it’s own, but not so tight that gentle hammer taps have no effect. This allows me to advance the blade in very small increments, using a very light hammer, and controlled tapping. When I have the blade advanced to the needed depth, I tighten up the knob with a screwdriver, so the blade won’t drift in or out. Another method of setting the blade depth, is to use shims under the plane body, on both right and left sides. With the body resting on the shims, loosen the adjustment knob and let the blade gently slide down until it contacts the surface. Again tighten the knob with a screwdriver and very rapidly, you have an accurate depth setting. No matter what method is used, it’s really pretty easy.
The hardest question may be which of the two styles of the #271 to get, which can ultimately come down to personal taste. Some prefer the open throat version, feeling they can more readily see in front of the blade, while they work. Personally, I find the closed throat version has enough viewable area in front of the blade, so I don’t feel like I’m working blindly. If you are working an area, on the edge of a thin board, the closed throat version would seem to excel. This is due to the extra material in front of the blade, allowing the plane to rest on the board, both in front and behind the blade. This makes it simple to keep the plane level, and the depth of cut consistent. When using the open throat version in this same scenario, I clamp an extra piece of wood on each side of the thin board, and level with the project board. This makes it so the body of the plane will ride on the two outside-boards, acting like an out-rigger, preventing the plane from accidentally tipping forward. Either way works fine, so it just depends on the users preferences.
Stay safe, keep making shavings and enjoy your woodworking. I hope to see some of you at our upcoming events, all listed on the Lie-Nielsen website. Feel free to contact me at lee@lie-nielsen.com if you have any questions or suggestions for future articles you would like to see.
Lee Laird
To take a closer look at the #271 small router planes, click here.
To see Highland Woodworking’s entire selection of Lie-Nielsen hand tools, click here.
Lee Laird has enjoyed woodworking for over 20 years. He is retired from the U.S.P.S. and works for Lie-Nielsen Toolworks as a show staff member, demonstrating tools and training customers.