

I just bought the hardware for a new Benchcrafted Glide Leg Vise from Highland and I am working on getting it installed in my workbench. I have a workbench which I made myself out of rock maple about 30 years ago. The plans came from Tage Frid’s books on woodworking and the design is Danish or European style with an L-shaped vise on the right front and a shoulder vise on the left front.
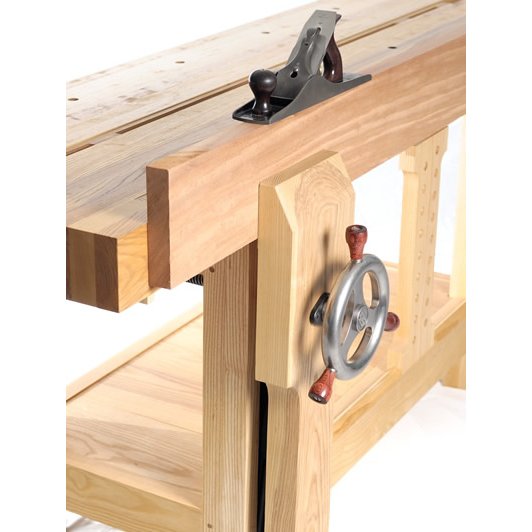
Benchcrafted Glide Leg Vise
When I read up on the Benchcrafted Leg Vise and looked at the installation instructions, at first I was going to put it on the right front leg of my bench. I then realized if I put it there, it would always be in the way because that is where I stand about 90% of the time when using the bench. Because of where my bench is located in the shop, I don’t have a lot of flexibility on moving the bench. Note in the pictures the bench is up against the wall at its left end and fairly close to the table saw on the right end. If I move the bench, I will have to rearrange almost the whole shop, and that seems a bit like the tail wagging the dog.
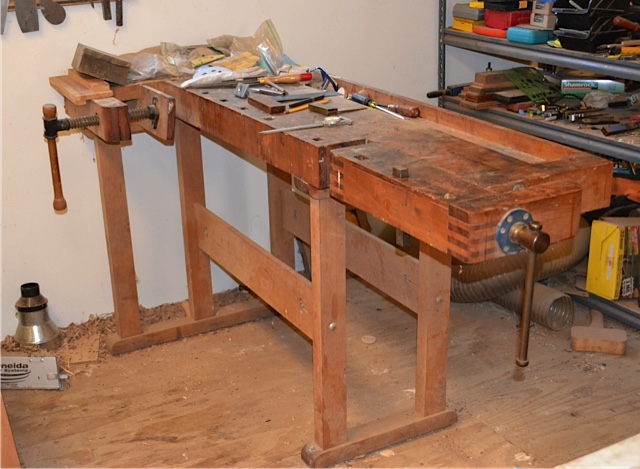
My Existing Workbench
I got to looking at all the mounting options and decided I would mount it on the “rear” of the right end of the bench. That means the vise will be on the outside of the tool tray with an auxiliary leg to allow for the size and thickness requirements of mounting the vise.
As I thought about the vise and searched for information, I began to realize that to call it a bench leg vise is a bit of a misnomer. It could be mounted on a post in the middle of the shop since the only role of the workbench is to keep the vise from falling over. All the clamping is between the back piece (usually the bench leg) and the chop.
I think a little vocabulary lesson is in order here cause I know I struggled with the terminology. Am I the only one who did not know what a “chop” is? What the heck is a chop?! And why do they call it that?
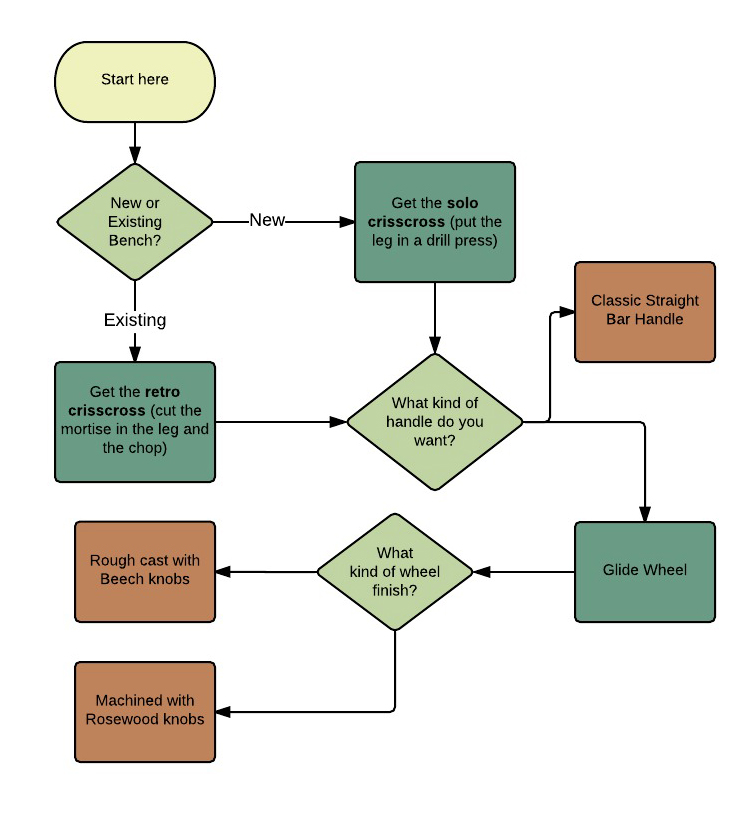
Benchcrafted sells several different vises. Our topic is Leg Vises and there are several options for Leg Vise Hardware. There is the Classic, the Crisscross where you can get a Classic Crisscross Solo, a Classic Crisscross Retro, or you can buy the Classic Hardware Only. Then there is the Glide M and the Glide C. I almost needed a decision flow chart to figure out which one to buy, but when I went to Highland, they pulled out the one they said I needed and it turned out to be the right one.
Glide C
Let me see if I can simplify for you. The “chop” is the tall outside piece that moves when you clamp something in the leg vise. The chop does not rest on the floor so the weight of the chop is carried by the Crisscross, which is two cast iron pieces hinged in the center like an “X”. There is a Crisscross Solo and a Crisscross Retro. The Solo is generally mounted on a new bench because it has pins at the top which need to be drilled precisely for smooth action and is best done with a drill press. The Retro is more forgiving since it is mounted on two cast brackets set in a mortise in an existing bench leg.
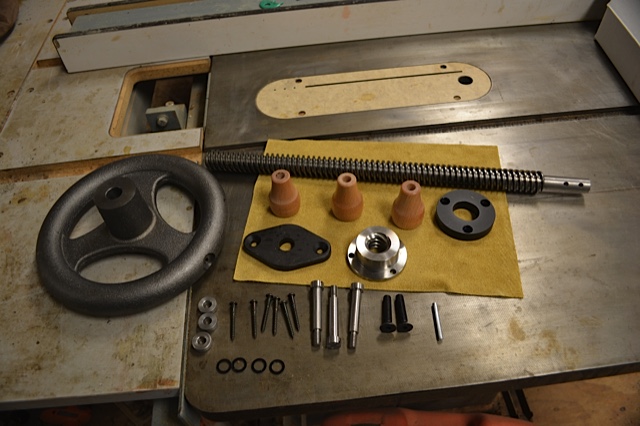
The other part of the leg vise is the screw which moves the chop. You can make your own, buy someone else’s screw, make or buy a wooden screw, or you can buy the one from Benchcrafted. The traditional one from Benchcrafted is the Classic, a fast action screw with a straight bar handle. Old school.
There are two other screw handles besides the straight handle Classic. They are the Glide M and the Glide C, both shaped like a ship’s wheel. The only difference is the “M” is machined and polished with rosewood cocobolo knobs on the outside and the “C” is cast but not polished and has beech knobs. You pay about $70 additional for the polished wheel and rosewood knobs.
Click to see a larger version
So here is the flow chart: Decide if you are mounting to a new or existing bench. If it is a new bench and you can put the leg in a drill press, then get the Solo Crisscross. If it is going in an existing bench, get the Retro Crisscross and cut the mortise in the leg and the chop.
Then decide if you want a Classic straight bar handle or if you want a Glide wheel. If you want a wheel, decide if you want to pay $70 additional for polish and rosewood.
So there, it sounds so simple once you figure it out, but it took me a few days even with the information on the Benchcrafted Web site, to get it in my head.
We will continue next time as I mount the vise to my bench. There are no directions in the box when you buy the hardware, so you will need to go to their Web site to download the instructions. There are a lot of instructions, they go back and forth and you will need to read them several times to get what is needed to mount your vise. When you do get it mounted, it should be a real joy.
Autographed copies of my flow chart are available.
I would add to your flowchart for the crisscross solo 1. do you / the drill press have the ability to drill straight and have a good quality drill bit ? If no then buy the retro. 2. did your hole turn out straight? If no go buy the kit to convert to the retro.
DAMHIK.