George T. (Terry) Chapman

Terry Chapman is a Professional Engineer (Civil) and Land Surveyor who lives south of Atlanta. He has done woodworking for many years and particularly enjoys bowl turning and making Windsor Chairs. He currently works as Site Development Manager for a local affiliate of Habitat for Humanity and has one son who pastors a Church in Connecticut. You can email him at cdeinc@mindspring.com.

Feb 172012
 

Bet’cha can’t do this. Not many people can cut a perfect arc on a table saw in a thin piece of plywood. Notice how the cut is just the right depth to keep the ply together. Notice how the cut starts in from the side perfectly tangential to the arc. Notice how the cut continues all the way across the workpiece in a perfect arc. Notice the small blood stain in the center of the piece.

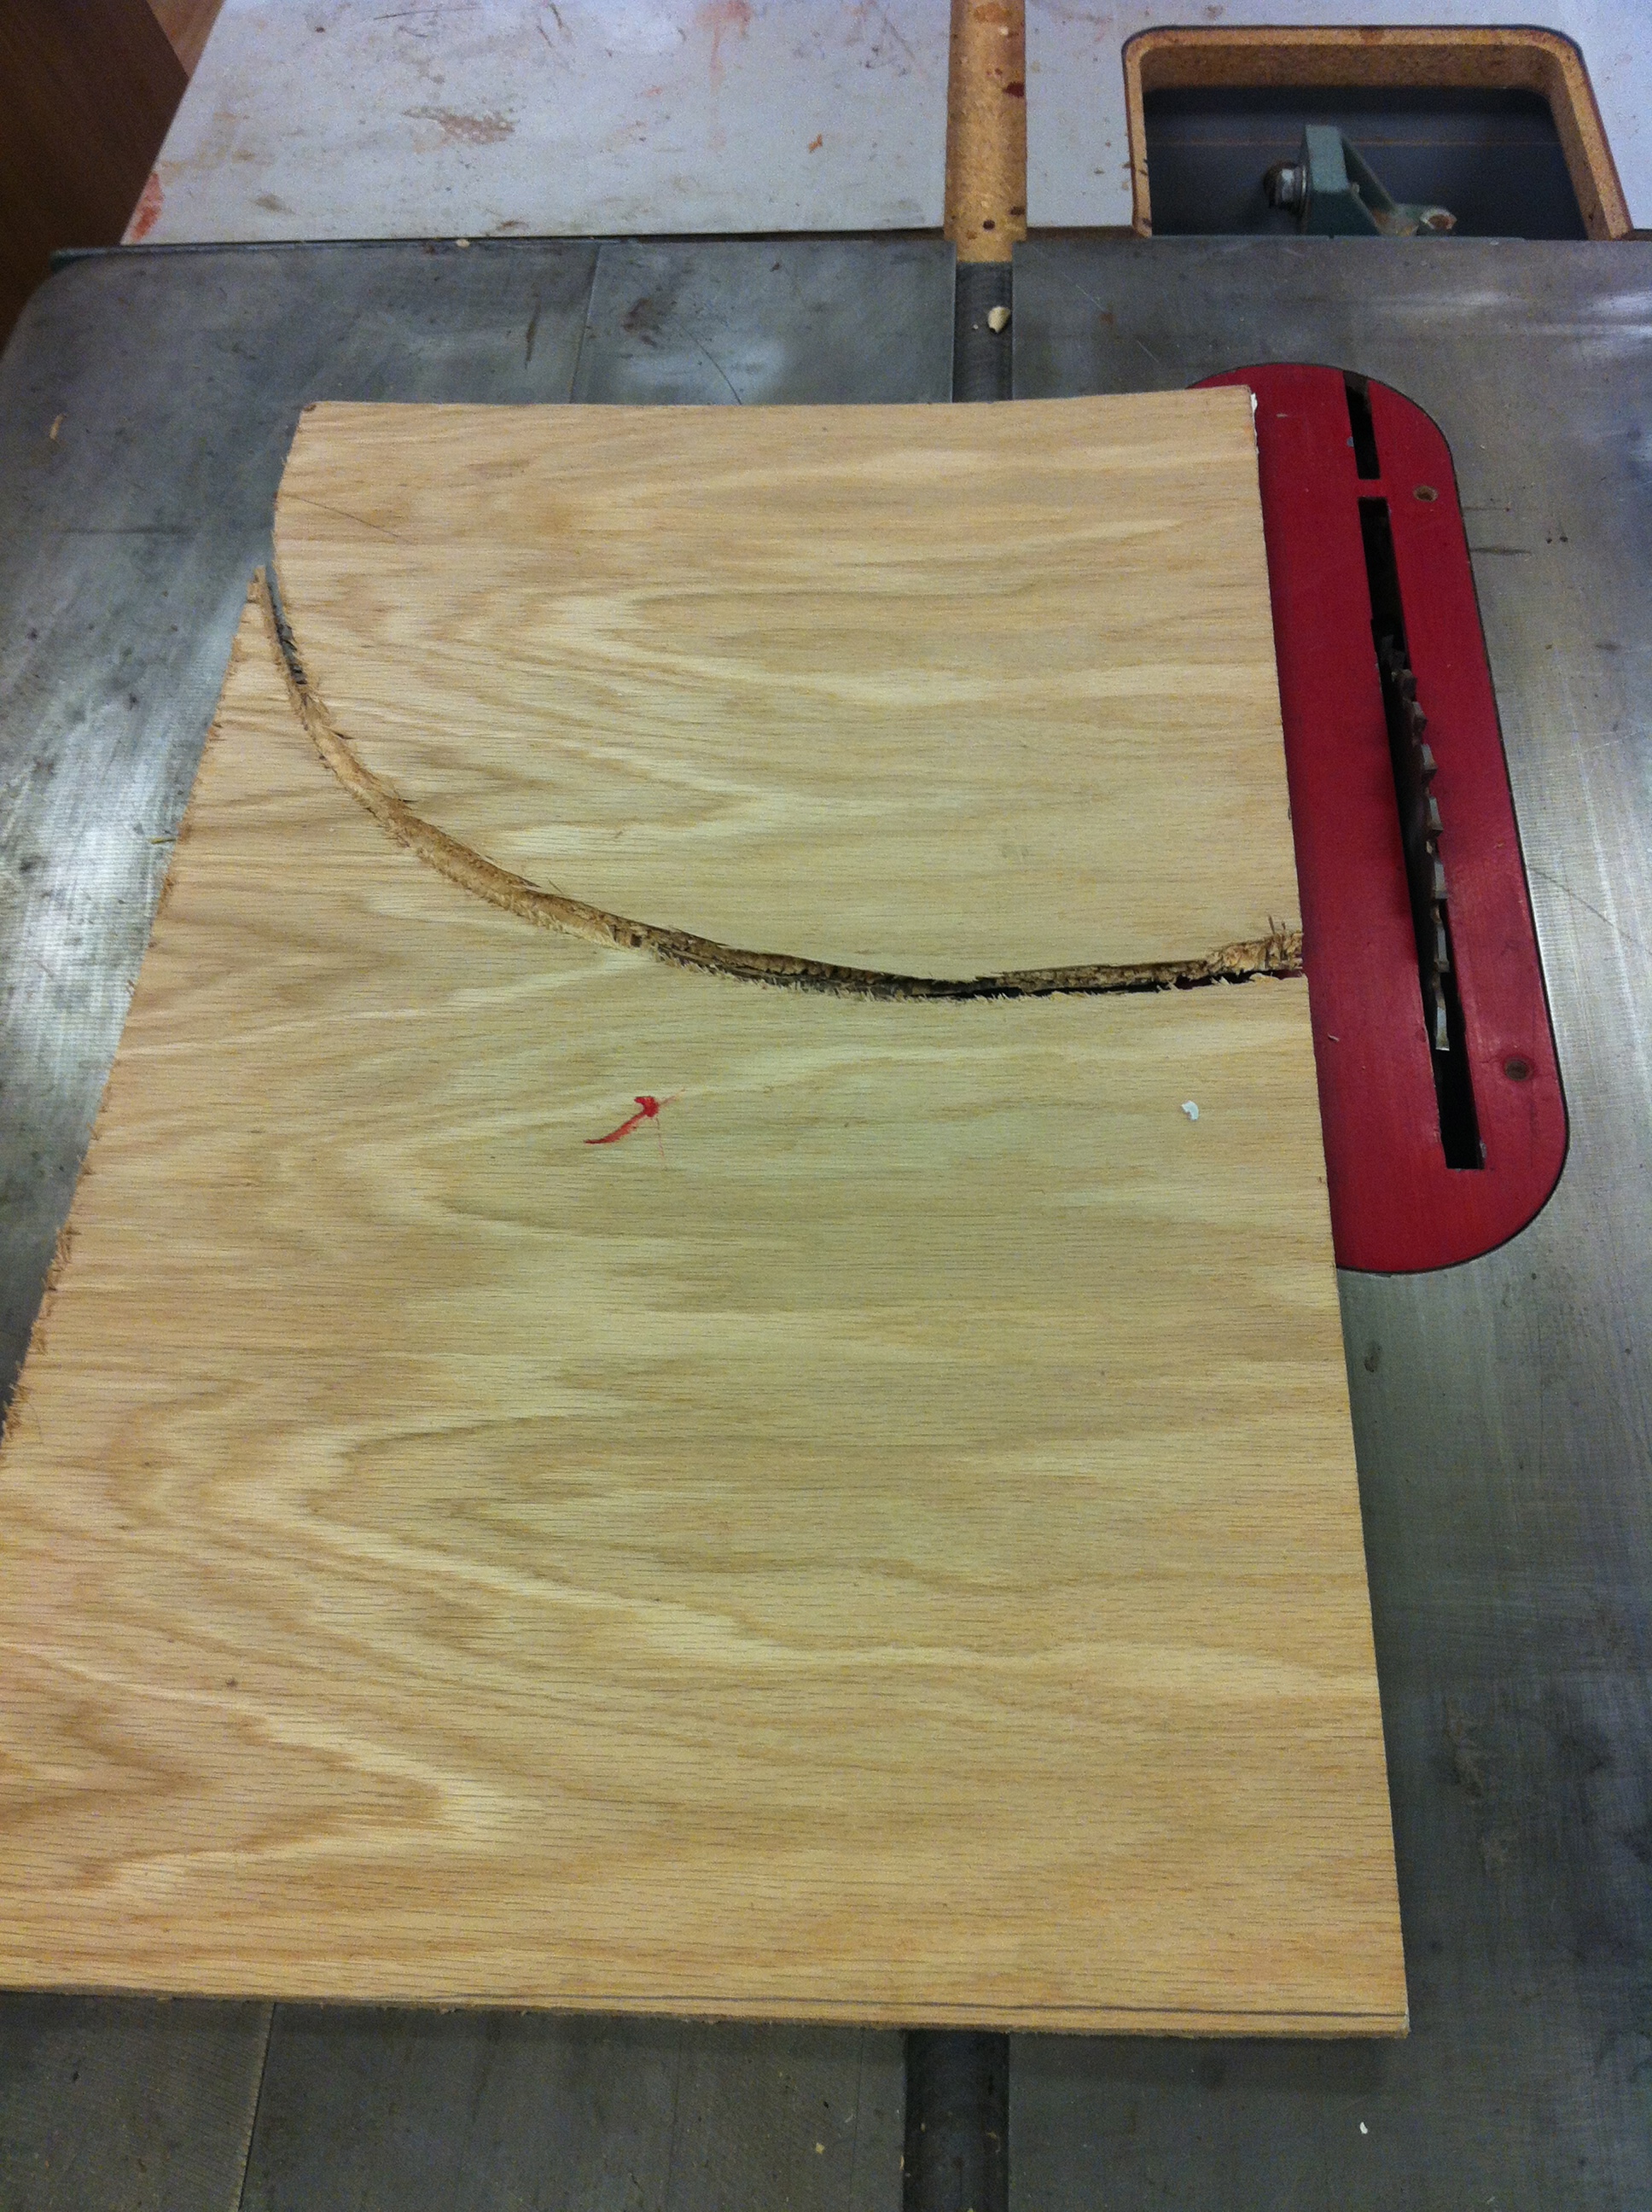
Perfect Arc on the Table Saw

Maybe you have guessed by now this is a terrible mistake and a big screwup. I was cutting some pieces of plywood for our annual family gingerbread house construction and I failed to pay sufficient attention near the end of the cut. It got away from me in about one tenth of one second and the next thing I knew it was bouncing off the back wall of the shop about 15 feet behind me. Thank goodness I was wearing a face shield and standing to the side as I always do. The only damage, besides my ego, was a broken fingernail and a pretty good scrape to my ring finger from the flying plywood. That thing took off like a helicopter, flew just past my head, all the way across the room and banged into the wall near the ceiling behind me. It was brutal and scary and reminded me all over again how potentially devastating a moment of carelessness can be in the shop.

I am sure that many of you out there are looking at my saw and noting the lack of a guard and splitter at the blade. You are right and I deserve that. But for all you beginners out there, note this. I am an experienced woodworker who has used a table saw for years and I know how this kind of kickback happens. It happens because I took off the splitter behind the blade and the piece twisted and the back portion of the saw caught the wood and threw it back at me. But you see, I was just going to use the saw for thirty seconds to make a base for a gingerbread house and it was not a real project, and I know all about this stuff cause I write for Highland and I don’t need any advice from you. That kind of thinking is what gets you hurt. Leave the guard on your saw or at the very least, get an aftermarket splitter behind the blade. And be careful out there.

By the way, the way you know you are pretty far gone is when something bad happens, all you can think is “Oh wow, that’s a great blog entry”.
Dec 192011
 

Christmas is coming and it is time to look at the old wish list.  My family laments the fact that I have all the $30 woodworking tools.  Anything I still need/want is going to be more.  Assuming you have been a good boy or girl, perhaps it will be a fruitful year in the workshop.  For the sake of any of you friends and family (particularly my son Jon) who might be looking for something to grace this old blogger, here is my list for this year.  Maybe there is something you might like on my list.

1.   I would like to be able to write songs like Brian Wilson of the Beach Boys and sing like George Younce of the Cathedrals.  Oh wait, did you say this was a Wish List for a Woodworking store?  Sorry, those two just slipped out.

2.   Hollow Chisel Mortiser — Highland has a top notch mortiser.  I saw it in the store this week and it is high on my list.  If you do a fair amount of mortise and tenon joints, then this tool may be just right for you.  It is bench mounted and has a rack and pinion adjustable fence for easy alignment.  The handle adjusts to six positions and is reversible.  The switch is right up front and easy to reach.  The bits lock into the spindle and there should be none of that twisted bits stuff which is so irritating on lesser models.  This thing looks like an excellent medium duty machine for the serious amateur mortise maker.

3.  ANYTHING from Festool.  I have not started my Festool collection yet, but these tools are always on my list.  Given my choice, I would start with the chop saw, then the router, and then the sanders with the vac.

Shaping a Rocker

When I was working on my rocking chair, Charles Brock in his shop had the heavy duty Festool sander hooked up to the Festool vacuum and it is a sweet operation.  Probably not going to happen this year, but perhaps if I am very, very good next year.

4.  Sawstop Table Saw —  Highland can ship the SawStop Contractor Saw to all the lower 48 states now and if you are looking at a table saw, you owe it to your spouse and family to keep all your fingers.  Touted as the safest table saw out there, don’t ask for any other saw without looking seriously at this one.  Watch the famous hot dog video, (or the chicken leg demo) and you will be a fan.

Fein Multimaster Tool

5.  Auriou Chairmaker’s Rasp Set — If you have never used one of these things and all you have ever tried is one of those five dollar rasps from the local hardware, then you are in for a revelation.  I had never used one of these things until I worked on a sculptured chair.  Who knew that the single biggest issue with one of these beautiful tools is you have to be careful to not remove too much wood.

Auriou Chairmaker’s Rasp Set

How many hand tools do you use where taking off too much wood is the main problem?  Most of the time, I have trouble just getting tools to cut in the first place.  Well, you say, I sure as heck ain’t paying that much money for a stupid rasp.  Well, nay, I say, nay!  First of all, these rasps will last the rest of your life and your children will bless you for them.  Second, once you try them you will wonder how you missed them your whole woodworking life.  Just try one and you will agree with me.  (By the way, Jon, I like the set of three for $349.99.)

There you go.  Slide this list under the door for somebody, or leave it open on the computer.  Or print it out and leave it under the breakfast cereal.  If you don’t score any of these things this year, try being gooder next year.  I’ll let you know how it worked out for me.

Dec 132011
 

A few months ago, I posted some videos of my wood turning efforts with the Easy Wood Tools. These tools are fairly new at Highland and I wanted to give them a try. I started with the Large Rougher which has a rectangular tip on it and has turned into one of my favorites especially when starting a project. You can move a lot of chips quickly and easily. In fact I would venture to say it is excellent for a beginner who wants to jump into turning and produce something immediately on the lathe.

The next month I moved to the Easy Finisher and made a video of that one showing less success. The tip on the Easy Finisher is round and like all the others is very sharp. Unfortunately, I let some ingrained habits take over and violated some of the rules put forth by the manufacturer for using these tools. I blew one small bowl apart and then got a nasty catch (is there any other kind?) as I was working on a larger walnut bowl. My conclusion was that I needed more practice and that perhaps the Finisher should be named the “little bit harder to use” tool.

As it turns out, the people from Easy Wood Tools were watching and got in contact to offer some suggestions. At the time, Rory Curtis was the National Director for Easy Wood Tools and called to offer some suggestions.

He suggested first of all that the best grip is to have your thumb on top of the tool and your finger underneath. Using that grip leads directly to Rule #1: Flat on the tool rest. Now if you are a beginner and have never learned to use a bowl gouge, that grip is easy. If like me, you spent many hours learning that delicate little compound curve motion to move from the edge of a bowl to the center with a conventional bowl gouge, then you will find you have to make a conscious effort to keep the Easy Tool flat on the rest. Keeping it flat is critical.

Rule #2: Level to the floor. That one is different too. Not many of my other tools are used level to the floor. That same compound curve motion from Rule #1 that takes months to learn with other tools can lead you wrong with Rule #2. My instinct is to constantly adjust the angle of the gouge as I feel the bevel and watch the cutting edge. It is hard to get away from long established habits, but when you come off level with the Easy Tools, bad things happen.

Rule #3: Set the tool rest so the top of the tool is even with the center of the work piece. This one is not much different from what I normally use. I do set the tool rest a little further back from the work, but these tools are long and heavy and a little more space helps keep them flat on the rest.

I think it is fair to say that for some tasks I pick up the Easy Tools first. I especially like the Rougher for starting a project and for making a flat bottom in a bowl. The Detailer is so much easier for me to use than a skew chisel. If you are a beginning turner and want to learn to make something quickly, these tools fit the bill. If you follow the Rules, they are as easy to use as advertised.

Having grown up in the South, I know that up North, stories begin with “Once upon a time.” Down here they begin with “You ain’t gonna believe this.” If you want to see a remarkable use of the Easy Wood Tools, go watch Bob Kennedy using the Easy Tools “in the dark.” You ain’t gonna believe this!! Amazing!!

CLICK HERE to see the complete line of Easy Wood Tools sold at Highland Woodworking.

Nov 302011
 

It occurs to me that many of the people who frequent this Blog would be interested in one of my favorite things, i.e. Habitat for Humanity. Not to be bragging, but I am probably up to 75 houses that I have worked on in some fashion or other over the years. A few more and maybe I will learn how to actually build a house. Let me tell you about it.

The system is pretty typical around the country. A corporate sponsor or group or individual comes forward and offers the money needed to purchase the land and the building materials. Then the sponsor or group will collect volunteers (that’s you, Pilgrim) to come and actually do the construction work. In my local Chapter, we look for about 30 to 35 people per day on the site, and we schedule about ten days to complete a 1400 square foot house. The Chapter obtains the land and the building materials, the permits and licenses, and provides essential construction expertise. The skilled trades which require licenses will be hired by the Chapter.

Once everything is in place, construction begins and that is the really fun part. Day One and Day Two are the best. In our Chapter, we are sorely disappointed if all the walls are not standing by the end of the first day. Roof trusses are usually scheduled on Day Two and the rest of the work proceeds from there.

One of the real joys of the construction time is working with the family who will live in the house. A requirement for purchasing (that’s right — purchasing) a Habitat House is the sweat equity investment. Before we will sell the house to a family, they must put in 250 hours (logged in and out) working on either their house or someone else’s Habitat house. Plus they must attend a 50 hour course on financial management as taught by Dave Ramsey of radio fame. Once they have made the hours and completed the course work and shown they can handle the payments, then we sell the house to them for the cost of materials and land. We provide a twenty year mortgage at zero per cent interest. At the end of twenty years, the house belongs to the family with no further obligation to Habitat.

But then, you ask, if the materials are furnished by the sponsor, and the labor is all volunteer, why is there a mortgage? The answer is that we take the money which comes in from the mortgages, pay a minimal staff, and then use the rest as seed money to build more houses. It is somewhat like a benevolent Ponzi scheme. Our Chapter for instance has built about 125 houses so we have around 125 mortgage payments coming in each month. Larger Chapters have built 1500 or more houses.

Habitat works all around the world. In fact, as a salute to our Christian beginnings, we tithe our monetary donations. Turns out you can build a house in Guatemala for about $3000. As a result, Habitat International recently celebrated construction of its 500,000th home. Corporate Donors also step up constantly. For example, Whirlpool Corporation donates a stove and refrigerator to every single house built in America by Habitat. When we finish a house, we call Whirlpool and they send them out. That’s why I buy Whirlpool every chance I get. Blessings on them and hundreds of others who do likewise.

How do you fit into this scheme? Call your local Chapter and see what you can do. Start by showing up on the site one day to offer your labor in construction. Look around and see what they need. What you will find is a bunch of good people doing something they love for the benefit of someone who will never have a home any other way. Match your skills to their needs and it will be a good thing for both of you. Go do some good!!

Our latest house, sponsored and built by employees of Delta Airlines in Atlanta.

Oct 312011
 

Let me announce a new display at Highland featuring the Sculptured Rocking Chair in kit form as presented by Charles Brock. If you recall, last fall and winter I started putting one of these kits together and began shaping the chair. Unfortunately (with apologies to Charles and his suppliers) I got sidetracked with some heavy Habitat activity and the project slipped. For the purposes of preparing an exhibit to put on display at Highland, I decided to finish half the chair and leave the other half in essentially the shape it comes in from the kit. Last week I was able to deliver the chair to the store so the staff could prepare a display for everyone to see and get a feel for the size and scale of the chair. The chair is imposing and I promise you will be impressed with its sensuous shapes, fine curves and subtle details. I also left the patterns which come with the kit, plus the forms I used to make the rockers assume their marvelous compound curve shape, probably my favorite part of the chair. If you have any chance at all, come by the store and get your hands on this chair.

With a lot of assistance from Charles, the left side of the chair is shaped and ready to get the final sanding and finish. As a matter of fact, if you buy Charles’ latest DVD on shaping a chair, you will see this very chair as the star of the show. (If you listen closely, you may hear me coughing in the background from the dust.) The chair will be on display at the store for several months and then I will bring it back to my shop and do the hard task of making the right side match the left side. Should be fun!!

By the way, if you want to present this chair to someone at Christmas, don’t delay getting your kit. I would hate for you to miss Santa because you are still up on Christmas Eve waiting for the finish to dry.


Terry Chapman did a whole series of blog posts on his experience with the Sculptured Rocker Chair kit – if you want, you can start from the beginning of the Sculptured Rocker build blog post series!
Oct 242011
 

Wow, talk about deja vu all over again!! Remember last week we were talking about the Moulthrop family and wood turning? Well I saw an ad on my local PBS station for an episode of Craft in America, a series produced for PBS in 2007, and I set it up to record on my DVR. When the program information came up, I was pleased to see it included the Moulthrops. There is a five minute interview with President Carter and he introduces the Moulthrops and a full third of the program is all about them. It is a wonderful show. Then on top of that, as President Carter is doing his introduction, he is sitting in a Maloof Rocker, an original, I am sure, but eminently recognizable. (Buy your sculptured rocker kit right here at the High.) I feel like Forrest Gump tiptoeing around the outskirts of history.

Go to pbs.org and click “watch video” in the top menu bar. Select Craft in America and look for Episode VII:Family. You can watch the full hour show right there on the web site or wait until it shows on your local PBS station. While you are there, you can watch Episode I with Sam Maloof, or you can watch all the latest Woodwright’s Shop episodes. Course if you do, maybe you ought to send some money to your local PBS station.

Oct 132011
 

You may have heard the name Moulthrop in regards to wood turning, especially if you live near Atlanta. Even if you don’t live near Atlanta, you may have seen the name at the White House, the Smithsonian, the Museum of Modern Art, the Metropolitan Museum of Art, and the United States Department of State, as well as numerous other similarly prestigious institutions.

I drove up to Marietta just northwest of Atlanta to visit the Marietta/Cobb Museum of Art to see “Moulthrop — A Southern Legacy”. I spent several hours there, and I came away with mixed feelings ranging from intense despair at my turning inadequacies to high ambition at the possibilities if I just keep pushing my craft. I took lots of pictures and have included a slide show (below) for you to see what I am talking about. What is difficult about simply seeing the photos is one cannot fully appreciate the scale of the objects. They are huge. In fact, the book I purchased at the front desk (Moulthrop, A Legacy in Wood, by Kevin Wallace) explains the methods and tools used by the three generations of turners. The Grandfather, Ed, started turning in the 1960’s when the craft was not widespread. He made his own tools and tried new methods and when he could not turn as large as he wanted, he simply built his own lathe. He laughs in the book about the heavy pieces of wood and the tools that resemble whaling harpoons, and actually getting flipped across the shop when the tool would catch in the wood. His Architect’s eye and natural talent served him well and soon people started to notice. One of my favorite pictures is of the grandson, Matt, at about 10 years old, standing inside a large scale chalice that Ed had made. After a while, his son Phillip took up the work, and then astoundingly, Matt, the third generation also picked it up.

It is remarkable: three generations, all rising to the highest levels of their field, and all very accomplished to my eye. In fact, I like Matt’s work the best. To my thinking, it is cleaner and more delicate than that of his father or his grandfather. But then, you can decide for yourself. Look at the pictures I took, but the book yourself, and then keep an eye on their expedition schedule and check them out in person yourself if they make it to your neck of the woods.

I’ve been turning a good while, but this stuff is amazing. Take a look at the slideshow below to see for yourself.