Steven D. Johnson

May 012013
 

Killing Me Slowly
By Steve Johnson

This is Woodworking Safety Day (formerly Woodworking Safety Week). It is also National Nurse Appreciation Week (I really hope that was pure coincidence!), Senior Corps Week, National Teacher Appreciation Week, International Compost Awareness Week (really?), and National Travel and Tourism Week. Regardless the competition, if the heightened awareness brought about by Woodworking Safety Day saves one finger or one eye it is worth all the ink and every keystroke on every blog, in every magazine, and on every woodworking club agenda.

The coverage of accidents and how to avoid them will likely be intense this week. But I have lately become equally interested in accidents that occur not with a shriek, a bang, or a buzz, but those that occur over a protracted period of time… the injuries that sneak up, like a thief in the night, and can rob us of health and vitality. I am talking about long-term exposure. In this column I have previously addressed noise and dust, two primary long-term exposure culprits. For this particular week of focus on safety, I want to address skin exposure.

Figure 1 – Skin absorption occurs 3 ways: Intercellular lipid pathway, or between the cells


Figure 2 – Transcellular permeation, or through the cells


Figure 3 – Through the appendages (hair follicles, glands)

Somewhere along the way the skin’s ability to absorb pharmaceuticals and chemicals entered the collective consciousness. It was something we really did not think much about before, but an onslaught of advertisements for stop-smoking patches, birth control patches, localized pain relief patches, testosterone-boosting patches, and even those miracle footpads that were touted as able to remove toxins from our body, all contributed to our collective realization that our skin, our largest organ, is capable of, and in fact very efficient at, pulling chemicals (both good and bad) into our bodies and into our bloodstream.

As this awareness has grown, some obvious marketing opportunities have been seized. Makers of lotions, potions and makeup have begun touting their more-natural or all-natural ingredients. Magazines warned us of parabens in our deodorant, lead in lipstick, sulfates in our toothpaste, and petroleum-based products in our hand cream. Fluoride, frequently the subject of grand conspiracy theories, hit the headlines again and the use of artificial colorings and sweeteners is being questioned; all-natural alternatives have begun to crowd the store shelves. But this is not merely marketing hype, and we woodworkers would be well advised to pay attention to the things that might be killing us slowly in addition to those things that could hurt us quickly.

The late great comedian George Carlin once said, “Scientists have announced that saliva causes cancer… but only when swallowed in small amounts over long periods of time.”

Funny, but like most of Carlin’s comedy, it is funny because there is a hint of truth. Our body is a complicated machine that burns fuel, expels waste, filters impurities, sifts between the necessary and unnecessary compounds, and occasionally does a little woodworking.

When we woodworkers dip a rag in solvent to wipe something, use our bare fingers to spread some oil, grease, putty, or solvent-based wood filler, or when we use harsh cleaners to scrub pitch from a saw blade, we do not get an immediate warning signal of pending danger. Instead, we may get a long-term cumulative impact that, like the thief in the night, sneaks up on us and intends us harm.

dtew4sm

So, while others address the slam-bang-crash side of safety, please give some thought to the long-term impact of dermal contact exposure. Wear gloves when handling chemicals and cleaners, read the label on that cream you slather on your chapped hands, and watch out for the fluoride… it really is a subversive plot!

Skin pathway illustrations from the Center for Disease Control. For more information, or to research the potential toxicity of chemicals in the products you use, consult the web sites of OSHA, the CDC, and download this document prepared by North Carolina Statue University. These are good starting points.


Feb 072013
 

You are reading this column slap dab in the middle of “Get Woodworking Week,” and if you don’t know what that is, it is a laudable project pioneered by Tom Iovino on his “Tom’s Workbench” blog.

As we contemplate ways to get more people involved in the hobby, craft, and vocation of woodworking, your first questions might be “Why do we need more woodworkers?”

Very simply, more woodworkers will increase the pool of potential customers for tools, training, supplies, and more. An increase in the customer pool will translate to higher sales for those who provide us those basic necessities of woodworking life, which in turn will fuel innovation and help keep prices in check. But more woodworkers will do more…much more.

To read the rest of this article, CLICK HERE.

And CLICK HERE  if you would like to check out the entire February issue of Wood News.

Jan 012013
 

13 For 2013… New Years Resolutions From the Down To Earth Woodworker

For many years I had a hard time coming up with New Years Resolutions. Either I was smugly (and falsely) pleased with myself or as I get older I am discovering more and more opportunities for improvement. This year the problem was not in coming up with resolutions, but rather containing the size of the list. So here are some things I would like to do in 2013…
#1 – Read more… In 2012 I read only 43 books. In 2010 I read 52. The steadily declining number can only be attributed to alternate activities. So, let’s see, I am not going to spend less time in the shop. Oh! I know… I will cut down on TV.

#2 – Less TV… In order of insignificance, eliminate TV by genre. I have already given up all network programming. Next, no more news. I’m sure I will be happier. After that, I will wean myself from the oldies. I’ve seen every M*A*S*H show like a hundred times anyway… likewise for Seinfeld, Raymond, and Dick van Dyke. I will miss Antiques Roadshow though. I still miss Norm.

#3 – More Music… Music hath charms, you know, but all my music listening is done in the shop and my wife already says, “You might as well just live out there”…hmmmm… I’m getting project ideas. How about a convertible workbench/cot? Wait! Maybe a Murphy bed… tool storage when folded up, comfy bed when folded down. I’m getting jazzed…

#4 – Coffee… My second (or is it third? Fourth?) grand obsession is coffee. I have learned dozens of ways to make it, but have yet to figure out how to work coffee into a Wood News column. How to stain with coffee? How to remove a coffee stain? Build a barista station? A coffee-serving tray?

#5 – More Time Outdoors… What better way to spend time in the fresh air thanbuilding some outdoor projects? I would like a pergola… just love the name…pergola. A teak table by the grill would be great. A custom gate for the fence. Oh yeah, and build the fence. So many projects, so little time. I’ve got to give up something else…

#6 – Less Sleep… Edison, Napoleon, and Michelangelo got by on 4 hours a night. I’m going for 3.

#7 – Less Shopping… An inordinate amount of time is spent shopping for unimportant things like food, clothing, and toiletries. Eliminating these tasks will allow more time for tool shopping.

#8 – More Efficiency… More shop time by being more efficient. Learn to sand with both hands. Never lose anything, put my tools back as I use them, keep my wood organized, use story-sticks more.

#9 – Go Metric… Sixteenths and thirty-seconds, inches and feet… very inefficient. This is the year to finally make the big switcheroo to millimeters. At least I will learn to use my Festool equipment the right way!

#10 – Go Green… My truck gets only 6 kilometers per liter (wow, my mental metric makeover is working already!), so hunt for an electric truck. Of course it will not make it to the lumberyard and back on a single charge. I wonder if they will let me plug in and sleep over?

#11 – Recycle… I’m going to learn to make fireplace logs from sawdust and maybe make my own particle board. Use coffee grounds in the garden, wood chips for mulch, and make progressively smaller and smaller projects from progressively smaller leftover pieces of wood.

#12 – Be Patient… A low threshold of boredom has me thinking about the next project before I am halfway through the current project. I rush through applying the finish when I know it is just as important as the build (sometimes more important when there is a little flaw or two to hide).

#13 – Fall Down… North country lore has it that everyone falls down once every winter. I would like to get it out of the way early. The surprise of the fall is one of the things I like least. And I would like to fall someplace soft… fluffy snow over a bed of pine needles sounds nice. And somewhere isolated. No one to laugh at me, no one to hear me cry. I think I’ll go take a walk in the woods.

What are YOUR New Years Resolutions for 2013?

To read more woodworking resolutions for 2013, CLICK HERE

Dec 282011
 

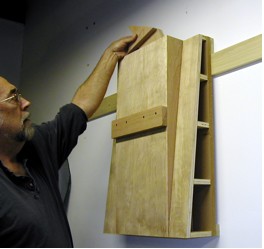
My trusty shooting board, perhaps the great-great-great-grandson of my first shooting board, was getting a little “long in the tooth.” Giving birth to a new one would typically involve about fifteen minutes of labor. But, I decided to prolong the gestation period over a cup of coffee and think about whether the laughably simple “classic” design could be improved.

What’s unique about the design Steve came up with? Read his full article HERE!

BONUS! Are you interested in making a Down to Earth Shooting Board like this one? Here’s a list of must-have materials and the video demonstrating its use after it has been built:

Building the Universal Ambidextrous Shooting Board does not require any special tools — it is mostly cutting and gluing. But in order to achieve the accuracy needed, it is important to mark out and make cuts carefully. For accuracy, I depend on my Starrett Combination Square, an angle gage, and a perfectly flat and true straight edge. All cuts were made on the table saw with a Forrest Woodworker II thin kerf blade. This blade works particularly well on the ¾” plywood used in the project. My “AngleCube” is indispensable for setting tablesaw angles precisely, and really came in handy with the shooting board. I used Titebond III glue for all the joints, not because there was a real need for waterproof glue, but because I like the short “open” time for a project like this.

Veritas Steel Straightedge 24″ | Measuring Straightedge

Starrett Combination Square | Starrett Squares

True Angle 12″

Forrest Woodworker II: 10″ x 40 Tooth, 3/32″ Kerf | Forrest Saw Blades

AngleCube Digital Angle Gauge

Titebond III Ultimate Wood Glue 32 oz | Titebond Wood Glue

Check out the full archives of The Down To Earth Woodworker monthly column.

Jul 122011
 

From the publishing schedules and tables of contents of the woodworking magazines it would seem we woodworkers are expected to slow down and shift gears in the summertime. We are expected to be gardening, golfing, fishing, or, if we build anything at all, it is supposed to be deck furniture, gazebos, or lawn games. Don’t despair, however, it’s summertime, and as DuBose Heyward wrote and George Gershwin set to music in 1933-34, the “livin’ is easy.”

Summertime,
And the livin’ is easy
Fish are jumpin’
And the cotton is high

Your daddy’s rich
And your mamma’s good lookin’
So hush little baby
Don’t you cry

No doubt there are plenty of summer distractions for us woodworkers. The lawn must be mowed, the garden tended, and the lure of the biking and hiking trails is strong. Golf clubs and fishing poles call our names and beg us for outings. But hang in there and “hush little baby, don’t you cry,” ’cause summertime can also be awesome shop time.

Sunshine & Air

Supreme Court justice Louis Brandeis’ advice that “Sunshine is the best disinfectant” is often quoted but seldom followed in our nation’s capital. Here in the North Country where we seem locked in a multi-month state of constant cold, rainy, and overcast conditions, we have no evidence that the judge’s advice is true either. Yet, as best we can remember, sunshine is a wonderful disinfectant.

If you are lucky enough to have some sunshine this summer, fling open those shop windows and doors! Roll your equipment out and maybe do a little springtime cleaning. I read about one woodworker who opens the door on his shop when the weather gets warm and blasts it clean with a leaf blower. Your shop may not need disinfecting, but a little sunshine and fresh air won’t hurt!

For me, summer is a great time to do some equipment maintenance. Clean, lube, sharpen, and calibrate machinery. The things you can see in the bright sunshine may surprise you. Sort all the hardware and fasteners that have accumulated. A pleasant way to spend an hour or so is sorting screws while sitting on the deck sipping your favorite beverage. Have a driveway sale and clear out unused tools and gadgets. Need to strip a finish? It is so much more pleasant to do that nasty, smelly job outside. Want to run your belt sander over the top of your workbench? Let the wind take away the sawdust in the wide, open spaces. All those wood chips and sawdust you collected over the winter will make great compost or mulch, so get to work. Best of all, just let the sounds of summer envelope you as you quietly plane a board to perfect flatness.

Summer brings out the neighbors. Passersby may take a peek into your shop, and with a little luck, may be intrigued. Your summertime woodworking may start another soul down the path of this outstanding hobby.

Stock Up On Materials

Buying wood is almost always fun. Combing through the stacks, looking at boards, imagining the pieces and placement in your next masterpiece is all part of the excitement of woodworking. But for those of us in snow country, the wintertime buying experience is fraught with potential for turning a normally pleasurable experience into at best an ordeal, and at worst, a misadventure.

Clearly I remember the day last winter when I purchased some stunning black walnut. The looking and buying experience was great…the loading and unloading experience, not so much. By the time I kibitzed with the guys at the mill for an hour or so, spent an hour or so picking my boards, and drank coffee for another hour with my buddies, the weather had taken a turn.

I loaded long, wide 10/4 boards into my truck in 35MPH, 20 degree wind blowing thick snow. All the way home I faced the dual worries of (bad) slipping off the road and (worse) damaging my new boards. My stress was exacerbated when I got home and couldn’t get into my drive or unload my lumber until I shoveled what, by then, was a foot of snow. Boards that might normally take a couple of days to acclimate took several days just for the snow and ice to melt and to dry out. Summertime is a much better time to stock up on wood for all those winter projects that are noodling around in the back of your head; and with a little luck, you may even get a bargain since most other woodworkers are busy doing “summer stuff.”

Summertime can also be a great time for tool buying. Many people start to conduct and to shop garage and estate sales in earnest when the weather improves. Many retailers run promotional sales, since traditionally wintertime is shop time and the summer business is slow. Take advantage of the slow business season for your favorite supplier. In addition to that shiny new power tool, stock up on glue, finishing supplies, and sandpaper.


One of these mornings
You’re going to rise up singing
Then you’ll spread your wings
And you’ll take to the sky

But till that morning
There’s a’nothing can harm you
With daddy and mamma standing by

Do Something BIG to Improve Your Shop

Constantly tweaking, rearranging, and generally “perfecting” your shop? Then summer is a great time to make major changes. Add a window, replace a door, or just go ahead and knock out that wall and add on – you know you have been wanting to!

A friend of mine is plumbing his walls for air and adding a central air compressor. Another is changing from portable dust collection to a big, more sophisticated central dust collection system with all its attendant pipes, blast gates, and fancy remote controls. One guy has pulled everything in his shop out into the driveway, covered it all with a big tarp, and is epoxy coating his concrete floor. Summertime is great shop expansion and rejuvenation time!

Keep on Woodworking

Most of all, summertime is a great time to just keep on woodworking. Although now in late-June we still have the heat on where I live, at least in many parts of America you can work comfortably in your shop this time of year. The fresh air and summer breezes will likely help to oxygenate your creative brain cells, and new ideas will abound.

There are practical reasons to not take a summer hiatus, too. It seems that almost every year I belatedly give shop-crafted holiday gifts about a month late. Planning on giving a gift of your craftsmanship this winter? Start early (like now) and make sure you have plenty of time to get the project finished. One year I had to warn everyone to let their gifts sit for a while, preferably in the garage, before they used them – the finish wasn’t fully cured.

If summertime woodworking makes you feel guilty about all those outdoor projects languishing on the to-do list, don’t despair. You have always been creative enough to get a new tool purchase past your frugal spouse…you can probably figure out a way to justify hiring someone to clean the gutters, trim the bushes, or paint the house. How much do you love woodworking? If you figure paying the kid down the street a few bucks to mow your lawn is stimulating the economy and giving you more shop time, you are an avid woodworker. If the grass grows to the point the neighbor mows it for you, you are obsessed, and we are undoubtedly kindred spirits.

It’s summertime, and I think the magazines all have it wrong. Summertime is prime woodworking time!

Summertime Memories

Figure 1 – Sam Cooke

By the way, if the Porgy and Bess tune “Summertime” is conjuring pleasant memories, download a few versions of the song and give them a spin while you do something enjoyable in your shop. It seems almost everyone has recorded this song at one time or other (from Billie Holiday to Willie Nelson and Ella Fitzgerald to The Zombies), and almost any version is guaranteed to put you in a good woodworking mood.

Figure 2 – Janis Joplin

Need a recommendation? No music collection is complete without the Sam Cooke version, of course, but my current faves are alternating between the jazzy scat-infused Billy Stewart version (that man had soul and definitely felt the music!) and Janis Joplin’s bluesy, earthy, and dare I say it, sensual version. By the way, Janis’ version has some of the most raw and gutsy guitar work I ever heard on any Joplin song. I only wish I could have seen her perform it live.

Figure 3 – Billy Stewart

This article was originally published in The Down to Earth Woodworking column in the July 2011 edition of Wood News Online.

Jun 272011
 

While remodeling what he eventually dubbed the “unhandy house”, our own Down to Earth Woodworker, Steve Johnson, found there were a few things he would have done differently if he had a second chance.

The Mistakes I Made in the “Unhandy” House

It is probably a bit early to do a full post-mortem on the work done in the “unhandy house” remodeling project, since there are still a lot of unfinished items. Still, mistakes are truly instructive, and lest I forget one of my many “teachable moments” I thought it wise to share now.

Plan for Unforeseen Situations…

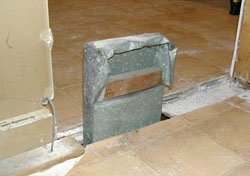
Figure 1 - Who would have known? This clumsily sealed and hidden air duct took a day to resolve.

Every step of the project was planned in what was, I thought, infinite (almost obsessive) detail. Sheet after sheet in my notebook detailed entries like “Day 37, 38, 39 – sand and prep floors.” My mistake was to not fully anticipate and plan for unforeseen problems. The floors took 4 days to sand, not three. The time budget was blown. The dollar budget was also blown with added sanding machine rental costs and additional sanding pads. There truly is no way to make up a day when you are on a tight schedule and working mostly by yourself.

Re-routing a hidden air duct embedded in a wall cost me an extra day. Electrical problems cost me three or four days of lost productivity. In the midst of it all, the sump pump began spewing water on the walls from a dry-rotted rubber coupler, and a rush trip to the hardware store and the ensuing repair and cleanup cost me another half a day. No matter how skillful one might be at estimating the time required to do each project, it is wise to add some “buffer” or contingency time to every project.

Penny Wise and Pound Foolish…

It was, I thought, fortunate to have a recycling center only fifteen miles away where I could dispose of a brimming pickup truck load of material for just $7. In retrospect, 30 miles round trip in my truck with current gas prices equals roughly $10 in gasoline cost. That translates to $17 per load, and so far, I have disposed of 13 loads, or $221 in real cost. Almost every trip to the dump entailed a swing through the donut shop drive-in window for coffee and sugary baked treats, so add another five bucks or more per load. In reality, my misplaced frugality cost me close to $300.

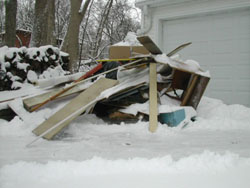
Figure 2 - Piles of trash get handled multiple times. Get a big open top dumpster and handle the waste only once.

Each trip took roughly two hours, with loading, driving, unloading, and driving back. Those 26 hours of time would have been much better spent working. There is a safety consideration as well. Demolition is dangerous work, and the potential for injury is multiplied by handling the waste material multiple times. I carried materials to the driveway and stacked the garbage until it looked like a full truckload. Then I loaded the mess into the truck, one additional handling. Then, at the dump, I unloaded everything, marking the third handling of material that was filthy, full of rusty nails, and possibly other noxious “stuff.” With an open top waste container in the driveway, I would have handled the waste material only once.

Checking locally, renting a 30 cubic yard capacity roll-off open-top dumpster costs about $550. Considering the time saved, the safety, and the convenience, if I ever take on another project like this, I will order a large dumpster.

Rip It All Out First…

Most of the base trim in the house had to be removed for floor work, but it was an older profile, not readily available, and it looked like it was going to take a lot of time to replace. The trim was covered in multiple coats of paint. I removed a lot of the trim, but decided to try to “save” some and some I left “in situ,” thinking that it would be easier to paint in place rather than cut, fit, and attach new baseboard. All of that thinking was a giant mistake.

As the project continued, I found myself removing more and more of the base, until all that was left was a small section in the hallway. That small section proved difficult and time-consuming to paint, and there was no really “seamless” way to transition from the old profile to the new. I would have been better off to just remove it all in the beginning and be done with it.

In fact, my original decision to haul things to the dump, rather than order a dumpster, made the process of ripping things out gradually seem logical. In real life, it caused me undue and extended heartburn later as problem after problem was revealed. The gradual exposure of problems wasted time since many extra trips to the supply stores were required to buy unexpected needed supplies. On a major remodeling job like this, bite the bullet and rip everything out at once. Most problems will be revealed early, and it will be easier to make more complete “to do” and “to buy” lists.

No Matter How Good The Sale Is…

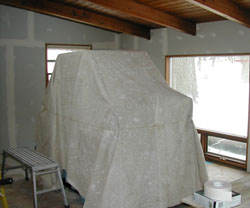
Figure 3 - How do you work around this? A way-too-early delivery of appliances created problems throughout the project.

From the first visit to the “unhandy” house, I could visualize a gleaming new stainless refrigerator and dishwasher to accompany the fairly awesome and relatively new stainless oversize stove the former owner had installed. As luck would have it, the perfect fridge and dishwasher went on sale a week after taking the keys to the house. Buying these items early was a big mistake. Unable to install either, they were in the way.

As soon as the items were delivered, I inspected them for physical damage and, finding none, repackaged them as best I could, covered them in moving blankets and a drop cloth, and set them to the side. As the project moved along, more tools took up temporary residence in the house, and things began to get crowded. The appliances were moved at least four times for different projects, and slowed down the work as we took care not to damage them.

As fate would have it, when the time finally came to install the appliances, the refrigerator did not work. The equivalent of an entire day was wasted arguing with the dealer, the manufacturer, and the delivery service until the unit was eventually replaced. Had I waited to purchase, the refrigerator would have been delivered, hooked up, and its defect would have been noted immediately and the unit would have been replaced quickly. Had I waited, these bulky appliances would have been out of the way and in no danger of damage. There would have been more “elbow” room, and the work could have progressed more quickly. A few dollars of savings proved to be a point of frustration and wasted time.

Simple Steps to Avoid Remodeling Frustration

  1. Everything is going to take longer than you think – plan for it, then add a few extra days
  2. While the words frugal and cheap may technically mean almost the same thing, they do not – don’t be “penny wise and pound foolish”
  3. Do demolition all at once – you may discover all kinds of new challenges all at once, but you will be better able to plan and execute and you will save time!
  4. Even if you catch a good sale, think long and hard about buying things before they are needed. Where will you store them? Will they be in the way? Could they be damaged during the renovation?

This article first appeared in the Down to Earth Woodworker column in the June edition of Wood News.


Jun 232011
 

If the weather had been better, if I had planned (or executed) better, if the former owner had not been the quintessential “unhandy” man, if I had not been only 20% effective for a week or more with the flu, if, if, if…

As a buddy of mine used to say, “If a frog had a tail he wouldn’t bump his butt every time he hopped.” And if everything had gone right, I would have remodeled the house and the garage before time to move in, and I would be building furniture by now. But, frogs don’t have tails, and my remodeling project took longer than expected, and the garage had to wait.

What to do with all my equipment while the shop was under construction became the pressing dilemma. The answer, my friends, was blowing in the wind. Literally.

I remember the day well. I left about 5:30 AM for the unhandy house, ready for another full day of remodeling work, undoubtedly to be filled with additional surprises. The pressure was building. Every day the drop-dead date for being out of the old house was nearing, and every day it seemed new problems and fate was prolonging the project. It was cold, but then, when is it not in Wisconsin? I believe the temperature was around 7 degrees, the wind gusting bitterly from the Northeast. Bundled in about five layers of clothing, head bowed against the blowing snow, I headed into the coffee shop for a much needed start to the day. Another frigid patron was wrestling with the newspaper vending machine and a fortuitous gust of wind ripped papers from her hand and directly into my face. As I peeled them away and tried to smooth and return them to her, I spied an advertisement. It was just like in the movies, when the spotlight shines, the music swells, and enlightenment spikes like a smile – a moving and storage company advertisement and a picture of a storage pod.

Despite the cold and the caffeine deficit, I changed a dollar into quarters and overpaid for the local newspaper. Over coffee (finally) I read and re-read the ad, and wondered if an on-site storage pod could be the answer. I could put all my equipment in a great big weather-tight and secure box, move the pod to the new house, store it in my own driveway, and move the machines into the shop when the garage conversion was complete.

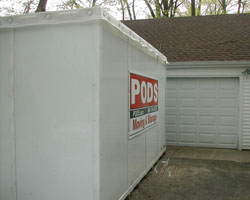
Online, I checked out various companies that offer pod-type storage. All seemed similar, but the namesake Pods Enterprises seemed to be the originator, or at least had co-opted that position through marketing. Pod’s online quote system was slick and professional. By the end of the workday I had made the decision and formulated the plan, and had an appointment to have a Pod delivered.

I fretted over details…could the delivery guy put the Pod close enough to the garage? Could he set it straight? Would the slope of the driveway cause an issue? Would the 16 by 8 foot Pod be big enough? Would it really be dry inside and secure? How high was the Pod off the ground? Were there ways to secure my equipment for the move?

The helpful customer service representative at Pods patiently answered my questions, and the delivery driver was as professional, caring, and proud of his company as anyone could be. He set the Pod just four feet from the garage door, perfectly square to the entrance, and walked me through the use of the door, the lock, and what to do when I was ready to have the Pod moved.

The next Saturday a friend had volunteered to help pack the Pod. I had already spent the better part of the night before prepping the equipment for its hopefully short hibernation and relocation. Most drawers were emptied and the items packed. Doors and drawers were secured with shrink-wrap plastic. Delicate sections of the equipment were further protected with Styrofoam or bubble-wrap, and then each machine was covered with a moving blanket or two. The padded moving blankets were secured with additional shrink-wrap.

I hacked together a low ramp of 3/4 inch plywood and scrap dimensional lumber to smooth the rolling of equipment from my garage to the four-inch floor height of the Pod. I also purchased a number of 4 X 8 sheets of 2-inch thick Styrofoam insulation to be used as packing protection, a few inexpensive plastic drop cloths, and a few additional moving blankets.

In Wisconsin we plan for the worst possible weather, and the reality is usually worse, so I also rigged some heavy plastic above the Pod door and attached it to the front of the garage roof, forming a type of temporary roof over the short span between garage and Pod. I also rigged temporary plastic walls between the Pod and garage, essentially forming a plastic “hallway.” This turned out to be a good move. Saturday ushered in a rainstorm of epic proportions. Cold, fierce rain driven by gusting winds and a bone-chilling temperature of 38 degrees dampened our enthusiasm for “Pod-packing,” but we soldiered on.

My rolling lumber rack was the first item loaded. We partially emptied it, rolled it into the Pod, and then reloaded it. It was the item I had guessed to be the heaviest and most unwieldy, but the makeshift ramp held, so we were off to the races.

My workbench is the only large item in the shop not on wheels. We carried the beast, a few inches at a time, and nestled it into the Pod, opposite the eight-foot long lumber rack. The Pod unit has convenient tie-off points throughout. We used webbed straps and rope to secure the lumber rack and workbench and a couple of blocks of wood screwed to the wooden floor as insurance. Boxed items were packed in, under, and around the workbench and lumber rack, and within an hour, half the Pod was packed.

Before loading the machinery, we lined the Pod walls with the two-inch Styrofoam insulation. Like a make-it-up-as-you-go-along jigsaw puzzle, we put each machine into the Pod, secured it, and braced it with additional Styrofoam. When everything was loaded, we sealed the Pod inside its door, floor-to-ceiling, with 4-mil thick plastic (in case there was any water leakage around the door), closed the door, and added a padlock.

On the appointed moving day, the Pods driver arrived precisely on time. The moment he raised the Pod into the air and began to load it on the truck, my heart raced, but I was comforted by his professionalism and care. By his control gauges, he told me the Pod had 5,700 pounds inside. Not the heaviest load he ever carried, but well above average. He followed me to the new house, and in what seemed like only minutes, he had unloaded the Pod and placed it, just as carefully, at the entrance to my new garage/shop.

Shop equipment resting peacefully, waiting for its new home.


I was tempted, of course, to open the Pod and examine the contents, but I resisted. My rationale was simple…if anything was damaged, it might be weeks or longer before I could unload the Pod and really assess the situation, and in the meantime I would simply fret and obsess. Better that I not know. That lasted about ten days, and finally on a day without rain, I opened the door to find that everything was just as we had left it. Whew!

Now every day, I look at the Pod and it provides motivation to get the garage converted to the new Down To Earth Woodworking shop. If you are ever facing a move, or simply want to clear out your shop for some renovation or remodeling, consider using a pod storage unit.


This article first appeared in the Down to Earth Woodworker column in the June edition of Wood News.