Molly Bagby

May 112018
 

After we first announced in 2017 that The Highland Woodworker had reached its series finale we received dozens of phone calls, emails and comments saying “say it ain’t so!” Well we listened to our viewers and we have returned with 4 brand new episodes in 2018!

Our Spring 2018 episode includes the following:

-Not only does Doug Stowe build fine furniture and beautiful boxes – he also teaches young and old alike how to express themselves as woodworkers. His story and a lesson in box building is sure to inspire.

-Popular Woodworking Magazine’s David Thiel teaches us how to size a band saw blade in Tips, Tricks and Techniques.

-Our Tool Box segment introduces the Narex Spoon Carving Kit.

You can watch the full episode below:

Be on the lookout for the additional 3 episodes throughout 2018 and if you haven’t signed up to receive the episodes in your inbox you can do so by clicking here.

May 022018
 

Photo Credit: Bill Rush Photography

On Saturday, April 28th, 2018, we celebrated Highland Woodworking’s 40th Anniversary! We were excited to have our special guests Nick Offerman, Roy Underhill, Thomas Lie-Nielsen and Chuck Brock. We also had demonstrators from Festool and SawStop as well as a carving demonstration by Jim LeClaire. Our guests and demonstrators were located throughout the store offering a variety of demonstrations, discussions, and overall woodworking camaraderie.

Nick Offerman signing his books

Upstairs we had actor/woodworker Nick Offerman signing copies of his books Good Clean Fun, Gumption, and Paddle Your Own Canoe. In the middle of the day Nick took a break from signing and came downstairs to demonstrate the quick technology of the SawStop Professional Cabinet Tablesaw PCS. Instead of doing the demonstration with a hot dog, Nick specifically requested a bratwurst. Despite a new kind of “test dummy” than is normal for these demonstrations, the SawStop still proved itself and barely nicked the bratwurst.

In our Seminar Room we held our Dovetail Donation Challenge where we partnered with Building Homes for Heroes, an organization that builds or modifies homes, and gifts them, mortgage-free, to veterans and their families. With the kind donations of our customers we ended up raising $295 for the charity, which Highland Woodworking matched and the organization will be receiving a check for $600. We also had carver, Jim LeClaire demonstrating his figurine carving.

Roy working his machines

Roy Underhill, host of The Woodwright’s Shop, was centerstage in the middle of the store entertaining customers with a variety of his woodworking machines he brought down from his shop in North Carolina. His machines were all powered by hand and “kids of all ages” were excited to try them out.

Also in the middle of the store we had Thomas Lie-Nielsen and Deneb Puchalski from Lie-Nielsen Toolworks. Deneb was demonstrating a variety of Lie-Nielsen planes, chisels and saws while Tom was answering questions and chatting with customers.

Charles Brock interviewing Roy for a future episode of The Highland Woodworker

Charles Brock, host of The Highland Woodworker was stationed at the front of the store with his sculptured rocker he brought down from his shop in Tennessee. Throughout the day Chuck was also conducting interviews for a future episode of The Highland Woodworker so be on the lookout for that episode!

In the back of the store we had our Festool representative on hand answering questions and demonstrating our wide array of Festool Power Tools.

We hope all who came had a wonderful time and if you couldn’t make it to our store this past weekend, you’re always welcome to come visit us here in Atlanta!

Click here to view our photo gallery with highlights from the event.

Apr 132018
 

Yesterday, Chris Bagby (also known as my Dad and one of the Owners of Highland Woodworking) and I went to Winnona Park Elementary in Decatur, GA where we were interviewed by a class of 30 3rd graders taught by Mr. Matthew Hicks. The class is currently studying Entrepreneurship and they have had several business owners from around the Metro Atlanta area come in to discuss their businesses and how they got started.

My Dad and I came with a stack of our newest Spring/Summer 2018 Catalogs to hand out to the students as well as a copy of our very first tool catalog printed back in 1982. To give the kids more of an idea of the products we sell, I also brought my Narex Spoon Carving Starter Kit which I started a few weeks ago at the Ormewood Park Makers Festival where Highland Woodworking had a booth promoting our store and woodworking classes.

One of the main questions was how the business was started and what resources were needed in order to start the business. My Dad discussed how he and Sharon, my Mom,  founded the business as Highland Hardware back in 1978, across the street from its current location in Virginia-Highlands. Armed with both a bank loan and a personal loan from Sharon’s parents, the two were able to rent the building at 1034 N. Highland Ave for just $500 a month. He emphasized the importance of capital, a dedicated staff, and an attractive storefront/layout as important resources for starting a business.

We had a fun time answering the kids creative questions and getting them (hopefully) interested in woodworking as well as in possibly starting their own businesses in the future.

If you want to read more about the history of Highland Woodworking, check out our About Us page on our website.

Nov 212017
 

We’re excited to have been featured in another Atlanta publication this month after having just been featured in an interview on the Voyage ATL website.

Grace Huseth, a contributor for Atlanta INTOWN sat down with Molly Bagby, daughter of owners Chris and Sharon Bagby, to discuss 40 years of Highland Woodworking.

Although Molly hasn’t been around for all 40 years of the store’s operations, she spent the majority of her childhood in the store when Sharon started bringing her to work just a few weeks after she was born.

Read more about Highland Woodworking’s history in our article featured in the November 2017 issue of Atlanta INTOWN.

You can also scroll through this month’s issue below:

Aug 212017
 

Prior to today’s 97% eclipse here in Atlanta, the last annular eclipse that was seen in the area was back on May 30th, 1984. Back when Wood News was a print publication, we included pictures and a write-up from the events of that day.

1984 Wood News Article on the Eclipse

This year’s event was another exciting one here at the store, with employees talking about it throughout the morning. Once the eclipse started around 1:05pm EST, Highland employees took turns going outside to look through the few pairs of eclipse glasses that some of our fellow employees were nice enough to bring and share with the rest of us. One of us even brought a welding mask and another made a pinhole camera out of paper.

Viewing through glasses and welding masks

Pin Hole Camera

While it didn’t get completely dark down here at Highland Woodworking, you could definitely tell a difference in the light, not to mention the quietness that occurred.

One of the highlights of the event was the beautiful crescent shadows made by the trees located throughout the store parking lot.

Crescent Shadows

Aug 092017
 

Molly Bagby is an employee at Highland Woodworking who recently finished up a 2 Week Basic Woodworking course at Center for Furniture Furniture Craftsmanship (CFC). Although she grew up at Highland Woodworking from a mere 1 week old, her knowledge of woodworking skills is limited. With this class, she was able to change that. You can follow her on Instagram @HighlandWoodwoman.

To read my previous post on Mortise and Tenon Joinery, click here

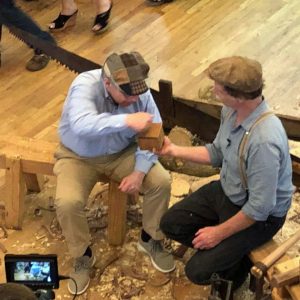
At the start of week 2, I felt it was finally time to move on to dovetails, something I had been dreading because it was already about 5 days after Peter had done his first demo on how to make them. Luckily, one of Peter’s most important teachings is that the student should feel comfortable in each step of the process and not have to rush through any of it, so he was happy to go through the process step by step with me.

Specific Tools I Used for Dovetails

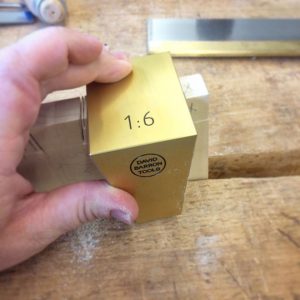
The first step in marking out dovetails is to figure out what angle you want the dovetail to be. For learning purposes, we made a 1:7 angle, which we first drew out on paper and then recorded that angle with the sliding t-bevel, to transfer to the wood.

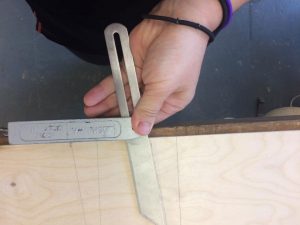
As I may have said before, I am a very visual learner and since I had never used some of these tools before, instead of having Peter demonstrate them multiple times, I took pictures of “how they work.” For example, the sliding T-Bevel seems like it can go in a million directions and figuring out what side needed to lay on the wood for proper marking of the dovetails proved to be a challenge for me. But once I took a picture of it in action, I was able to reference it for future layouts.

As I learned the hard way, the goal for cutting dovetails is to try and get a finished fit right off the saw so then you have to do less chiseling. I didn’t trust myself with the saw right away and so my cuts usually ended up being way off the line I had marked for myself. At least I was almost always following one of Peter’s most important rules of not cutting/paring away the pencil lines!

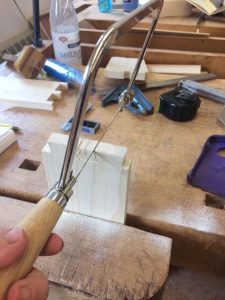
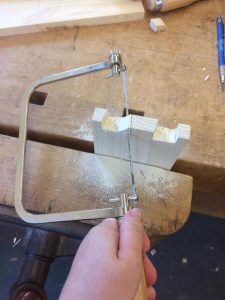
Cutting out the waste with a fret saw

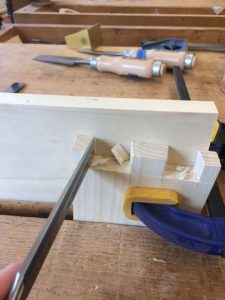
When cleaning up the tails, one of Peter’s tricks to get a nice clean edge is to square a new visual guideline with a sharp pencil a few inches from the tails. After marking out your new lines, put the wood piece into the vise so that your new lines are perpendicular to the vise and you will be able to get a nice, straight cut down your new pencil line to the shoulder. The most important part of the cut is the positioning of the elbow and hand that is holding the chisel, as illustrated below.

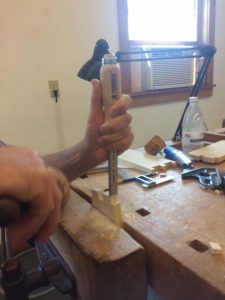
Ideal hand positioning for cleaning up the tails with a chisel

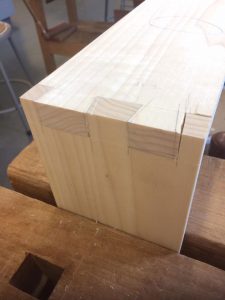
When I first started my dovetails, I took the long route and marked both my tails and pins at the same time. Then I learned that by the time you’re done with your tails, they are a lot less likely to fit the original pin sizes you created. You’re better off marking and cutting your tails first, and then marking your pins based on the size of the tails you just cut.

Mark your pins by tracing the tails you just created

Again, one of Peter’s most important steps in cutting both tails and pins, is to make sure you saw the waste up to the pencil line, but DO NOT REMOVE THE PENCIL LINE.

Removing the waste of the pins

Paring back the pins with a chisel (note the vise setup with backing board)

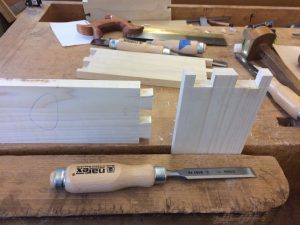
Are they ready to be put together and joined?

Unfortunately, there was a point where I wasn’t using a backing board when paring away the waste on my pins (as pictured above) and I ended up chiseling across and going off the far side. When this happened, Peter got really excited because it made for a great class tutorial on fixing cracks.

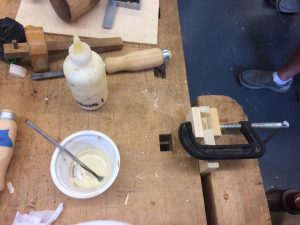
Crack Fix: With thinned out Titebond glue, brush the glue onto the surface and then push it down into the crack with the brush. Remove excess glue off the end grain surface, clamp up and let dry. Make sure you clean your glue brush while waiting for your piece to dry!

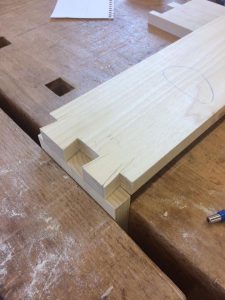
The first dovetail I’ve ever made with just a small gap on the right side.

I started my dovetail practice on a Monday, and the next Tuesday I received a package from Highland Woodworking containing a Lie-Nielsen Dovetail Saw and a David Barron Magnetic Dovetail Saw Guide. Let me just say, that with these 2 amazing tools, I was able to speed up my dovetail making two-fold! Not to mention that I already had 1 set of dovetails down, so it is always easier once you know what you’re doing.

The David Barron Magnetic Dovetail Guide is an amazing time-saving jig for cutting dovetails precisely and quickly!

For the rest of the week I used my David Barron Dovetail Guide on all of my practice and project dovetails. I occasionally felt like Peter was giving me the side eye when he saw me using the jig, but it made my process so much less stressful and I was able to make my project dovetails a lot more quickly!

When I first watched Peter demonstrating dovetails, I got really nervous that they were going to be hard and complicated. Once I started practicing them, they came very quickly to me and I actually enjoyed making them a lot more than mortise and tenon joints! I also enjoy how they’re so pleasing to the eye!

Aug 022017
 

Molly Bagby is an employee at Highland Woodworking who recently finished up a 2 Week Basic Woodworking course at Center for Furniture Furniture Craftsmanship (CFC). Although she grew up at Highland Woodworking from a mere 1 week old, her knowledge of woodworking skills is limited. With this class, she was able to change that. You can follow her on Instagram @HighlandWoodwoman.

To read my previous post on The Importance of Sharpening, click here

After we learned the most important skill in woodworking (sharpening), it was time to move on to joints. For learning purposes, we practiced with poplar wood, an ideal wood choice for beginning joinery. During the two weeks of the class, we learned and practiced 3 types of joinery, Mortise and Tenon, Dovetails, and Half-Blind Dovetails. It’s amazing how much work goes into just 1 little joint of a project.

The hand tools I used for all of my joinery included:

Specific Tools for Mortise and Tenon

As I’ve said before, even though I have grown up around power tools, I’ve never actually used any of them. We went through a full walkthrough of the machine room on Day 1, and were told the only machine we could use by ourselves without shop assistant supervision was the drill press. Over the course of the first week, I got to know the drill press really well with the amount of mortise waste I was drilling out on my samples. An important tip I learned on the drill press was to make sure all dust and wood chips are removed from the table before setting up what you are drilling, or else you’ll get an uneven drilling.

I spent several days “perfecting” my mortise and tenon joint. I am a slow learner and even though Peter demonstrated each process in front of the entire class, I needed a separate tutorial for each one, where I could go step by step to make sure each “move” I made was correct. By the end of the week, when everyone else was starting their projects and had already “perfected” their dovetails, I had made about 5 mortise and tenon joints. That also included a full day of re-sharpening all of my chisels, and countless demos and discussions by Peter about other aspects of woodworking.

One of the most helpful tips I learned in making my mortise and tenon joints was the use of the Lie-Nielsen 271 Router Plane to help flatten the cheek of the tenon.

My last few words of advice on making a mortise and tenon joint: make sure you measure tenon size based on the size of the mortise you end up with! If you base your tenon on the size you were originally intending from the beginning….it will likely not fit.

A successful mortise and tenon joint!

They fit into each other!

The whole time I was working on my mortise and tenon joints, I couldn’t help but thinking about Mortise & Tenon Magazine, and fully understanding the meaning behind the name of this incredible magazine! If you haven’t read this magazine, I strongly suggest you get a copy. They’re just about to release issue #3!