As these things tend to do, our floor finishing project dragged out over 3 weeks, rather than wrapping up in the two days I had (naively) imagined. But I will say, now that I’m standing on my beautiful wood floors at the end of the three weeks, I think it was worth it. I wrote about the first weekend in an earlier post. Here’s an update on the finished project and a few thoughts.

Before - no sander has touched this floor in years
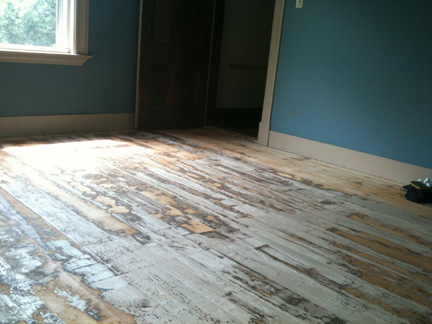
'Halfway' through, but more like 33% finished, once all the other steps were added in!

Really and truly finished. And literally, finished!
I would be remiss if I didn’t bring up the safety concerns that two of my friends and fellow Highland Woodworking columnists brought up. George (Terry) Chapman and Steven D. Johnson both emailed me soon after my first post went up on the blog and gave me a full, concerned description of what precautions I should be taking while sanding paint off the floor (or any surface) of an older house. I’ll summarize their advice here for any other beginning woodworker who is embarking on a similar project.
- First of all, get a lead testing kit and test all the layers of the paint you are taking off. In our case, the test showed up negative for lead on all layers, but I still took a bunch of precautions to make sure I wasn’t inhaling more of the sawdust than I needed to.
- Wear a respirator (preferably with highly rated filtration), eye protection (I started by improvising with swimming goggles, but will be picking up a real pair of safety glasses for future woodworking projects), and if you are using a power sander, you will want ear plugs as well. It wasn’t an issue for me, but Steve Johnson suggested that if you have a hard time getting the edges of the respirator to form a sure seal, use a little Vaseline around the edges. This step will help to catch any dust that tries to creep under your mask, as well as prevent chafing of your skin where the mask makes contact.
- Create positive air pressure in the room by putting a $20 box fan in the window (blowing out) and seal any open areas around it with plastic – a heavier quality plastic drop cloth and some duct tape will work fine. Close the door to the room while you sand. You will, in effect, be creating a pressure differential in the room where you are working (lower pressure in the work room, higher pressure in the rest of the house) and dust will stay primarily in the room you are working in.
- Dispose of the collected dust as hazardous waste – double bag it and check your local codes on whether it can be put out with regular household trash or if it needs to be disposed of differently.
- Clean up stringently and carefully. Vacuum and wipe down any of the sawdust on all surfaces (window screens were tricky but a damp rag did the trick.) Make sure to hit up all the surfaces outside the room too, such as hallways and adjacent rooms and, in some cases, all the way down the stairs and around the corner where you would never imagine the sawdust could reach.
A revelation: I have a hand tool for that!
While sanding the threshold piece for one of the closet doors (also known as the door’s saddle, I’ve heard – love the new lingo I’m picking up!) it occurred to us that perhaps planing these pieces would be more effective then sanding them. Maybe you’ve read the recent Fine Woodworking piece on Sander vs. Handplane – which is faster? Well I can tell you in this case, the handplane won full out. Part of it had to do with the wood we were working with – a lot of traffic and weathering had caused the different sections of the wood to be much higher or lower than the rest, and after an hour with the sander, it looked no different than when I started. But after pulling out my Lie-Nielsen 102 block plane as well as my Lie-Nielsen low angle jack plane, we had each of the saddles done in about 10 minutes of work each. And look at how nicely they turned out:
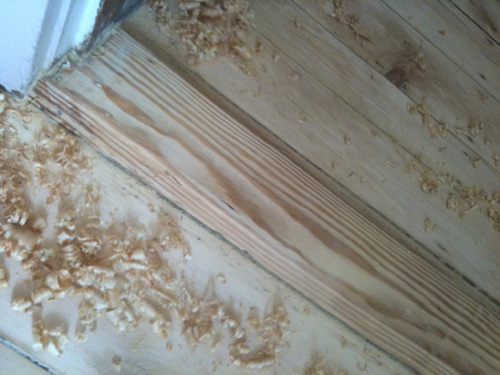
After two weekends of sawdust, plane shavings were a welcome sight.
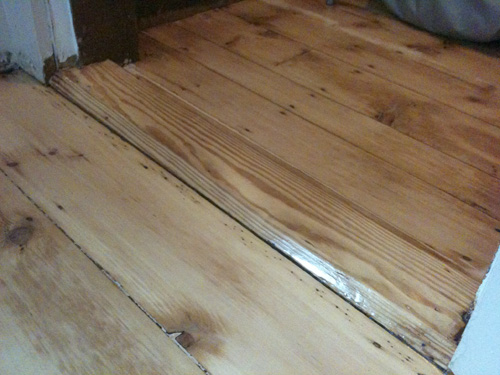
Now I'm going to have to plane all of our other weathered door thresholds so they look as good as this one does...
I’ll confess right here that I was almost embarrassed to admit I used a couple of planes for this, but mostly because the planes are so elegant and this seems like such indelicate work for them to be doing. But, Lee Laird from Lie-Nielsen did tell me that my planes would be ideal for almost any kind of smoothing work, and boy were they.
Once we were done with all the sanding, it was just a matter of applying a finish. We used three coats of a water-based clear semi-gloss finish, and sanded and wiped it down in between each coat (as well as allowing 3-4 hours for each coat to dry). After the last coat was applied we allowed a week for the finish to cure (what’s another week at this point?) before moving our furniture back in. Honestly, I am reluctant to move all of the furniture back in because more furniture = less gorgeous floor exposed to look at. And don’t even think about putting a rug over top of it, even if it is going to get down to 5 degrees in winter.
All in all, I think this whole experience has been a great introduction to what I have to look forward to with woodworking. And it taught me a few things: technically, I gained some knowledge about sanding, planing and finishing, and practically, I learned that you should give a project a good 500% overage on your time budget if you want to be safe. I also learned to appreciate the details of the work you are doing, and enjoy it for the work itself, and not just the finished project. The extra two and a half weeks made me think long and hard about that silver lining…
And now, it’s time to move on to the next project!
But first, a quick acknowledgment to George T. (Terry) Chapman and Steven D. Johnson, who expressed great concern and who I am eternally grateful to for their assistance and comments. These guys know their stuff – thank you for the suggestions!
 The newest edition of Wood News is now available for your reading pleasure.
