Kelley Bagby

I grew up around woodworking tools (see picture, age 4-5ish) but only recently started doing some of my own woodworking.

Aug 182011
 

This week we have a new video by Lee Tigner featured on our Youtube Channel. In his latest video, Lee documents the impressive feat of reclaiming 19th Century timbers that have been submerged in South Carolina low country swamps for more than 100 years.

Take a look at it here:

Lee’s videos have been featured on the Highland Woodworking Youtube channel several times now – we really appreciate the consideration he takes with his topics, and look forward to many videos to come. Embedded below are the other videos by Lee we have featured, for your entertainment:


Aug 152011
 

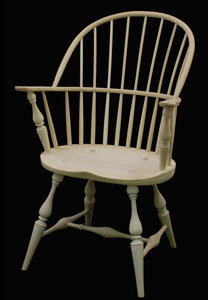
This is the fourth post in a series – to go back to the first entry in the series, click here. If you just want to go back to the most recent entry, click here.

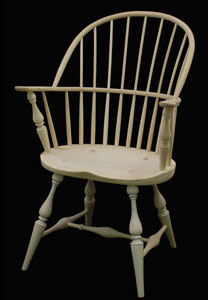
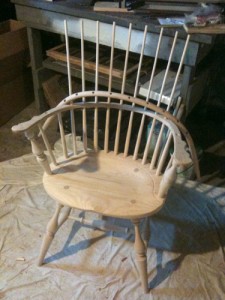
It’s been awhile since my last day in the shop with my windsor chair kit, so I take the opportunity to go back through the instructions from the beginning and make sure I did everything right. I might have missed some sanding somewhere – better to catch it now while only the base is assembled than after I get all the spindles glued in.

Amazingly enough, it appears that my workshop ADD has not kicked in yet and I’ve followed most of the steps up to this point pretty thoroughly. It is pretty satisfying reading back over the descriptions of everything I’ve finished. Makes me feel more accomplished and confident to face the rest of the build. I pull out the sander and go over a few surfaces again, just to make sure they are as perfect as they can be.

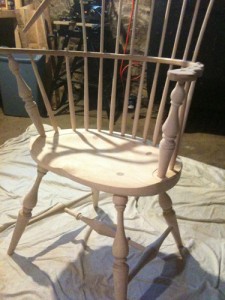
The chair is still sitting in the dry-fit state I left it in at the end of my previous work day, and as I slide the arm off the spindles, I try to do it such that all the dry-fit spindles will stay in their holes, to get a sense of how tight a fit it will be to slide the arm back on once the spindles are glued in. Doing such a complicated operation makes me very nervous, so I figure a practice run is a good idea. And I’m glad I tested it because it does look like it will be a challenge that I should prepare myself for. But that’s okay – I like challenges! What would be the point otherwise?

The next step is to finish sand and do any shaping and carving on the arm before attaching it. I know my limitations as a carver (i.e. many!), so I round the edges, make sure the hands match and feel comfortable to grip, and go over it with several grits of sand paper to make it as pleasant as possible for when I’m finally leaning back in my finished chair. I practiced some careful sanding around the pre-drilled spindle holes. I don’t want to be too aggressive with the sander or I may hit one of the holes at a bad angle and knock off a chip.

Next, the instructions tell me to dry fit all my spindles and the arm posts so I know where they go when gluing up. Even with the previous dry fit, I go ahead and do this again, if only so I can take them out in order and lay them on the ground in the positions they will eventually take in the chair. Hopefully this will ensure that I don’t end up with any extra pieces or anything in the wrong spot! And now to another big glue-up. Breathing easy, I get started. The arm posts go in easily. I wedge the bottom of the post from the other side, sand it down, flip the chair back over, and start gluing the spindles in.
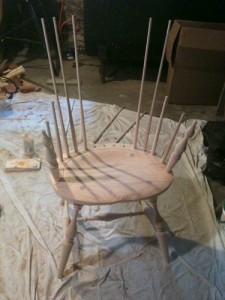
I firm up the first few spindles by hammering them in: after gluing the hole, I insert the spindle as far as it will go pushing it by hand, after which I hit it with a mallet a few times and then with a hammer (with a small block of wood sitting between the hammer strikes and the top of the spindle) until the spindle won’t move anymore. I take heart in the fact that I’ll be cutting the tops off of most if not all of the spindles once the bow is on, so if I damage the tops of a couple of them while trying to hammer them in, it’s not the end of the world. However, i do sense there must be a better way to do this, especially once I get to the longer spindles that don’t take as well to the mallet/hammer approach.

On the second long spindle I insert, I figure out a much more effective method: apply the glue to the spindle hole, then insert the spindle and twist it. As there is a little space in the hole, it seems willing to spin and sink down comfortably to the bottom of the hole. This is probably most effective because it is done before any of the glue has had a chance to dry, and I’m working with easier forces of friction than I was with my other methods. In fact, the glue seems to help reduce the friction while it is still wet. A good lesson learned for future shop projects requiring gluing into a tight fit!
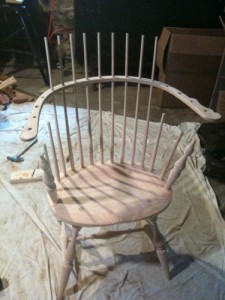
I am still experiencing some friction though, and most of that is taking its effect on my hands. By the time I am gluing in the second to last spindle, my hands are feeling the pain with every turn. Maybe I’ll try doing this with work gloves on next time…the wood does seem happier to be worked with finesse rather than brute force though, and I imagine this is a theme that carries through a lot of woodworking, and maybe what separates beginner woodworking from experience. Still, I’m not looking forward to installing that last spindle due to the minor wood burns I’ve accumulated on my hands – the only thing that keeps me working is that I know the glue is drying and it will only get harder as that happens! Turns out glue drying is the ultimate motivator for getting a job done, even if it hurts.

Perhaps this is where my idea of ‘woodworking training camp’ would be useful – my soft computer-based job hands are not equipped to be working this hard (and I know this isn’t even all that hard!) and some calluses sure would be useful right now.
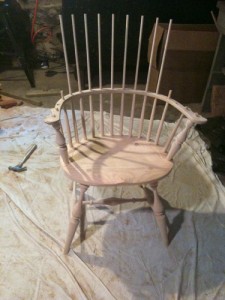
Once the last spindle is glued in, I give my hands a short break, because I am excitedly anticipating the next step: sliding the arm onto the chair! When I start this process, I hold my breath, thinking it will be a struggle, but it ends up working beautifully, and it is a moment of pure exhilaration! This seemed like a tenuous fit at best when I was doing the dry-fit, which probably contributed to my lack of motivation for getting back into the shop every day to finish this project. I was just sure it wouldn’t work!

I glue the arm post holes and the short spindle holes to hold the arm in place, then pull out the tape measure to check if the arm is resting at the right height. And it is here that I encounter a bit of stress, as once I have stretched out the arm to reach both arm posts and it is sitting low on all the spindles, the wood gets a lot less flexible. This makes the process of shifting the arm down the spindles a little more difficult, and right now it sits at about 9-1/2″ above the seat instead of the 8-3/4″ the instructions call for. Instead of my previous feeling of exhilaration, I am now overwhelmed with a sense of INeedToDoThisStepAsQuicklyAsPossible! (i.e. before the glue dries, of course!) My main fear is of breaking a spindle, or chipping a piece of the arm. Is it a bad sign that the main standard I have set for myself at this point is to not break this kit during its assembly? Maybe I should raise my expectations a bit.

In my panic to get the arm in the proper position before the glue freezes it in place, I return to my previous brute force methods and use the mallet and a piece of wood to hammer the arm down to the position called for in the instructions. When it is in position, I drill through the arm and center spindle and glue one of the supplied dowels in to support the arm position, then sand it down when the glue is dry so the dowel is barely visible.

I also wedge and sand the tops of the arm post and the short spindle that are sticking up through the arm. At this point I can carefully sit in the chair with my arms up on the armrests and pretend it is all done, but I know there is one major step left, and I’m going to leave this one to another day: installing the bow. This one is going to require a lot of focus, so I’m dedicating a whole day to it. Looking forward to it, albeit with quite a bit of nervousness!
This is the fourth post in a series – to read the next entry, click here. To go back to the first entry in the series, click here.

Aug 122011
 

Last month, Kreg McMahon taught a well-attended cabinet built-ins class at Highland. In the class, Kreg demonstrated all the construction steps of building a custom built-in right onto a wall, including design & planning, sheet good processing, joinery methods, adjustable shelf holes, design detail enhancements and face frame cabinet door construction.

Kreg is a very enthusiastic teacher!

As Kreg is a big fan of Festool, he posted several more pictures from the class on the Festool Owners Group – you can go check them out here, in the forum post where he discusses the success of his ‘road show’:

Kreg’s first road show post on the Festool Owner’s Group

A full gallery of Kreg’s class pictures

Interested in taking a class at Highland? We offer a large selection of topics, from chip carving to timber framing to woodturning to all kinds of finishing, and many project based classes where you can build a shaker table, a peppermill, a bookcase, a picture frame or even a windsor chair. Take a look at our 2011 class schedule and sign up today!

Aug 112011
 

Wow, we are almost halfway through August – when did that happen? If you are wondering where the summer went, and trying to think of some fun activities to do with your kids or grandkids in these last weeks of the season, here’s a great option:

Woodman Concept Toy Kits for kids include all the items you’ll need to build a colorful toy from start to finish, including pre-cut beech wood pieces, safe-for-kids acrylic paints, brushes, a kid-sized hammer, and the glue you’ll need to put it all together. The great project options include a farm set, a locomotive, a helicopter, two different airplanes (including a fighter jet!), a safari jeep, a quad rider and a sail boat.

Teach your kids some great woodworking skills this summer and build some toys they will have a good time playing with afterwards – check out these toy kits today!


Aug 082011
 

This is the third post in a series – to go back to the first entry in the series, click here. If you just want to go back to the most recent entry, click here.

Did I say yesterday was a sanding marathon? I think I was confused, and actually meant to save those words to describe today.

And while I’m mentioning words like ‘yesterday’ and ‘today’, I should clarify that these are casual words I’m using to distinguish the different days I’m writing about, but in no way are they connected to the real-life flow of time. I was originally planning to build this chair in a single week shop marathon, but it turns out that due to some traveling and a packed work schedule, I’m going to have to finish the chair in a series of shorter sprints. Which is probably better anyway, given my lack of endurance training in the workshop. Is it reasonable to think that you have to train for woodworking in the same way you do for a sport or athletic event?

I think it is, but before I stray too far on this tangent, I’m going to set it aside as a topic for another blog post down the road, and get back to assembling my Windsor Chair Kit.

So, the sanding. There was a lot of it to be done! Luckily I was armed with a Festool RO-90 that can make some pretty quick work of it, relatively speaking. The challenge as a beginner seems to be finding the balance between sanding thoroughly but also sanding carefully. Occasionally I found myself getting drawn into the lull of the sander and forgetting to keep it moving around the seat so it would sand evenly. I had the same problem while sanding the floors in my house last summer, and there is still a small divot (that only I can see) to show for it. I am trying to take a bit more care with this chair.

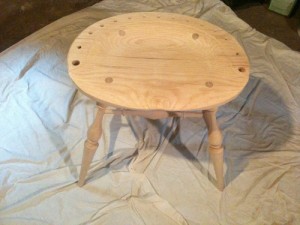
The instructions say to work down the legs that are currently sticking through the top of the seat first, as they are a much harder wood. So, I dutifully sanded the legs down until they were even with the rest of the scalloped part of the seat, and then proceeded to sand the rest of the seat top to remove the router lines. Once the whole seat was sanded down, I took a few minutes to admire the color contrast of the tops of the legs to the rest of the seat. And I made a mental note to pay attention to this in other windsor chairs I see in the future. It’s starting to feel like a chair is becoming much more than just a chair, despite Willie Nelson’s assertion to the contrary.

The next step after I decided I was done sanding was leveling the chair. And this is where my brain stopped working. This part confounded me. I read and re-read and re-re-read the instruction page and still didn’t quite understand what I was doing or why I was doing it. I think all the sanding I just finished really did numb my brain over. I did understand that having a level chair was important, but the process for measuring the height and figuring out how to cut off each leg still confused me. Luckily I have an engineering expert in the house, and after a short discussion, he was able to make it clear to me. Let’s see if I can pass on the favor for anyone else who is as confused as I was.

So you start by leveling across the seat, and stick the spare spindle wedges under each leg as needed to make the base sit level. This part made sense. What confused me was where it asks you to measure from the surface the chair is resting on (in this case my workbench) to the bottom of the level. I don’t know why, but even after taking this measurement several times, I couldn’t figure out why this is how one would measure the height of the seat. Something about measuring from the surface to the top of the chair, and including in that measurement things like the spare spindle wedges is what was really driving my confusion. My live-in engineering expert explained that, because the seat itself is an inconsistent height from front to back, the only way you can know for sure how much to cut off the legs to make the seat the correct height and level is to measure it from the seat (or the level sitting on the seat) to the floor, determine how much excess height you’ve got, and then trim that amount off from the legs themselves.

The next step in the instructions makes this much more clear – use a pencil laying flat on an appropriately sized chunk of wood to mark the cut on each of the legs. So with the wedges in place, I marked where each leg should be cut, and amazingly, when I actually finished trimming each leg to the line with my handsaw and sander, I put the chair down, and it sat perfectly level! I checked the height on the front and the back from the seat to the floor and it was correct. Incredible how that worked out exactly as the instructions said it would.

I imagine this leveling and measuring process must make quite a bit more sense to someone who has done a lot of woodworking, and it was a great lesson for me that I will surely use again in future projects. Being a visual learner sometimes makes it difficult to figure out conceptual steps like this one, but I’ll never get better at it if I don’t attempt it!

I also realize that my explanation above might still not make sense to someone who was in my shoes (i.e. about my experience level!) so if you would like me to break it down further, leave a comment and I’ll be happy to elaborate.

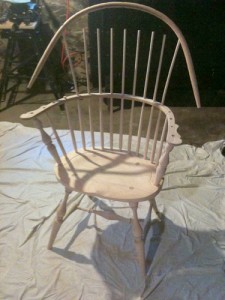
After the brain-bending leveling step was over and done with, I decided to try something fun and dryfit all the remaining parts, just so I could see how they would all go together. I put all the spindles in through the arm and into the back of the seat, and even was able to sort of put the bow in place. Then I took a seat and pretended that I had finished the rest of the chair. Of course, were I to lean back, the cold, hard truth of the work I have yet to do would become abundantly clear. So I stood up, took a picture, and headed upstairs, leaving the next step for another day.

And speaking of another day, my new timeline plan is to do approximately one update a week until I finish this chair. Each update will represent a few hours of work in the shop, and regarding this, I wanted to note specifically for beginners and inexperienced woodworkers:  don’t worry about how long it is taking me to finish this. I don’t believe the time I am taking to complete this chair is necessarily representative of how much time it would normally take, so please don’t be scared away!

I’d love to hear your thoughts in the comments! Has anyone else suffered from that same brain bending feeling I did while approaching a woodworking problem? How did you get through it? And what do you think about my idea of ‘training’ for woodworking? Is it something you build up strength for, in the same way you train for a running race or some other athletic event? And do you train your brain similarly, so those mindbending problems are little more than bumps in the road in the future?

Thanks for reading!


This is the third post in a series – to read the next entry, click here. To go back to the first entry in the series, click here.

Aug 042011
 

That’s right – the August 2011 edition of Wood News is out, and it’s another good one. This month, we’ve got a new column from our Down to Earth Woodworker, where he updates us on the progress of his new workshop, including installation of stairs to the second floor, a couple windows, and an inviting new door. Steve also takes some time to talk about deterioration of basic woodworking skills as well as show off his own MacGyver-esque skills when it comes to emergency sharpening.

We’ve also included a great article by one of our customers about strategies for coping with arthritis while woodworking, as well as some great new submissions to our Shop column, our Show Us Your Stuff column, and our brand new Carving column, this month featuring the work of Kari Hultman, aka The Village Carpenter. Maybe you’ve heard of her?

All this plus some great new products to check out, including a preview of Charles Brock’s new sculptured rocker DVD AND a new giveaway, this time featuring some great Rikon tools that would look fantastic in your shop.

So what are you waiting for? Go take a look at this month’s Wood News…right now!

Jul 262011
 

The following article appeared in the 4th issue of our new woodturning newsletter, The Highland Woodturner. If you are interested in receiving The Highland Woodturner every month, you can sign up here!

Turning Your Own Baseball Bat

By Jack Masten
North Creek, NY

What does a retired Industrial Arts Teacher give his 15 year old grandson for a gift? Seeing that he is the starting catcher on his high school baseball team, why not make him a baseball bat from Northern White Ash?


Materials and tools needed

  • Northern White Ash 3″ x 3″ x 36″ long
  • Lathe
  • Roughing gouge
  • Parting tool
  • Spindle Gouge
  • Skew
  • Band saw
  • Finishing Supplies
  • Caliper
  • Ruler
  • Pencil, paper, hardboard
  • One Grandson (pictured)

Click here to see how Jack turned his own baseball bat and learn how to do it yourself!