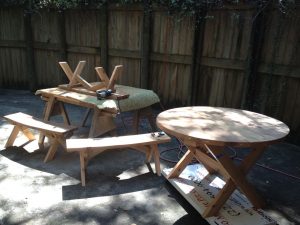
I absolutely love working with cedar, despite its lack of forgiveness. The ultimate beauty is worth the sacrifices and do-overs.

I absolutely love working with cedar, despite its lack of forgiveness. The ultimate beauty is worth the sacrifices and do-overs.
Welcome to “Tips From Sticks-In-The-Mud Woodshop.” I am a hobbyist who loves woodworking and writing for those who also love the craft. I have found some ways to accomplish tasks in the workshop that might be helpful to you, and I enjoy hearing your own problem-solving ideas. Please share them in the COMMENTS section of each tip. If, in the process, I can also make you laugh, I have achieved 100% of my goals.
No Southern-fried Southern boy wants to be called a Yankee, but we share the characteristics of shrewdness and thrift. Thus, each month I share a money-saving tip. It’s OK if you call me “cheap.”
In our home office I have a file labeled “Lifetime Warranty.” Believe it or not, you probably have a bunch of things with lifetime warranties. But, try collecting on the item’s failure without a receipt! Many companies who offer lifetime warranties are counting on consumers to fail to keep up with them.
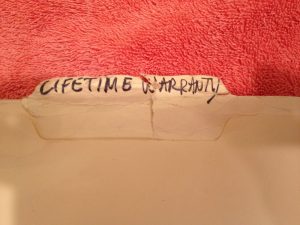
A folder labeled “LIFETIME WARRANTY” holds valuable proof-of-purchase of items whose warranties never expire.
For example, the treated-lumber boards on a fence at our office rotted. Most of the boards still had the familiar yellow tag on one end, which I thought would serve as “proof of purchase”and represent a valid claim to the lifetime guarantee. Not so. The company actually paid a lawyer to deny my claim in writing, referring to the clause in the guarantee that requires the original receipt. For what they paid that attorney they probably could have bought me the few boards I was asking to have replaced!
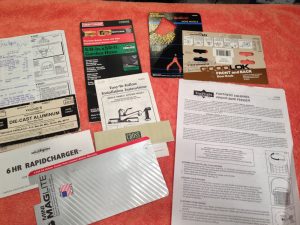
Get a load of the variety of items with never-ending warranties. Another advantage of this file is that it tickles the memory about what has a non-expiring warranty.
Craftsman lifetime warranties don’t require a receipt, under normal circumstances. However, I once took a 100-foot garden hose in for replacement. I’d had it nearly forever, but, lifetime is, well, lifetime. There would have been no problem, except that when this hose was made, the only place that said “Craftsman” was on the female end of the hose. You’re getting ahead of me, but, yes, that was where the defect was. The part that housed the female threads had been separated from the ferrule, and the only Craftsman insignia was on that part.
In spite of all the money I’ve spent with Sears and the Randolph generations before me who lived by the saying, “If Sears ain’t got it, we don’t need it,” they wouldn’t take my word that it was a Craftsman hose unless I had a receipt. Stubborn man that I am, I took my hose back to work and sulked.
Months went by.
One afternoon an assistant came into the clinic from her duty of raking leaves in the exercise yard. A dark, heavy, metallic object in hand, she said, “Dr. Randolph, is this anything important?”
“Only about $85 worth!” I replied. You guessed right again. It was the missing hose part, factory-engraved “Craftsman.”
The next day I was off to Sears, 100-foot hose in the back of the truck, female hose threads deep in my pocket. I had wire-brushed the tarnish from one facet so that “CRAFTSMAN” gleamed for everyone to see. I called the Sears personnel together who had doubted my veracity a few weeks before, produced the required proof, and was awarded my brand-new hose.
It’s different, though, from the previous 100-footer: every few inches along the hose it’s embossed “CRAFTSMAN.”
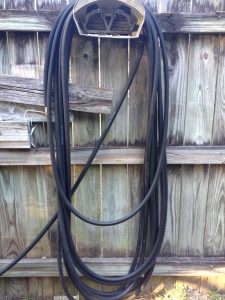
If the lawnmower ever chops this hose, there will be no problem collecting the Craftsman lifetime warranty, the print will be on every piece of hose!
Some other time, remind me to tell you how I got lifetime-warranty batteries from J. C. Penny Automotive for nearly 25 years.
Yep, those receipts are worth keeping.
Jim Randolph is a veterinarian in Long Beach, Mississippi. His earlier careers as lawn mower, dairy farmer, automobile mechanic, microwave communications electronics instructor and journeyman carpenter all influence his approach to woodworking. His favorite projects are furniture built for his wife, Brenda, and for their children and grandchildren. His and Brenda’s home, nicknamed Sticks-In-The-Mud, is built on pilings (sticks) near the wetlands (mud) on a bayou off Jourdan River. His shop is in the lower level of their home.Questions and comments on woodworking may be written below in the comments section. Questions about pet care should be directed to his blog on pet care, www.MyPetsDoctor.com. We regret that, because of high volume, not all inquiries can be answered personally.
Welcome to “Tips From Sticks-In-The-Mud Woodshop.” I am a hobbyist who loves woodworking and writing for those who also love the craft. I have found some ways to accomplish tasks in the workshop that might be helpful to you, and I enjoy hearing your own problem-solving ideas. Please share them in the COMMENTS section of each tip. If, in the process, I can also make you laugh, I have achieved 100% of my goals.
No one will argue this point: Steve Johnson, The Down-To-Earth Woodworker has a superior filing system for owners’ manuals and equipment paperwork. However, if you don’t have the space and/or energy (Steve drinks a LOT of coffee!), here is another shop organization filing system you can try.
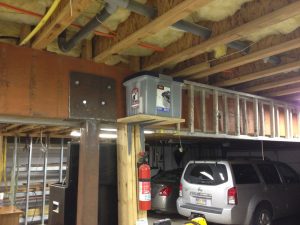
You will notice that the file box sits on a VERY high shelf. I had a system just like this before Katrina went directly over our Mississippi Gulf Coast home. Actually, I still had a system like this after Katrina, too, but it was more than a little soggy. Hopefully, if we ever flood again, it will now be above the water.
I start with a Rubbermaid or Sterilite hanging file box, some Pendaflex hanging file folders and a Magic Marker or other bold-writing pen. I like a bold pen for the labels so they’re easy to see if you’re using the box in a part of the shop where the light isn’t so good. The Pendaflex system comes with top labels.
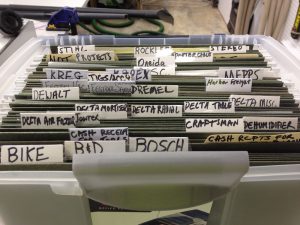
This is a Rubbermaid Simplifile Box Office, but I also have a Sterilite version, and like them both. Look for the utensil storage in the lid, it’s a handy place to put a pen, pencil and Magic Marker.
While there are many ways to organize the folders the important thing is to use a system that works the way your brain works, then be consistent.
Here’s an example: Bill Livolsi, head of the Maker’s Hustle Podcast, organizes his shop contents by “like things.” He puts tape and glue and labels all in the same box and labels it “Sticky.” Anything that’s sticky goes in that box. The point? There’s no use in copying my system if it won’t fire a synapse in your brain.
In my system one tool gets one folder. Folders are grouped together by brand. Thus, for Delta tools I have “Delta Air Filter,” “Delta Mortiser,” “Delta Radial Arm Saw” and “Delta Table Saw.” Behind that is the first exception. The DeWalt drill-driver and DeWalt planer share the same folder because their respective manuals are small.
What goes in the folders? I staple the original receipt to the very front of the owner’s manual. I put the date the tool entered service on the front, too. If there is a shipping list or invoice, that goes in. Separate warranty info? In it goes! Whatever paperwork is available gets saved. Sometimes I take the owner’s manual to the band saw and slice off the non-English languages. I can’t read them, and they just take up space I can’t spare. Just be sure to leave the binding so the book will stay intact.
There is a Miscellaneous folder. Some would put that folder in the front of the box because it’s not a brand, and there’s nothing wrong with that. For my brain, if alphabetical is good enough for “Bike” to “Stihl,” it’s good enough for Miscellaneous. Miscellaneous is for items with papers that don’t take up much space, like a tool that was purchased strapped to a card, and has no other documentation with it, especially if I have no other tools in that brand.
After I had a few Festools, the old box was nearly full; it made sense to give them their own box.

I got some Festool stickers at a Festool Road show in New Orleans. Now, it’s easy to tell which filing box is which.
You could use a full-size, 2- or 4-drawer standing metal or wooden filing cabinet. That wouldn’t work in my shop, though, because I can’t spare the floor space and it would be too hard to carry upstairs in the threat of another flood. Let us know about your system in the Comments section, below.
Jim Randolph is a veterinarian in Long Beach, Mississippi. His earlier careers as lawn mower, dairy farmer, automobile mechanic, microwave communications electronics instructor and journeyman carpenter all influence his approach to woodworking. His favorite projects are furniture built for his wife, Brenda, and for their children and grandchildren. His and Brenda’s home, nicknamed Sticks-In-The-Mud, is built on pilings (sticks) near the wetlands (mud) on a bayou off Jourdan River. His shop is in the lower level of their home.Questions and comments on woodworking may be written below in the comments section. Questions about pet care should be directed to his blog on pet care, www.MyPetsDoctor.com. We regret that, because of high volume, not all inquiries can be answered personally.
One of the earliest challenges I had in woodworking was deciding how to store sandpaper.
Disks for random orbit sanders come in boxes. The disks curl, like all sandpaper, but it’s OK because the platen flattens them back out again.
Sandpaper pre-attached to sanding blocks stays flat, but it seems to be such a wasteful way to purchase sandpaper. When the grit is used up you have a big chunk to put in a landfill. That just doesn’t feel good.
The day I realized 9″ x 11″ sandpaper would fit a gallon zipper-locking bag, I thought my sandpaper-storage problems were over forever.
That illusion lasted about 24 hours. Given South Mississippi’s heat and humidity, it’s a bit surprising it took that long to turn them into a bag of potato chips.
However, I stuck with that system for years. It was transparent, so I could see the size and color at a glance. It took up almost no room, well, except for the real estate on one wall. Also, that wall was close to where I most often sanded, making it easy to change grits or renew with a fresh sheet.
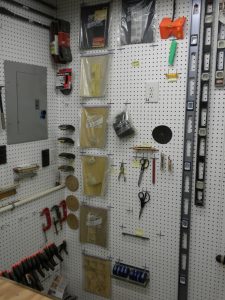
My first attempt at sandpaper storage. Mostly used zipper-locking bags filled with sandpaper bought in bulk with an effort to keep it from curling by holding it against the wall. In retrospect, I’m pretty sure screws would be required to keep sandpaper flat!
At one point I moved the Ziplocs to the rolling stand my oscillating spindle sander lives on. I already had sanding disks in the drawers, so it just made sense to have all of the sanding resources in one place.
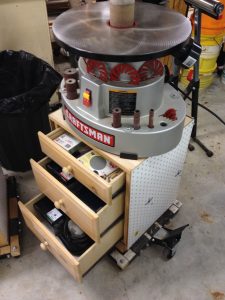
I made this stand from a “solid wood furniture” bedside table that Brenda bought. With a Universal Mobile Base under it, it’s an any-terrain, go-everywhere tool stand. Once, I even rolled it out to the deck to sand some treated lumber. Sanding disks are in the drawers, along with the Porter-Cable sander that went into semi-retirement after Festool sanders took over.
Still, I longed for a better means of storage, one that would achieve that Nirvana-state of perfect sandpaper flatness.
I was making a filing system for shop tools one day, when it hit me: “I can put sandpaper in these hanging folders, push them to the back of the box and they’ll stay perfect. And, with labels on top, it will be easy to see which folder holds the grit I’m looking for.”
That system kept the sandpaper flat longer than the Ziploc system.
About five minutes longer.
That’s when I realized it was going to take some real force to stop the curl.
Months went by, and I thought about alternatives a lot, but wasn’t coming up with any new ideas until I picked up a couple of drawers in someone’s trash one Friday morning. I didn’t know what I was going to do with them, but they were too big and too well-made to let go of. I’ve had been stepping over them for close to a year, but one day, sandpaper in hand, I looked down at the drawers and saw my solution: “A box, 9″ by 11″, with a heavy weight on top.”
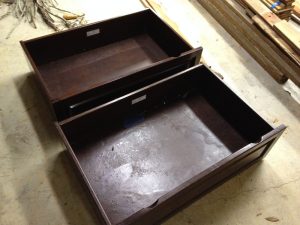
Unintended consequences with a good outcome: these so-far-useless, in-the-way drawers served to inspire me to a solution for keeping sandpaper flat!
Now, if I could just find a discarded drawer or a wooden box with those dimensions I’d be in business! Then, one Saturday morning, I walked past the solution, and it was right in my shop: an old milk crate. Even better, it had a handle for carrying!
The first iteration sent the sandpaper back to Ziploc bags. They were already labeled, so it was just a matter of transferring them out of their folders.
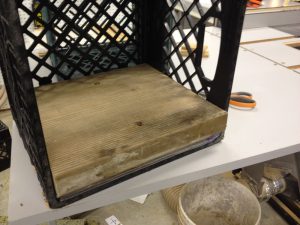
A milk crate is the perfect dimension for sandpaper sheets, and this concrete-form 2×12 cutoff is just the right amount of weight to hold the paper flat.
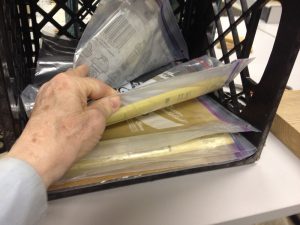
See how nice and flat this sandpaper is? Finally!
Which, by the way, should have told me something, because, months later it occurred to me to put them back in their “hanging” folders, which then gave me ready access to the grit I needed.
No, it’s not pretty, but the price was right. I found the milk crate in someone’s discarded trash. The 2×12 is left over from the construction of our home. Someday, I might sand and paint it. I might even make a proper wooden box with a handle.
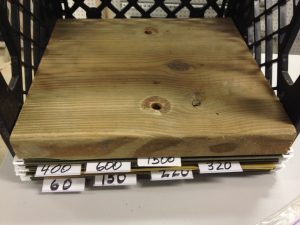
Going back to storing sandpaper in tabbed file folders allows me to quickly find the exact grit I’m looking for.
But, probably not. The sandpaper stays flat just fine like it is.
Jim Randolph is a veterinarian in Long Beach, Mississippi. His earlier careers as lawn mower, dairy farmer, automobile mechanic, microwave communications electronics instructor and journeyman carpenter all influence his approach to woodworking. His favorite projects are furniture built for his wife, Brenda, and for their children and grandchildren. His and Brenda’s home, nicknamed Sticks-In-The-Mud, is built on pilings (sticks) near the wetlands (mud) on a bayou off Jourdan River. His shop is in the lower level of their home.Questions and comments on woodworking may be written below in the comments section. Questions about pet care should be directed to his blog on pet care, www.MyPetsDoctor.com. We regret that, because of high volume, not all inquiries can be answered personally.
I recently started a log called, “What I learned during this project.” What was the inspiration for such a file?
Mistakes.
I suspect there are three kinds of woodworkers when it comes to mistakes: those who make a few, those who make a lot (yours truly) and liars.
I was assembling the stool pictured below when I realized that not only had I swapped the left and right legs, I had the middle panel in backwards, too.
At least the top was on top!
Fortunately, the legs’ thicknesses were within 1/64″ of each other. Still, I had cut the mortises using relative dimensioning, a slightly narrower mortise for the slightly thinner board. Since the whole leg was the tenon, there was no shoulder to cover imperfections in the mortises.
As Popeye once said, “All’s well that ends in the well.” While one leg was a little tight and the other was quite loose, you can see that there isn’t enough difference to even detect in the photo.
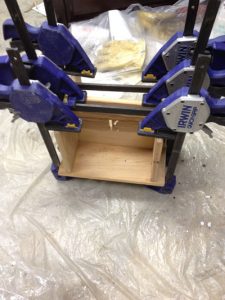
Distractions caused me to switch positions on these project components. Lesson learned.
By the time I realized my mistake glue and clamps had been mobilized, and there was no way I was going to try to take anything apart. In the heat and humidity of South Mississippi, chemical reactions happen very rapidly. While it may take hours before glue is cured, only seconds need pass to prevent repositioned parts from being reseated in their intended locations.
After the clamps were on, there was time for reflection: “How in the world did this happen?”
I believe I know.
A while back I wrote about watching television during mindless tasks like sanding. Now, I believe I’ve let that practice bleed over into duties that require more of my attention.
Here’s what really brought it home for me the very next day: I wheeled my hand truck across the garage floor toward the south wall. The hand truck hangs on the frame of the wood storage rack on that wall. The stench of mold from my late mother-in-law’s coffee table was heavy in my nose. Moisture in the storage unit had not been kind to its particle-board construction. The smell made me realize, “Wait, where am I going? I’m not headed to hang up the hand truck, I’m putting this moldy furniture in the trailer, and I just walked right past it!”
Listening to a podcast, I was paying so much attention to what the participants were saying that I totally spaced out on the simple task I was doing.
How much easier, then, to slip up and make a mistake on a project?
I’ve resolved to limit podcasts and videos to truly mindless tasks, like sanding.
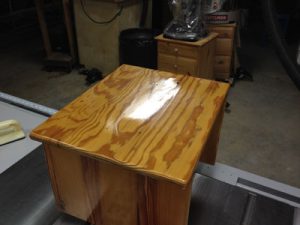
For 150-year-old pine this child’s stool project must be OK, as its recipient likes it.
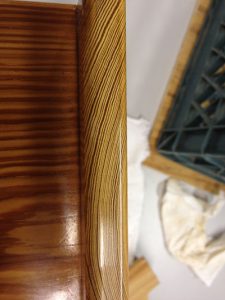
My favorite part of this old, old pine: the end grain finishes so beautifully.
Another resolution I made: Use painter’s tape to identify pieces. On this project pencil marks on the ends of tenons and inside mortises specified location and direction. Chalk on the large area of a panel denoted left and right. For me, the chalk rubbed off too easily. And, the pencil instructions were on parts that were hidden during dry as well as glue-up assembly. IDs written on 2″ pieces of tape will be nearly foolproof, helping to minimize mistakes.
We encourage your comments below. How do you avoid mistakes in your projects?
No Southern-fried Southern boy wants to be called a Yankee, but we share the characteristics of shrewdness and thrift. Thus, each month I share a money-saving tip. It’s OK if you call me “cheap.”
When a friend advised me to thin my Epifanes varnish 50% to 75%, my first thought was, “I don’t want to pour this expensive stuff into a measuring device and lose 10% of it.” The perfect solution was a Tostitos salsa jar.
Its volume is small enough to make tiny batches, big enough to do a small project and the mouth is wide enough for a 2½” brush. One doesn’t need a high degree of accuracy in dilution. Fill the jar half-full of varnish and fill it the rest of the way with mineral spirits and you’ve got 50:50. Or, close enough.
Perhaps its best characteristic is the rubber-sealed lid that allows one to shake the dickens out of the contents with no spilling.
The rubber seal, however, is a two-edged sword. That same rubber will soak up finish and cement the lid to the jar until the cows come home. I found out the hard way. Had to resort to my Mama’s technique of smacking the lid in the direction that would open it. The next time I doubled a small sheet of waxed paper over the mouth before closing the lid. No more sticking.
Of course, any jar with a lid can do the same thing, but one with a narrow mouth will require decanting the mixture into another vessel.
Be sure to label the jar so you know whether it contains matte or gloss varnish and the degree to which it was diluted.
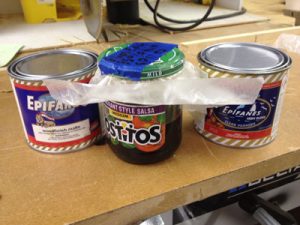
A salsa jar makes a good, splash-free, resealable finish-mixing container. A shallow jar like this can also be stirred with a credit-card ministrip.
Jim Randolph is a veterinarian in Long Beach, Mississippi. His earlier careers as lawn mower, dairy farmer, automobile mechanic, microwave communications electronics instructor and journeyman carpenter all influence his approach to woodworking. His favorite projects are furniture built for his wife, Brenda, and for their children and grandchildren. His and Brenda’s home, nicknamed Sticks-In-The-Mud, is built on pilings (sticks) near the wetlands (mud) on a bayou off Jourdan River. His shop is in the lower level of their home.Questions and comments on woodworking may be written below in the comments section. Questions about pet care should be directed to his blog on pet care, www.MyPetsDoctor.com. We regret that, because of high volume, not all inquiries can be answered personally.
Welcome to “Tips From Sticks-In-The-Mud Woodshop.” I am a hobbyist who loves woodworking and writing for those who also love the craft. I have found some ways to accomplish tasks in the workshop that might be helpful to you, and I enjoy hearing your own problem-solving ideas. Please share them in the COMMENTS section of each tip. If, in the process, I can also make you laugh, I have achieved 100% of my goals.
The last time one of our air conditioners had to be replaced, I asked the AC techs to save the old squirrel-cage fan for me. I wanted to make an exhaust fan for the shop, and I had two reasons:
First, I grew up in a time when almost every home had an attic fan to draw ventilation through its windows. As Americans became accustomed to lower humidity levels in our homes and businesses, such fans became relics.
We didn’t have an attic fan down on the farm; those were for rich city folks. We just had a window fan. Not just a box fan stuck in an open window, mind you, but a three-speed, reversible purpose-made window fan. The fan was in my bedroom. That was where I first learned the value of white noise to block out sleep-disturbing sounds.
Since I don’t have air conditioning in the shop, it was completely practical to ventilate a little.
The second reason I needed an exhaust fan is that I’ve been using CPES, Clear Penetrating Epoxy Sealer on a project, and the instructions include the notice, “WARNING: This product is inherently unsafe. It cannot be made safe. That’s why it works so well. We recommend the use of a respirator capable of filtering organic solvent fumes and vinyl gloves during application.” No, I didn’t use it in my garage with our living level right above. I did the bulk of the CPES work outdoors under our First Up tent. However, I did need a little coat on the bottom of the feet, and I’d already moved the entire project back indoors. The finish coat is Epifanes varnish. As many of you know, Epifanes is extremely thick, and some recommend cutting the first coat as much as 3:1 with mineral spirits. That’s a little too much fumes for me, so I took the old fan that had been sitting around the shop for a couple of years and finally made a movable window unit. Here’s how:
I started with an old piece of 3/4″ CDX plywood. You didn’t think I was going to spend actual money on this project, did you? Then, to find out how big the panel could be and still go in and out of a window, I did a series of measurements and test-fits. Clearly, the panel needs to fill the opening, lest breeze move around it, defeating its efforts to create air movement.
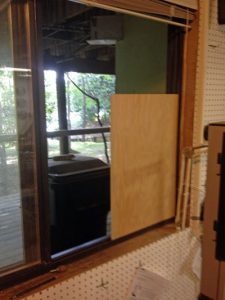
This window near the band saw was the best place to pull fumes from the finishing area. The ultimate plywood size would maximize sealing.
Step two was to determine the best position on the plywood and cut a hole for exhausted air flow.
Step three was to install studs to correspond to the bolt holes in the fan housing. I drilled relief depressions and epoxied the studs so they wouldn’t turn when installing the fan-holding nuts.
After cutting an initial small exhaust hole, I mounted the fan and enlarged the opening everywhere that would improve air flow but not remove important structural support.
Most everyone knows that latex paint rusts steel. Here’s a bonus tip this month: spray all exposed metal with a rusty-metal primer first, and allow it to dry thoroughly before coating with latex primer.
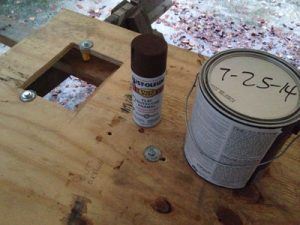
Rust-oleum Rusty Metal Primer will prevent metal parts from being corroded by latex paint, and it dries rapidly, but be sure it’s completely dry before starting to brush on latex primer.
Two coats of primer, then we’re ready for finish paint. This project called for a special-order paint job. I wanted it as inconspicuous as possible on the outside, so it’s the same dark brown as the storm shutters. Inside, I wanted it to reflect as much light as possible, so it’s white.
The edges? Two brown, two white. Of course.
Bonus tip two: I keep balloons in the shop (more on that in a future post), and they were perfect for protecting the threads of the studs from being painted.
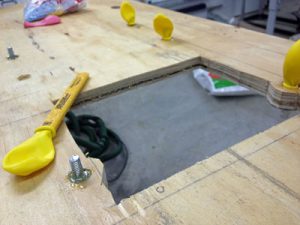
Don’t make fun of me because all of the balloons are yellow. It helps me to have inner peace! Some of you understand.)
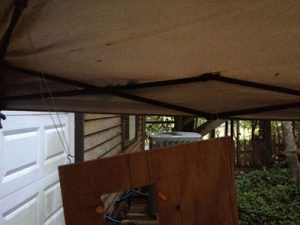
Hanging the plywood under the tent allows me to get to all surfaces for a quick paint job, rain or shine.
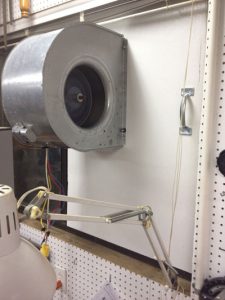
The final product has two big handles and can easily be picked up and inserted into the window opening. It takes 2:04 to install and 1:36 to remove.
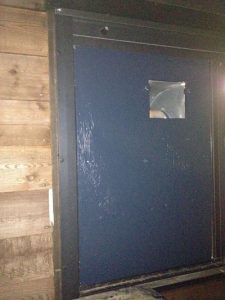
Even wired to the highest speed, it won’t create a hurricane, but there is plenty of air movement to evacuate fumes, and I can control where the air moves through the shop by which windows I open. For safety, the exhaust port needs a screen or grille.)
Word of caution: this fan is not spark-free and is not intended to be used in an environment where fumes might be combustible. Be safe!
Jim Randolph is a veterinarian in Long Beach, Mississippi. His earlier careers as lawn mower, dairy farmer, automobile mechanic, microwave communications electronics instructor and journeyman carpenter all influence his approach to woodworking. His favorite projects are furniture built for his wife, Brenda, and for their children and grandchildren. His and Brenda’s home, nicknamed Sticks-In-The-Mud, is built on pilings (sticks) near the wetlands (mud) on a bayou off Jourdan River. His shop is in the lower level of their home.Questions and comments on woodworking may be written below in the comments section. Questions about pet care should be directed to his blog on pet care, www.MyPetsDoctor.com. We regret that, because of high volume, not all inquiries can be answered personally.