Jim Randolph

Sep 052017
 

When Matt VanDerList of Matt’s Basement Workshop was on the Wood Talk Podcast, he used to get a lot of grief about his use of exotic woods. What constituted “exotic” for Matt? Oak. Pine. Poplar.

That was about as radical as Matt would get.

And, every time he would say something about using those wood species because he was happy with those species, I would give him a virtual fist pump!

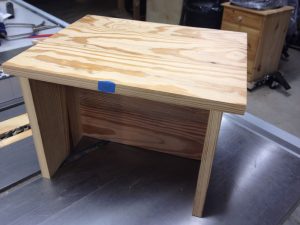
I’m an oak kind of guy, too. Red oak is my thing, although I’ve published reports on cedar and redwood projects before.

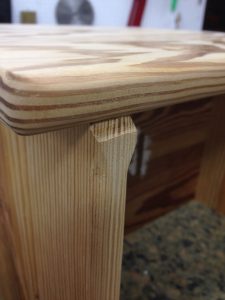
One of the challenges with oak, and other open-grained woods, is that PVA glue allowed to remain on the surface or, worse yet, soak in, will interfere with the appearance of most finishes. Everyone has his/her favorite technique for removing the glue, and we’d like to know which ones are Highland Woodworkers’ favorites.

Me? I usually go with wet rag wiping. Why? Because in the heat and humidity of deep South Mississippi, glue curing is unpredictable. While I like peeling skinned PVA, I find it difficult to get the timing right. Some days 15 minutes might be just right. Other days, come back in 30 minutes, lift the ribbon of uncured glue and a puddle ensues, spreading the mess even further (at which point I reach for the wet rag). As often as not, I forget to come back and check at 15 or 30 or 45 minutes, and then there’s a massive amount of glue to remove. For me, it’s easier to just clean it right away and be done with it.

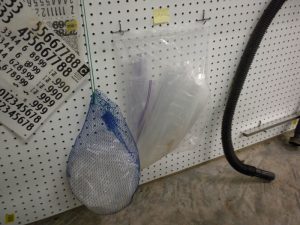
Of course, there are those times when wet-cleaning pushes glue into the grain, and you’re still dealing with finish interference. That’s when I pull out the toothbrush.

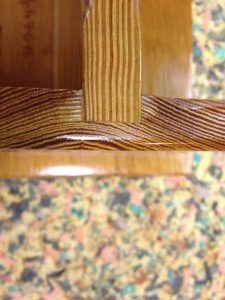
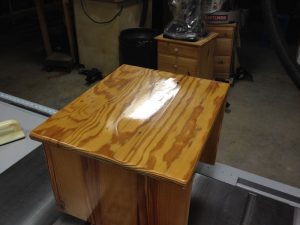
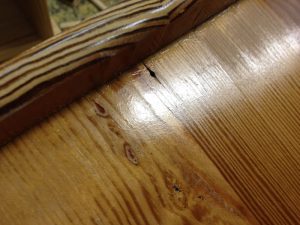
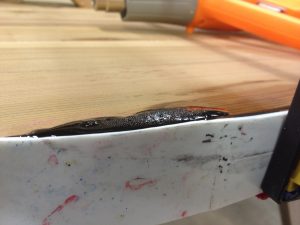
While this is pine, and not oak, it’s an excellent example of PVA glue interfering with the look of polyurethane finish.


Jim Randolph is a veterinarian in Long Beach, Mississippi. His earlier careers as lawn mower, dairy farmer, automobile mechanic, microwave communications electronics instructor and journeyman carpenter all influence his approach to woodworking. His favorite projects are furniture built for his wife, Brenda, and for their children and grandchildren. His and Brenda’s home, nicknamed Sticks-In-The-Mud, is built on pilings (sticks) near the wetlands (mud) on a bayou off Jourdan River. His shop is in the lower level of their home.Questions and comments on woodworking may be written below in the comments section. Questions about pet care should be directed to his blog on pet care, www.MyPetsDoctor.com. We regret that, because of high volume, not all inquiries can be answered personally.

Sep 042017
 

No Southern-fried Southern boy wants to be called a Yankee, but we share the characteristics of shrewdness and thrift. Thus, each month we include a money-saving tip. It’s OK if you call me “cheap.

In the August 2017 issue of Wood News Online, Steven Johnson talked about needing his dehumidifier most of the summer thanks to heavy Wisconsin rainfall. In previous years, his average summer humidity was 38%; this summer he’s had 56% on average, with a high of 70%.

It’s not just Wisconsin. The Sun Herald, our regional newspaper, published a story in early July saying the first six months of 2017 have been the second-hottest and the second-wettest on record.

Steve, we feel your pain.

Except that my shop rarely drops to 50% humidity, even in the winter. It hovers around 85% most of the year and can reach 90% during a winter rain.

Not long after we built our home, 22 years ago, I had a little rust problem on an old Craftsman contractor saw, so I decided to invest in a Kenmore dehumidifier.

This 70-quart unit is the great-great-great grandchild of the first dehumidifier we bought 20+ years ago.

My wife, Brenda, was along for that shopping trip, and, when the salesperson offered a service contract, my knee-jerk reaction was, “No.” Brenda asked me to consider the harsh conditions the unit would be operating under, and the included annual cleaning that would remove what would surely be mountains of aspirated sawdust. Her argument convinced me to go from “No” to “Yes, give me the 5-year contract.”

What a money-saver that investment has been!

I have scheduled annual maintenance every August, because that tends to be our driest summer month. I would have sent it in winter, but Sears repair has no means to simulate hot, wet conditions in their Nashville, TN, facility, so the performance evaluation would have been worthless. Instead, almost every year, I got a call, saying, “Hi, this is Sears, we evaluated your dehumidifier, found it beyond repair, and need you to come to the store to pick up a replacement at no charge.”

I haven’t kept track of how many “free” dehumidifiers I’ve gotten, but it’s a lot.

Like Steve, I started out emptying the built-in bucket, but three emptyings every 24 hours times 22 years … that’s a lot. To say nothing of the fact that I’m lucky to get part of one day a week in the shop.

My solution was to utilize the built-in drain connection on the dehumidifier.

When our house was new, and we were trying to get grass and ground cover to grow (now we’re trying to get it to stop!), I purchased ten cheap, half-inch garden hoses and covered the entire yard with sprinklers. Once the yard was established, I stored the hoses under the house. Protected from ultraviolet light, they have aged well.

I placed the dehumidifier as close to the center of the shop as I could, while also compromising on a position that’s out of the workflow and reasonably near the cast iron tools that need the most protection.

The nearest floor drain is 30 feet away, so I elected to go through the wall. I know, drilling a hole through one’s home isn’t ideal, but I couldn’t come up with a better solution. (A replacement model I received one year had a built-in pump that utilized a little 1/4″ hose, but that feature wasn’t offered on future models.) Step One was to drill the hole, high enough to miss the wall’s floor plate, but low enough for gravity to do its part, with a little bit of an angle, too.

A short length of PVC hose guides the garden hose through the wall …

… and outside, to go under the house.

That went well, and the back half of our house is on pilings, so it was easy to direct the hose under the house to drain into the wetlands.

Because all of this area is adjacent to wetlands, the environment doesn’t even notice the added water from the dehumidifier.

Granted, I had to buy the first dehumidifier, and I’ve had to renew the maintenance contract every five years, but Sears has provided all of the subsequent units. That’s an expense even a cheapskate can love!


Jim Randolph is a veterinarian in Long Beach, Mississippi. His earlier careers as lawn mower, dairy farmer, automobile mechanic, microwave communications electronics instructor and journeyman carpenter all influence his approach to woodworking. His favorite projects are furniture built for his wife, Brenda, and for their children and grandchildren. His and Brenda’s home, nicknamed Sticks-In-The-Mud, is built on pilings (sticks) near the wetlands (mud) on a bayou off Jourdan River. His shop is in the lower level of their home.Questions and comments on woodworking may be written below in the comments section. Questions about pet care should be directed to his blog on pet care, www.MyPetsDoctor.com. We regret that, because of high volume, not all inquiries can be answered personally.

Sep 012017
 

Welcome to “Tips From Sticks-In-The-Mud Woodshop.” I am a hobbyist who loves woodworking and writing for those who also love the craft. I have found some ways to accomplish tasks in the workshop that might be helpful to you, and I enjoy hearing your own problem-solving ideasPlease share them in the COMMENTS section of each tip.  If, in the process, I can also make you laugh, I have achieved 100% of my goals.

I suppose you could say I have two sanding centers. One holds the oscillating spindle sander and, because it has drawers, stores all of the disks for various Festool Sanders, too. It may be too fancy for some folks’ taste, being made from “real wood.”

This “sanding center” is on a universal wheeled base and can be rolled almost anyplace. The dust collection can connect to the cyclone or a shop vacuum, and the assortment of sanding disks can be close by wherever the sanding is taking place. If you’re constantly changing grits, that’s a really handy feature.

Mechanization is fine, as far as it goes. Sometimes, though, a job calls for hand sanding. Because we don’t want to be walking back and forth to our sandpaper supply, I made a sandpaper tote.

Our dear friends at the local Mexican restaurant saved some big steel cans for us. I spent about a million dollars (sorry, Steve) on Rust-OLeum rusty metal primer and Rust-OLeum flat black to coat the cans well before putting them to use. After all, they were going to be holding abrasives.

I attached the cans to a scrap piece of treated pine, and used the handle from an old Stihl string trimmer to complete the tote.

Fortunately, the old Stihl string trimmer handle was black, so the whole project was color-coordinated.

In the cans I put 1/3-sheet sanding blocks, scraps of sandpaper in Ziploc bags and a variety of other items that are used in sanding. Each can has a grit number assigned, with the appropriate Ziploc of scraps and a sanding block with that grit installed. The scraps all have their grit marked.

The cans are marked with Post-It Notes, just in case I want them to hold different grits in the future. One can holds a miscellany of sanding-related aids. For example, the rod can be slipped into the sanding block to lift the “lid” without ruining the ends of the paper. That way, they can go into the scrap Ziploc assigned to its grit, and not be wasted. Old scissors are handy for cutting sandpaper, or anything else that gets in your way. There’s an air blower for cleaning the paper when it clogs.


Jim Randolph is a veterinarian in Long Beach, Mississippi. His earlier careers as lawn mower, dairy farmer, automobile mechanic, microwave communications electronics instructor and journeyman carpenter all influence his approach to woodworking. His favorite projects are furniture built for his wife, Brenda, and for their children and grandchildren. His and Brenda’s home, nicknamed Sticks-In-The-Mud, is built on pilings (sticks) near the wetlands (mud) on a bayou off Jourdan River. His shop is in the lower level of their home.Questions and comments on woodworking may be written below in the comments section. Questions about pet care should be directed to his blog on pet care, www.MyPetsDoctor.com. We regret that, because of high volume, not all inquiries can be answered personally.

Aug 012017
 

I’m not known for being a wishy-washy person.
In fact, I’m often thought of as an all-or-nothing type.
But, on this matter, I like it one way sometimes, and sometimes the other way.
Edges

An argument could be made that the bedside table in the photo below should have had its edges rounded. Infrequently, I have bumped into the table on my side of the bed and, if I ever hit the corner, I know it’s going to hurt.

It just hasn’t happened yet.

I’m not sure what made me think in the beginning that I wanted these edges sharp, but, it came to be a challenge to keep them from becoming damaged. I think they came out nice, while, at the same time, I recognize the advantages of rounded and chamfered edges.

When I made a matching pair of tables from old, recycled oak flooring, I made up my mind early, I would try to maintain the squareness of all of the corners. After all, if something went bad where it showed, I could always whip out a router and a roundover bit.

On the other hand, I’ve never made a child’s stool without easing the edges. Just common sense, I’d say. Even if I liked the look of the acute junction, I wouldn’t jeopardize a kid’s safety for my taste.

Now that I think about it, sharp edges might not even be attractive in this stool.

Before rounding over these edges, this antique pine didn’t look like anything special, but …

…just a few minutes in the router table and a little sanding, and the grain flowing over the edge comes to life.

Then, the finish makes it shout.


Jim Randolph is a veterinarian in Long Beach, Mississippi. His earlier careers as lawn mower, dairy farmer, automobile mechanic, microwave communications electronics instructor and journeyman carpenter all influence his approach to woodworking. His favorite projects are furniture built for his wife, Brenda, and for their children and grandchildren. His and Brenda’s home, nicknamed Sticks-In-The-Mud, is built on pilings (sticks) near the wetlands (mud) on a bayou off Jourdan River. His shop is in the lower level of their home.Questions and comments on woodworking may be written below in the comments section. Questions about pet care should be directed to his blog on pet care, www.MyPetsDoctor.com. We regret that, because of high volume, not all inquiries can be answered personally.

Jul 312017
 

No Southern-fried Southern boy wants to be called a Yankee, but we share the characteristics of shrewdness and thrift. Thus, each month we include a money-saving tip. It’s OK if you call me “cheap.

A few days ago I was looking for a big piece of paper to trace an outline on. I didn’t have any paper that big, so I found some 8 x 10 advertising sheets that came with a product I’d ordered, taped them together and that worked fine. When I’m putting newspaper into a cage at work, if I run across the funny papers, I’m inclined to stop and read a few strips before moving on. When I picked up these sheets, I couldn’t help noticing that a company was selling sawdust for you to use to color your glue and epoxy.

Don’t fall for that! You’re already making sawdust just about every time you’re in the shop. All you have to do is collect it. Here’s how I do it.

First, I get a zipper-locking bag. No, not a brand new one! You do have a collection of free used bags, or bags that came in tools or parts that you saved, don’t you? Using a Magic Marker, label one red oak, one white pine, redwood, cedar, etc. Before you start collecting for your collection, vacuum the dust bag on your random orbit or vibrating sander. It doesn’t have to be sterile, you just don’t want a contrasting color of sawdust diluting your specimens.

Clean the bag on your sander thoroughly before beginning to collect for sanding dust to use for future coloring.

Sand normally.

Continuing to wear your dust mask, pour the sanding dust into the plastic bag.

Don’t be wasting your woodworking budget on Ziploc bags…find a used one in your collection.

The natural question arises, “Why not just take the dust from the vacuum or dust extractor?” That might work, if you use your dust extractor for nothing but sanding. But, if you’re like me, and you clean your shop with it, too, there is a high likelihood of “stuff” being in the mix you wouldn’t want on your project.

Be prepared to do some experimentation prior to using sanding dust on a project. For example, when you add this, or any other foreign material into epoxy, it changes the curing behavior, and you don’t want surprises on an actual project.

I like coloring epoxy, but there are challenges to determining how the coloring, the wood and the epoxy will all gang up against you. Some wood, for example, makes epoxy produce more bubbles. Some additives make the epoxy cure very rapidly.


Jim Randolph is a veterinarian in Long Beach, Mississippi. His earlier careers as lawn mower, dairy farmer, automobile mechanic, microwave communications electronics instructor and journeyman carpenter all influence his approach to woodworking. His favorite projects are furniture built for his wife, Brenda, and for their children and grandchildren. His and Brenda’s home, nicknamed Sticks-In-The-Mud, is built on pilings (sticks) near the wetlands (mud) on a bayou off Jourdan River. His shop is in the lower level of their home.Questions and comments on woodworking may be written below in the comments section. Questions about pet care should be directed to his blog on pet care, www.MyPetsDoctor.com. We regret that, because of high volume, not all inquiries can be answered personally.

Jul 302017
 

Welcome to “Tips From Sticks-In-The-Mud Woodshop.” I am a hobbyist who loves woodworking and writing for those who also love the craft. I have found some ways to accomplish tasks in the workshop that might be helpful to you, and I enjoy hearing your own problem-solving ideasPlease share them in the COMMENTS section of each tip.  If, in the process, I can also make you laugh, I have achieved 100% of my goals.

I got started making stools for grandbabies, and I just can’t stop. Now, I like making a variety of styles.

The last stool I made, for little Kessa, the legs were rather close to the edge of the top; wide for stability.

I ran into a problem when I began to sand that little area of the top’s underside, though, between the leg and the edge. I started out going back and forth, like one usually would when sanding, but there was just no way I could make my hand go straight enough not to cross the grain, even though the angle was very, very slight.

I discovered, though, that if I put the sandpaper up against the leg and simply pulled it away, in one direction, that the scratches were invisible, because they were perfectly in line with the grain of the wood.

Little scraps of saved sandpaper came in really handy for that job.

Vintage pine made a beautiful project, even if it was challenging to sand.

Funny story: I don’t always have paper handy to write myself notes, so I often dictate notes to myself on the iPhone. To keep myself from forgetting to write this tip, I dictated, “Sand in One Direction.” Why, I wondered, did iPhone capitalize One Direction? Then, I thought of our eldest granddaughter, who loves the boy band, and figured it out.


Jim Randolph is a veterinarian in Long Beach, Mississippi. His earlier careers as lawn mower, dairy farmer, automobile mechanic, microwave communications electronics instructor and journeyman carpenter all influence his approach to woodworking. His favorite projects are furniture built for his wife, Brenda, and for their children and grandchildren. His and Brenda’s home, nicknamed Sticks-In-The-Mud, is built on pilings (sticks) near the wetlands (mud) on a bayou off Jourdan River. His shop is in the lower level of their home.Questions and comments on woodworking may be written below in the comments section. Questions about pet care should be directed to his blog on pet care, www.MyPetsDoctor.com. We regret that, because of high volume, not all inquiries can be answered personally.

Jul 112017
 

No Southern-fried Southern boy wants to be called a Yankee, but we share the characteristics of shrewdness and thrift. Thus, each month we include a money-saving tip. It’s OK if you call me “cheap.

This little modification will make your portable air tank infinitely more useful: Where it originally came with an attached hose, turn the air-flow shutoff to the closed position, then remove the hose at the fitting, using a tubing wrench. Save the hose.

New, portable air tanks come with the air hose attached. You don’t want to ruin the hose or the fitting, so utilize a tubing wrench to disconnect the hose. Be sure the tank is empty, or the air valve is in the closed position, or both.

Using the appropriate-sized brass nipple, attach a female quick disconnect to the tank. Be sure to cover the threads with Teflon tape or pipe dope, because you don’t want any air being wasted through leaks.

A quick disconnect will allow you to attach any sort of air tool to your portable air tank.

Now, install a male quick disconnect on the supplied hose. You did save the hose, didn’t you?!

Congratulations, you just increased the utility and versatility of your little tank!


Jim Randolph is a veterinarian in Long Beach, Mississippi. His earlier careers as lawn mower, dairy farmer, automobile mechanic, microwave communications electronics instructor and journeyman carpenter all influence his approach to woodworking. His favorite projects are furniture built for his wife, Brenda, and for their children and grandchildren. His and Brenda’s home, nicknamed Sticks-In-The-Mud, is built on pilings (sticks) near the wetlands (mud) on a bayou off Jourdan River. His shop is in the lower level of their home.Questions and comments on woodworking may be written below in the comments section. Questions about pet care should be directed to his blog on pet care, www.MyPetsDoctor.com. We regret that, because of high volume, not all inquiries can be answered personally.