Jim Chrisawn

Hello my name is Jim Chrisawn and I am a fourth generation woodworker and have been a woodworker for the past 40 plus years. I have built everything from custom homes to custom furniture during this time. I do almost all of my woodwork with hand tools that by some standards are outdated, however there is something about using tools that have been handed down generation after generation that connects me to my past and brings those generations along with me into the present.

Feb 112015
 

veritassaws

A few months ago I received a nice commission on a couple pieces of furniture and decided I would do something I had never done before. I decided I would by myself three new dovetail or tenon saws. I have always bought used saws and reconditioned them to suit my task and purpose, but not this time. I began doing web and magazine research to determine which saws I would buy. While I had the money to buy a very expensive set of saws, something was keeping me from placing the order until I came across a blog somewhere that pointed me toward the Veritas saws with molded spines.

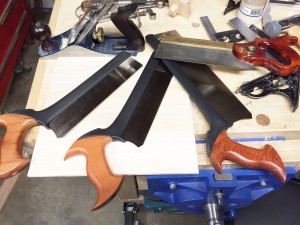
I looked them up and was I surprised by what I saw! These saws didn’t look anything like the ones I have in my saw till. While some people have a problem looking beyond tradition when it comes to hand woodworking tools I am not one of those people. Don’t get me wrong I love old tools, especially when they can be restored and put back to task. Here I was looking at the new saws and trying to decide if I liked what I saw and if what I saw would stand the test of time. Well there was only one way to find out. I ordered three of the Veritas saws:

Let me add at this point that the prices for these saws were all very reasonable and actually helped me take a chance on this different looking saw.

It took about a week for them to arrive. They came very well packaged and with great care instructions. After unpacking, I cleaned off the light oil coating left to protect them while stored. This was maybe the easiest cleanup of a new tool I have ever experienced. Now that they were cleaned up I took them to my shop and gave them a very thorough going over and test drive.

The fit and finish was very nice, but not over the top, great with very clean lines. The Bubinga handles felt really nice, however they were a bit lose on all three saws. This leads me to believe this was done on purpose. No problem a couple turns each couldn’t solve, and then they were snug and secure. The way they are attached makes it a simple matter to make custom handles if one desires to do so. More on the handles: They fit my hand very well and are at an almost perfect angle to the blade for great comfort sawing as well as being able to saw accurately. I have pretty standard sized hands as I wear an XL Glove and the handles are perfect for me.

The balance of all three of the saws is excellent! While the spine is molded it is infused with metal and has some decent weight but not so much as to affect the saws balance. The finish on the blade of each was was consistent and very well done. I have not noticed any flex in any of the saws that would indicate the molded-spine to be weak or inferior to metal backed saws.

Next, it was time to put them to task. I was making a few custom pieces from Hickory and felt this would be a good place to break them in. This brings me to a point that is quite important. As I began to put the saws to task they were not so smooth. I almost put them away for another day but decided to stay at it with them and it paid off. After a few hours all three saws settled down and became very smooth users. Thus be aware that they will need some break-in time.

To summarize this review: Now after a few months of almost daily use these three saws are top notch! I always reach for them first when a fine accurate saw is needed. Yes, I have some very expensive saws I have used for years and still use them along side these new generation saws. Will they stand the test of time? Only time will tell. So if you are in the market for a new dovetail/tenon saw these Veritas Saws just might be the way to go.

CLICK HERE to find out more information and purchase your own Veritas Saw.

Hello my name is Jim Chrisawn, I am a fourth generation woodworker and have been a woodworker for the past 40 plus years. During that time I have built everything from custom homes to custom furniture. I use a combination of machine and hand tool methods in my woodworking, however I lean more to the hand tool side of woodworking these days. Like a lot of other woodworkers I have accumulated a lot of tools over the years. According to my wife maybe a few to many, but that’s a different subject.

Dec 222014
 

zinsserI wanted to share a brief review and a few tips about using Zinsser Universal Sanding Sealer (100% wax free) Shellac. I know for some people finishing their beloved project can be a bit unsettling. I also know that Shellac is one of those “old” finishing options that gets passed over in favor of newer finishes. Now don’t get me wrong, I use a lot of different finishes, however shellac is my go to finish for most of my indoor wood projects. I have used different brands of shellac over the years, however I have found none better than the products from Zinsser. The quality from lot to lot is very good and I have never run into an issue when using their product from differing lots, even on the same project. So if you’re in the market for a finish for your new project you should give Zinsser shellac some careful consideration.

When using shellac, one thing I really like is that I never clean my brush. I just let it dry and when I am ready to go back to use it again I just let it soak in the shellac for five or ten minutes and it is ready to go. When applying shellac, make sure you work with some speed as it dries very fast. This is another reason I love using it. Once it dries, a light sanding with fine sandpaper or fine steel wool gets it ready for the next coat. One thing you also need to know about using shellac is that each coat dissolves the previous coat so that when you are finished you have one continuous coat of finish. When you put on your first coat it will be evident if you missed cleaning any glue off when getting ready to finish. This is another area where shellac gives you the advantage of easily removing the glue before the next coat.

As I mentioned above, shellac dries very fast so when you come back to re-coat be sure to move along and do not go back over it. If you made a mistake just let it dry and sand out the error. Once the desired number of coats (I usually do at least three) have been applied you are done.  You also have the option to wax the finish with a good quality furniture paste wax. Another really nice way to finish your project using shellac is to use 0000 steel wool to apply the paste furniture wax to give you a great satin finish.

Another use for shellac is as an undercoating for other stains and finishes, especially on woods that tend to be blotchy when finished. It is also a great undercoat for projects that will be painted when finished, and a great finish choice for restoration work.

image1 (1)

I built this clock for a lady and finished it using the shellac and methods as I have described in this article. So the next time you’re ready to finish a new product, consider using Zinsser shellac. Once you use it you will find that it is a very forgiving finish with many applications.

CLICK HERE to find out more about SealCoat Dewaxed Shellac Sealer and to buy your own.

Dec 112014
 

Hello my name is Jim Chrisawn and I am a fourth generation woodworker and have been a woodworker for the past 40 plus years. I have built everything from custom homes to custom furniture during this time.

I moved to Wyoming in 2012 and gave away my workbench to a dear friend and woodworker before moving so one of the first things that I needed to do after settling in was to build a new work bench. In this I needed a new vise. I love the old Record 52 vises and found that they were now very expensive and hard to come by as well. I did a lot of research and decided to try the Eclipse 10″ Quick Release Vise from Highland. I ordered the vise and it arrived promptly and well-packaged. Once unpacked, cleaned, and lubricated I set about installing it on my bench. The installation was straight forward, however be warned this is a heavy vise! Once installed I made vise jaw inserts out of some scrap hickory that I had in the shop.

image2
With the 3/4″ inserts installed, the vise opens to a generous 13-1/2″. The quick release lever tension is easily adjusted to suit the user and works great! The jaws close square and secure. Please note that the jaws close at the top first by design. I really like this design feature as it allows me to place the object in the vise, close it, and then make easy adjustments before fully tightening the vise. Once tightened the vise holds the work very securely and squarely. The vise comes with a metal dog that can be lifted into position and held securely with the thumb screw. This is a great addition if you installed bench dogs.

image1
I have found the vise a very well made copy of the Record 52D in almost every way. I have been using the vise now daily for nearly a year with no problems or issues. I did make a modification after reading one of Paul Sellers blogs by adding two o-rings to the ends of the tommy bar so it dampens the metal to metal noise you get using the vise. Overall, I am very pleased with this vise and feel it is a quality product even if it isn’t built in the USA.

CLICK HERE to learn more about the vise and purchase your own.