Amy Herschleb

Sep 142017
 

As an Atlanta resident and associate at Highland Woodworking, I have the privilege of meeting a lot of woodworker-customer-friends, both hobbyist and professional alike, who are making wonderful things. I’m pleased to introduce you to some of our fellow enthusiasts through this semi-regular dispatch of who’s who in the Highland community. -AH

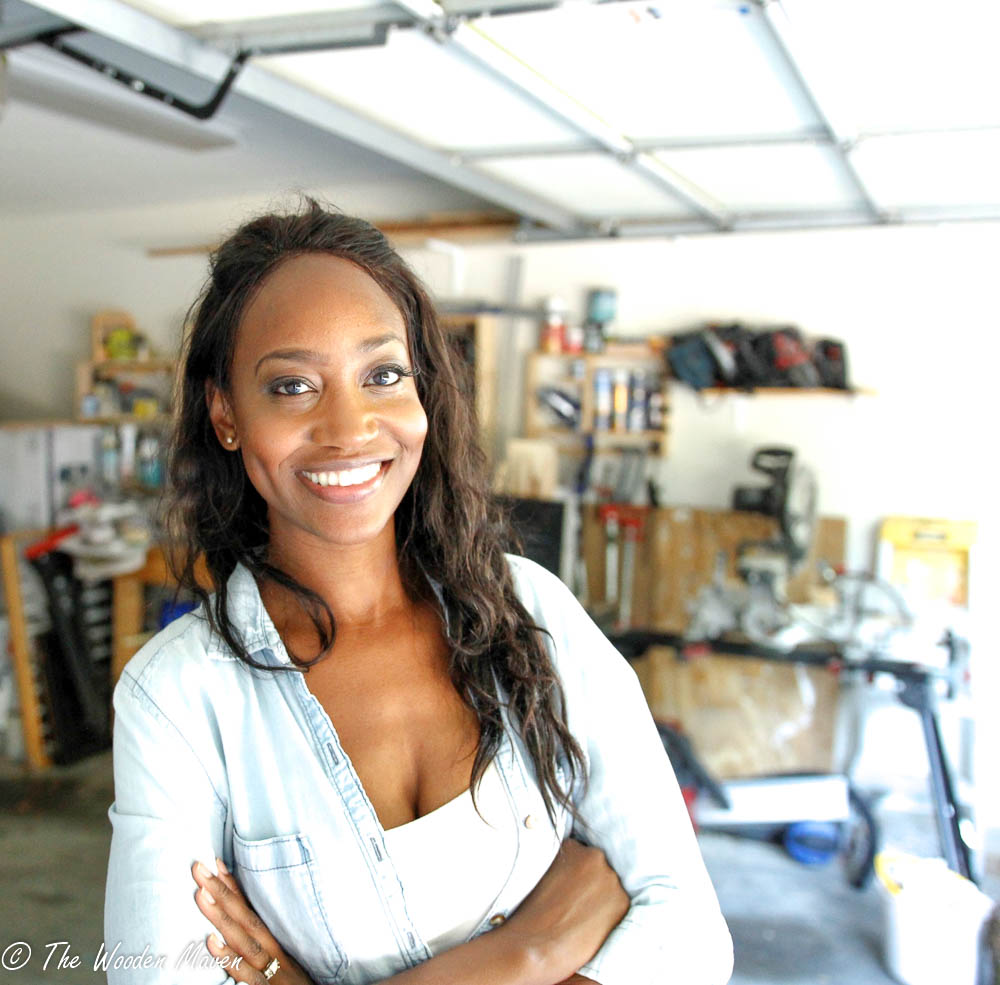
I met Char in the store when she was signing up for Sabiha Mujtaba’s Fundamentals of Woodworking class, a perennial favorite among woodworkers of all stripes. She told me about some of the projects she had finished for her family and fitting in her woodworking into an already full schedule. She invited me to check out her blog, the Wooden Maven, where I encountered not only an avid woodworker, but an inspiration.

How did you get into woodworking?
I began woodworking soon after undergrad when I moved into my first apartment. There was a platform bed I was interested in purchasing, at the time I could not afford it. I thought, perhaps I could build it. I didn’t have much direction to go on, YouTube was still in its developmental stage. After a few trips back to the furniture store to further inspect the bed, I drew my own plans, borrowed a drill, and purchased a ten dollar battery-powered screwdriver. It took me approximately three months to complete the bed… I believe that experience was the beginning of my love for building furniture. The gratification that came from producing something with my own hands was invigorating. That was back in 2003, since then I’ve been learning everything I can about my hobby-turned-passion.

What are you working on now?
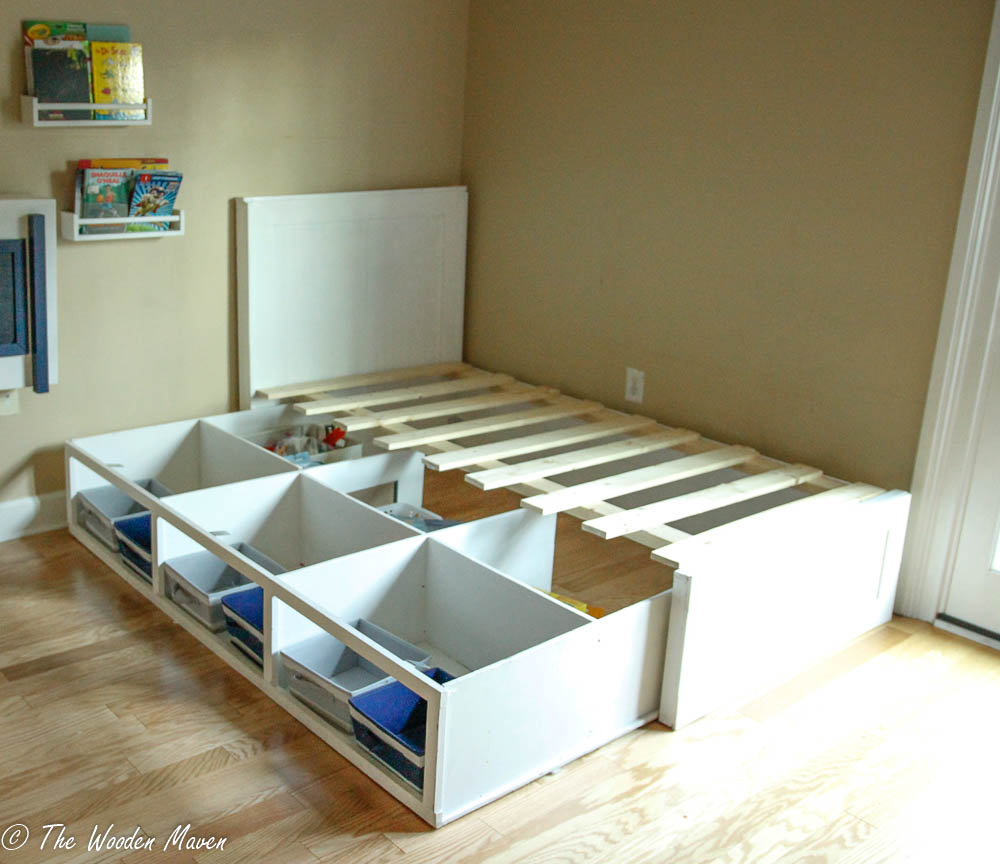
I always like to keep a few projects going at once. Right now I am working on two identical beds. They are twin beds that extend to king size beds. In addition [they have] accessible storage and non-accessible storage underneath. I needed the beds to serve several purposes: a place for my children, room for guests, toy storage, and of course storage for toys that shouldn’t be brought out every day. This was the largest project I constructed from only plywood. I used three-quarter inch PureBond plywood and a Kreg circular saw jig for rip and cross cuts. To give the bed a modern look, I used beadboard wallpaper on the headboard and footboard. To keep the beds as low as possible, I opted for furniture movers strategically placed on the bottom for easy gliding.

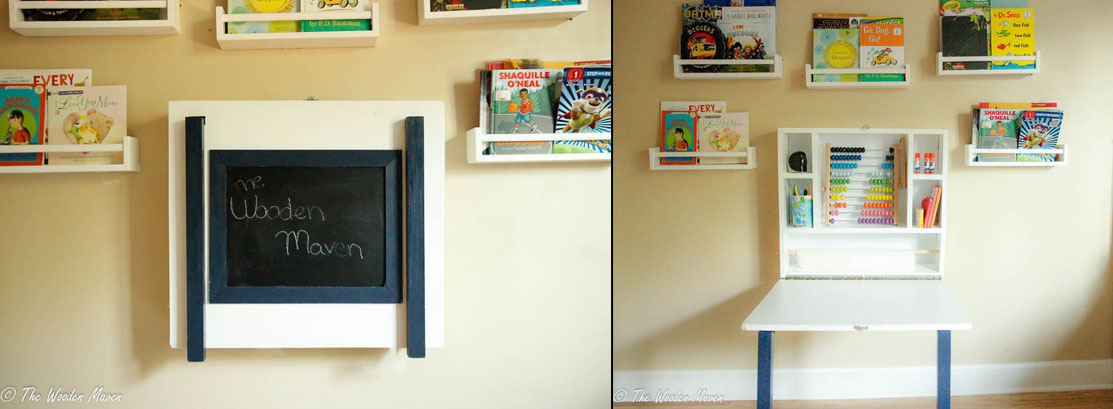
Along with the beds, I am putting the finishing touches on a matching children’s fold down desk. I chose pine for this project since it is lighter in weight and an affordable option for a place that will see a lot of use. The tabletop of the desk is covered with a thin polyethylene sheet to make for easy clean-up of paint, markers, or pencil marks. Both projects are paint sprayed with semi-gloss paint and a coat of polyacrylic, a touch of blue paint is used to accent the desk and tie in the bedding colors.

Lastly, I am working on a display case, in which I am using all the skills I learned in Sabiha’s woodworking fundamentals class. The case includes dadoes and the use of an ogee bit. It is made from oak and instead of glass to enclose any special object, I am using plexiglass. It will sit nicely on a mantle for many years to come.

What are your favorite tools? (do you prefer hand tools over power tools, or Japanese saws vs. Western style saws, or an old drill that has been passed down, or a brad nailer that’s just super handy)

I know that I truly enjoy woodworking because I fall in love with almost every new tool I experience. The versatility of each of them and the possibilities are all endless. I recently took a hand plane class at Highland after purchasing my first block plane. I never knew that hand tools could be so involved, it was an eye-opening experience. Hand tools allow you to interact with the wood and have a closeness to it, that you don’t get with power tools. I have to say that hand planes are my favorite for now.

Recently, I started turning and for someone who wants a finished project quickly, turning pens [is] the perfect answer. I do enjoy working with lathes and hope to get more involved in the world of woodturning.

For sentiment’s sake, I still have the little Black+Decker screwdriver I built my very first project with, it no longer works. It is a small reminder from whence I came and a nod to staying humble in my craft.


Amy received her MFA in Creative Writing from San Francisco State University. She is the staff writer at Highland Woodworking. In 2015 she and her dad co-founded Coywolf Woodworks, their hobby shop in North Florida.

Jun 302017
 
Making Things Work, Nancy R. Hiller (Putchamin Press, 2017)
Hilarious, engaging, and relatable, Hiller shares her philosophy of work with anecdotes drawn from her life about what constitutes success and the bumps in the road getting there. For some, her coarse language and tendency to call a tool a tool might irk a bad conscience. But for others, her dry wit and tenacity offer a refreshingly honest look at life and work on her own terms.


Good Clean Fun, Nick Offerman (Penguin, 2016)
We had the pleasure of seeing Offerman in the store at the outset of his book tour, and it was doubly a pleasure to read his book. It’s a conglomeration of fun, from projects to anecdotes to offbeat asides. Open it to any page and find something charming or inspirational. Learn to properly gauge your manliness. Build a stool. Have a cookout. Meditate on the process of giving new life to a once-living tree. Just don’t stop having a good time.


Woodland Craft, Ben Law (GMC Distribution, 2016)
An inspired glimpse at permaculture in the UK, Law’s book brings an ancient craft into modern day. From coppicing and woodland management to furniture and yurt building, this book spans from heritage to sustainability. If only there were such a book suited to North American conservation and resource management—dare to dream.


Where We Lived, Jack Larkin (Taunton Press, 2006)
Using data from the 1930s HABS (Historic American Buildings Survey) and first-hand journal entries and letters, Larkin looks at the oldest surviving habitations in the United States (mostly from the 1700 and 1800s) to discover how our colonizing ancestors lived. Bounded in this way by the progression of colonization, Cincinnati is considered “the West” and Florida does not exist. We delve into regional peculiarities, roads and commodes, the atrocity of slavery, and the effect of all, large and small, on the living arrangements of our unwashed if industrious ancestors. Fascinating.

Amy received her MFA in Creative Writing from San Francisco State University. She is the staff writer at Highland Woodworking. In 2015 she and her dad co-founded Coywolf Woodworks, their hobby shop in North Florida.

Mar 212017
 

Amy Herschleb attend Jim Dillon’s Hand Tool Sharpening class at Highland and came away with a new appreciation of working with sharp tools. In this series she will go into thoughtful detail on the 3 methods of sharpening Jim Dillon taught. Today she covers Method 3, The Tormek System.

CLICK HERE to read Part 3

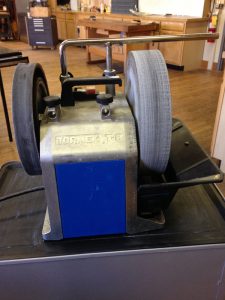
The final technique covered in class was the Tormek sharpening system, specifically we used the T-8. The slow speed wet grinder put a new edge on a worn-out tool while the leather wheel, with abrasive paste added, polished the tool. It can be fitted with a wide array of jigs for different shapes of blades from knives to scissors to chisels to axes. A plastic gauge that rests against the grinding stone sets the angle at which you are removing material. In class I watched the principles of the operation, then put them to good use while in Florida, putting a new edge on my kitchen knives (a couple of them older than me) that had probably never been sharpened in their entire culinary careers.

Even with a jig, the process demands a great deal of attention, especially with long knives or those that end in a curve. In this instance, the use of a Sharpie is vital. By coloring the cutting bevel black, you may see where and where you are not wasting material. Often areas near the heel or the tip are ground away unevenly, because so much depends on consistent movement of the blade across the stone. By paying attention to the markings, the sharpener may check for inconsistency along the edge.

The Tormek system allows you to grind either toward or away from the bevel, toward for most knives and away for small knives. I ground the knives toward the bevel with the universal tool rest set up horizontally, keeping one hand on the jig and the other on the handle, floating the blades back and forth, keeping the jig resting on the tool rest bar.

Due to the shape of the wheel, sharpening on a this surface creates a concave bevel, that is, a slightly hollow shape. This makes for a narrower sharpening edge, and faster sharpening times. Over time, the sharpening bevel gets bigger as the blade gets shorter from sharpening. When sharpening takes too long, it’s time to regrind.

Beyond a couple false starts involving a flying carving knife (no one was hurt) and a gouge I tried to put into the leather stropping wheel and the part where I ignored Jim’s advice to test a blade on the arm hairs instead of a thumb tip (I wasn’t sure I’d done that good a job. Spoiler–I had) this went off without a hitch. For once, my kitchen is equipped with a selection of sharp and useful knives, and vegetables and meat may be cut down efficiently without gratuitous sawing and strong-arming.

After experimenting (in a supervised environment and then free range) with a variety of methods, I am most satisfied with the Tormek system. Sandpaper, though easy to come by and easy to replace, is absolutely repulsive to me in a tactile sense and will destroy a manicure. Knowing where there are two Tormeks at my disposal certainly helps things, as I can re-grind worn down tools, then keep them sharp at home with a 1000/6000 wet stone.


Amy received her MFA in Creative Writing from San Francisco State University. She is the staff writer at Highland Woodworking. In 2015 she and her dad co-founded Coywolf Woodworks, their hobby shop in North Florida.

Mar 202017
 

Amy Herschleb attended Jim Dillon’s Hand Tool Sharpening class at Highland Woodworking and came away with a new appreciation of working with sharp tools. In this series she will go into thoughtful detail on the 3 methods of sharpening Jim Dillon taught. Today she covers Method 2, Using Waterstones.

CLICK HERE to read Part 2

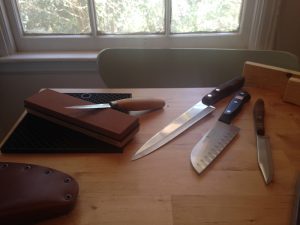
The next technique we practiced was with Japanese waterstones. Jim recommends Ian Kirby’s book Sharpening With Waterstones, which covers far more material than the title suggests. We began with 800 grit and worked up to 8000. A simple setup for waterstones Jim suggested was to make a wooden rack for the stone that will sit atop a 5-gallon bucket, so that the stone may be rinsed efficiently and the mess contained. In lieu of this in the classroom setting, after the initial soak, we wet ours constantly with a plastic squirt bottle and kept the stones on plastic sheeting.

The Japanese stone (specifically the 1000/6000 combination stone) is a great tool for touching up blades after using them, such as in the kitchen, before they can wear down far enough to warrant grinding a new edge.

Several weeks later, when I had the chance to visit the shop in Florida, I tried Dad’s DMT Duo-Sharp diamond stone. This one also had a plastic base and was reversible, with a grinding grit on one side and a polishing grit on the other (Dad’s is Fine/Extra-Fine). This I simply kept on the counter near the sink to rinse, then thoroughly dried the stone and base after use to protect the nickel from corrosion.

I found this technique to work very well, when I had the angle set by a guide. Without it, I managed to dull a kitchen knife significantly, simply by sharpening at the incorrect–or even an inconsistent–angle. This episode in the kitchen particularly emphasized the importance of careful setup and attention to detail in what risks being considered (by the uninitiated) the least vital of tasks. Meticulous preparation does indeed save you time down the road, as our buddy Young Thomas learned 178 years ago.

CLICK HERE to read Part 4 – Amy’s thoughts about the last of the three basic systems of sharpening she learned.


Amy received her MFA in Creative Writing from San Francisco State University. She is the staff writer at Highland Woodworking. In 2015 she and her dad co-founded Coywolf Woodworks, their hobby shop in North Florida.

Mar 172017
 

Amy Herschleb attend Jim Dillon’s Hand Tool Sharpening class at Highland and came away with a new appreciation of working with sharp tools. In this series she will go into thoughtful detail on the 3 methods of sharpening Jim Dillon taught. Today she covers Method 1, Sandpaper on Glass.

CLICK HERE to read Part 1

The first technique we learned was sandpaper on glass, the simplest and cheapest way to get started, though the most expensive method when used over time. The price of sandpaper eventually will exceed the short-term savings of a quick setup. We used wet-dry sandpaper (dry to minimize the mess in the workshop) beginning with 180 grit.

The first directive was to flatten the back of the blade. By drawing the blade at an angle in a single direction, a diagonal hatching is achieved. When the entire back is thus marked, we move on to 220 and change the angle of the blade so that the scratch marks now make a cross-hatching. When the back of the blade is entirely changed to this opposing diagonal, we move up a grade of sandpaper, and so on until we reached 2400 grit.

At 2400 we achieved a mirror-like surface, from which no further refinement was necessary. All that remained was to remove the burr left on the front of the blade by dragging the front of the edge, ever so lightly, against the sandpaper, then gently wiping the back on it. This technique, called “backing off”, prevents the edge from being crushed or otherwise deformed by being pushed against the burr, which is barely detectable.

For the beveled edge we tried two different honing guides: a side clamp honing guide and the Veritas MK II standard honing guide. These guides support the blade at a consistent angle against the sharpening medium and require a simple measurement to set up (side clamp) or have predetermined settings (Veritas). Chris Schwarz recommends sharpening everything to 35° in his blog, Jim Dillon 30°, and both have made a wooden gauge set to their angle of choice.

CLICK HERE to read Part 3 – Amy’s thoughts about the second of the three basic systems of sharpening she learned.


Amy received her MFA in Creative Writing from San Francisco State University. She is the staff writer at Highland Woodworking. In 2015 she and her dad co-founded Coywolf Woodworks, their hobby shop in North Florida.

Mar 162017
 

With the constant jokes circulating the woodworking workplace, there ought to be an award for who gets to be “the sharpest tool in the shed.” And as a newcomer to the field, until lately I would rank a non-starter.

I have been catching up on my reading, and being drawn to the attractively-bound volume, recently picked up The Joiner and Cabinet Maker, reissued and expanded by Lost Art Press. It contains not only the original 1839 text, but also an historical analysis of the techniques and tools, and then the process of building the three projects contained in the text by the apprentice cabinet maker “Young Thomas.” In one passage, the young apprentice is tasked with making a packing box, and finds the tools common to the apprentices to be in poor shape, befouled by shavings, edges dulled and dinged by nails, and the hone dry and hollowed. Instead of regrinding all three planes he needs, he is helped by his journeyman friend Robert, who lends him a hone to sharpen one plane and a second plane of his own to complete the commission. The protagonist immediately recognizes the necessity of beginning a task with tools prepared to do their job, rather than risking the outcome with poorly cared for tools.

I am not the person to teach you to sharpen. I am perhaps more an object lesson for the maxim “anyone may learn to sharpen,” just as Katy, age 8, is in Schwarz’s reworking of the Joiner and Cabinet Maker. Katy can sharpen, I can sharpen, you can sharpen.

Unlike Katy, I spend my childhood rigorously sheltered from the shop where straightforward carpentry and house-building occurred, and sharp objects in general. At the age of 13, my grandad gifted me a buck knife, I imagine, to the horror of my parents. But I grew up in the grip of that horror, and never did anything interesting with the knife, or anything else sharp, beyond slicing open my knuckle and never telling anyone (… oh).

And so I have carried on into adulthood. I never attempted nor considered it within the realm of possibility that I could sharpen until recently, when I took Jim Dillon’s sharpening class.

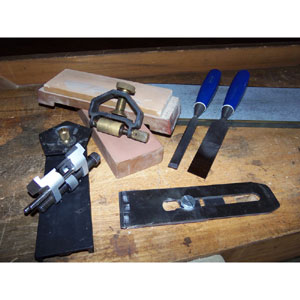
As I was not in the habit of bringing an assortment of tools to work every day, I chose a couple bench chisels from our workshop that needed a little TLC (tender loving care, not the 90s girl group. Though woodworking would definitely benefit from an infusion of feminist R&B).

Jim’s philosophy on sharpening grew out of taking classes with Drew Langsner at Country Workshops (or, we could say, was honed by). Langsner proved to be so particular in his sharpening that he would prepare all the tools himself before the class began, but when asked about the angle of a particular tool would answer, “oh… about 30 degrees.” Jim’s takeaway was that “sharpness is crucial, and the way you get there matters, but the precise angle (within a certain range) isn’t nearly important as the edge formed by two highly polished surfaces intersecting.”

In Jim’s class we covered three basic systems of sharpening, from low-tech to high-tech, on which I’ll elaborate: sandpaper, water stones, and the Tormek grinder. I had the opportunity to both learn about these in the classroom, and later, to try them out in the wild, unsupervised and at my own peril. The good news is everyone survived. The better news is that my forays into woodworking are safer and more effective because of learning this vital skill.

CLICK HERE to read Part 2 – Amy’s thoughts about the first of the three basic systems of sharpening she learned.


Amy received her MFA in Creative Writing from San Francisco State University. She is the staff writer at Highland Woodworking. In 2015 she and her dad co-founded Coywolf Woodworks, their hobby shop in North Florida.

Jan 022017
 

As a beginner woodworker, I have accomplished few enough things that I have a staggering amount to discover in any direction I turn. The reasons I was drawn to the craft in the first place included the joy of making things with my hands, a wish to share a hobby with my dad, and an all-encompassing love of trees (climbing trees, pecan pie, fires, writing paper, et al).

With these in mind, I’ve come up with a few resolutions for the New Year:

  1. Practice the skills I’ve learned: dovetails, sharpening, planing, sanding
  2. Keep learning new skills and writing about them: carving (the Ogham alphabet, a spoon), mortise & tenon
  3. Finish projects I’ve already committed to: block plane, pencil box, silk screen frames, a loft for the puppy, a carved spoon wedding present (I have a year for this, right?)
  4. Continue to build a thoughtful hand tool home shop based on the principles of The Minimalist Woodworker, KonMari, and Malta Kano.