

I have been hearing about Joseph Moxon and his book Mechanick Exercises for several years now. Christopher Schwarz of Lost Art Press writes about Moxon all the time and was able to find some details of the Moxon vise in Andre Roubo’s L’art du Menuisier, including a detailed drawing at Plate 280 of a twin screw wide clamping vise.
Over the years there have been several iterations of the Moxon vise. Benchcrafted in particular has a wonderful version of the vise which includes screws and hand wheels. Highland sells the hardware and you furnish the lumber. Lake Erie Toolworks offers another version through Highland and their version comes with the lumber included.
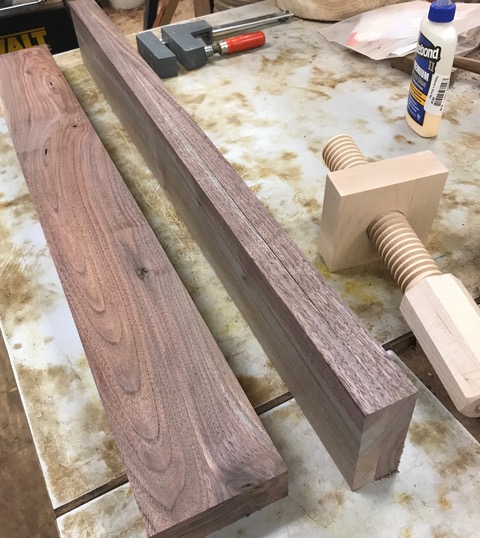
A new kit by Acer-Ferrous Toolworks just came on the scene at only $99.99. I got a kit from Highland to put together and give you my opinion. Included in the kit are two wooden screws and two wooden nuts made from lovely hard maple and beautifully machined with wooden threads. You will have to furnish your own wood for the jaws, recommended at 4 inches wide and 1-1/2 inches thick. The length can be whatever you want it to be depending on what kind of work you plan on doing. The instructions recommend 32 inches long which should give you about 24 inches or so of clamping room between the screws.
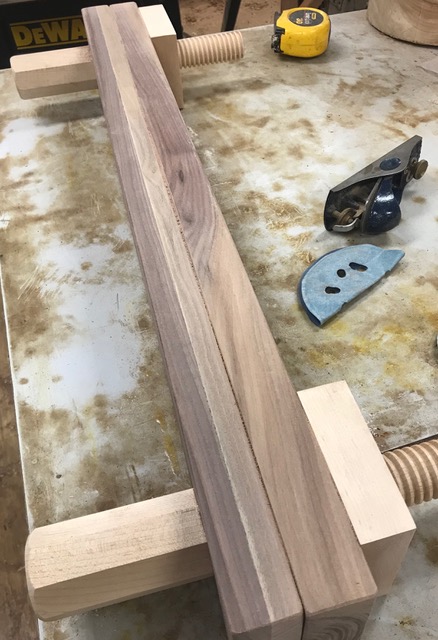
I have had some rough sawn walnut drying in my basement for several years, so I pulled out some of it to make the jaws. I only had enough inch and a half material for one jaw so I glued up two thinner pieces to make the other. I milled them both down to the dimensions recommended on the plans and then set out the holes for drilling on my drill press. As recommended, I used a 1-1/2 inch spade bit which moved right through the walnut jaws. It is critical to have the holes perpendicular to the face of the jaws, so the drill press is the best way to go. Once the holes were drilled, the next task was to glue the wooded nuts to the back of the rear jaw. The trick is to get them in exactly the right spot so they line up with the screw holes in the jaws and let the screws run true. The way to line the screws with the rear jaw holes is to wrap the threads with a shim to keep them centered. The instructions recommend cardboard from a cereal box, though they did not say what brand you had to use. I only had Honey Nut Cheerios and since I wasn’t sure that would work, I found some thin cardboard in the shop.
I wrapped the threads with the cardboard and added painter’s tape to get close to the diameter needed to slide snugly through the drilled hole in the rear jaw. By setting the nut in place on the outside and turning the screw tight through both jaws, I was able to clamp the nut to the outside of the rear jaw while the cardboard shim centered the screw in the rear jaw hole. When I was sure it was all in the right place, I loosened the nut and spread some glue on it, carefully avoiding the threads so it was not one big piece of expensive fire wood. When the glue dried, I screwed the vise apart, saving the tape and cardboard, and then put the other nut on and glued it the same way.
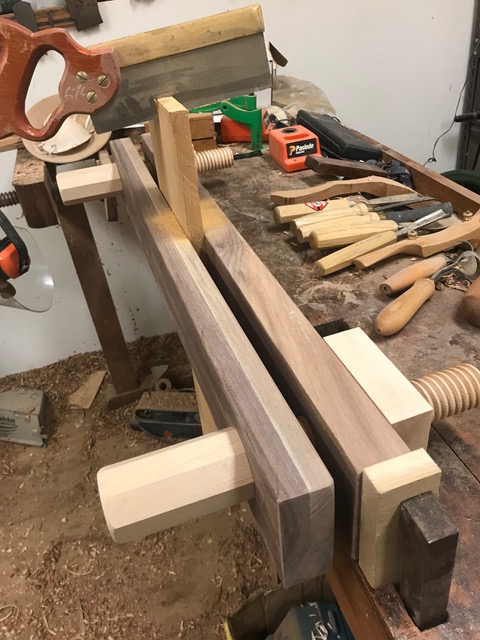
After the glue was dry, I put the whole thing together and checked it out. I realized I had made the jaws slightly shorter than the nuts, so I planed and sanded all the pieces to the same height. I broke all the sharp edges on both jaws to make it pleasing to the touch and it was ready to try out.
When mounted on my bench it certainly works as advertised. Clamping pressure is strong with very little effort. The increase in working bench height due to the height of the jaws is very pleasant when you are trying to do any kind of cuts on the end of a board. Obviously, this thing lives for making dovetails on the end of long wide boards like a blanket chest or a tool chest. Anything up to about 24 inches wide and maybe 40 inches long would work without any problem. The whole thing is very sturdy and easy to use.
If I were to make another one of these, (and you can look for this one at the store in the next few days if you want to try it out), I would probably make two changes. While looking over the literature to write this article, I saw where some recommend dropping the bottom edge of the front jaw say half an inch below the rear jaw. That way, the rear jaw sits on top of the bench, and the front jaw is used to align the vise to the front face of the bench. As built, any board clamped into the vise aligns it to the bench, a solution which works nicely for small boards but would be awkward for larger boards.
The second change would likely be a small clamping piece attached to the rear of the back jaw. If you notice in the photo above, my bench dogs are set in from the edge of the bench just a little too far to let the bench dogs grab the vise directly. If the vise had a clamping piece or was mounted on a flat base that extended onto the bench, then the bench dogs could grab, or two hold downs would catch. In addition, if the front jaw were made shorter than the back jaw, clamping would be easier.
Several articles I saw recommend making a beveled top on the front jaw, so if you are making blind dovetails and need to tilt your saw to the ceiling to keep from cutting the face of the finished dovetail piece, it could be more easily done. I think it would be easier to simply raise the workpiece.
I have not put finish on the vise yet, though I think I will do so. Several articles recommended not finishing the clamping faces to make it easier to hold the workpiece.
All in all, a good piece of equipment. With a little adaptation to your particular workbench, and if you do the kind of work this vise lends itself to, then the Acer Ferrous Moxon Vise Kit is well worth the price. Stop by the store and get your hands on it and see how you like it.
could you screw the nuts to the back jaw instead of gluing them?
Thanks.
Actually, Charlie, you could do that. In fact, that is how I clamped them in place for the glue to dry when I did attach them to the back. I think most people like having all the pieces together and just being able to slap it on the bench and go to work instead of having to gather up parts. The other issue, though minor, was that the holes did not line up precisely if I swapped it end for end. I ended up putting a carpenter’s triangle marker on the bottom in case someone took it apart and had trouble getting back together. i think this one is likely the best value of the ones available from Highland.
Thanks for reading.
In the original drawing in Moxon’s book, which I believe he plagiarized from another source, there are actually two versions versions of his vise or clamp. One has the bar with the nuts on it as the fixed part with the front bar moving. The other has the front bar fixed, with the back bar with the nuts moving. Both are useful in different circumstances.
I find it laughable that every tutorial in which a “hand tool” jig, work-holding device, or aid is to be constructed, uses power tools.
The shooting board tutorial has the “builder” cutting plywood down on his table saw to ensure a straight edge. Next he uses his drill press to ensure that the holes for fastening the fence are truly plumb.
Same with this bit of writing — don’t you get it? The guy who wants an old school vise, with which to do hand dovetails, may well not have any power tools.
The people who write such drivel are typically not woodworkers, but rather machine operators, who want to put a dainty toe in the hand tool pool, but have no hand tool skills.