

Amy Herschleb attend Jim Dillon’s Hand Tool Sharpening class at Highland and came away with a new appreciation of working with sharp tools. In this series she will go into thoughtful detail on the 3 methods of sharpening Jim Dillon taught. Today she covers Method 3, The Tormek System.
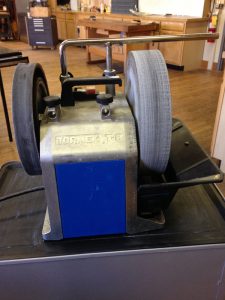 The final technique covered in class was the Tormek sharpening system, specifically we used the T-8. The slow speed wet grinder put a new edge on a worn-out tool while the leather wheel, with abrasive paste added, polished the tool. It can be fitted with a wide array of jigs for different shapes of blades from knives to scissors to chisels to axes. A plastic gauge that rests against the grinding stone sets the angle at which you are removing material. In class I watched the principles of the operation, then put them to good use while in Florida, putting a new edge on my kitchen knives (a couple of them older than me) that had probably never been sharpened in their entire culinary careers.
Even with a jig, the process demands a great deal of attention, especially with long knives or those that end in a curve. In this instance, the use of a Sharpie is vital. By coloring the cutting bevel black, you may see where and where you are not wasting material. Often areas near the heel or the tip are ground away unevenly, because so much depends on consistent movement of the blade across the stone. By paying attention to the markings, the sharpener may check for inconsistency along the edge.
The Tormek system allows you to grind either toward or away from the bevel, toward for most knives and away for small knives. I ground the knives toward the bevel with the universal tool rest set up horizontally, keeping one hand on the jig and the other on the handle, floating the blades back and forth, keeping the jig resting on the tool rest bar.
Due to the shape of the wheel, sharpening on a this surface creates a concave bevel, that is, a slightly hollow shape. This makes for a narrower sharpening edge, and faster sharpening times. Over time, the sharpening bevel gets bigger as the blade gets shorter from sharpening. When sharpening takes too long, it’s time to regrind.
Beyond a couple false starts involving a flying carving knife (no one was hurt) and a gouge I tried to put into the leather stropping wheel and the part where I ignored Jim’s advice to test a blade on the arm hairs instead of a thumb tip (I wasn’t sure I’d done that good a job. Spoiler–I had) this went off without a hitch. For once, my kitchen is equipped with a selection of sharp and useful knives, and vegetables and meat may be cut down efficiently without gratuitous sawing and strong-arming.
After experimenting (in a supervised environment and then free range) with a variety of methods, I am most satisfied with the Tormek system. Sandpaper, though easy to come by and easy to replace, is absolutely repulsive to me in a tactile sense and will destroy a manicure. Knowing where there are two Tormeks at my disposal certainly helps things, as I can re-grind worn down tools, then keep them sharp at home with a 1000/6000 wet stone.
Amy received her MFA in Creative Writing from San Francisco State University. She is the staff writer at Highland Woodworking. In 2015 she and her dad co-founded Coywolf Woodworks, their hobby shop in North Florida.