Welcome to “Tips From Sticks-In-The-Mud Woodshop.” I am a hobbyist, not a professional, someone who loves woodworking, just like you do. I have found some better ways to accomplish tasks in the workshop and look forward to sharing those with you each month, as well as hearing your problem-solving ideas.
I can’t take credit for this tip but it’s too good not to share. Sadly, I’m not clever enough to have thought of it.
I’ve faced this very situation before and the best I could come up with was to let my hole saw wobble around on the board until it “caught.”
The origin of the tip is Danny Lipford’s TV show, Today’s Homeowner. Danny and his crew are based in Mobile, Alabama. If you don’t know the show, you still might have heard Danny’s distinctive voice on commercials for “Glue Dots.” Each Today’s Homeowner show features a segment by Joe Truini called Simple Solutions. And, almost every week I watch Joe’s tip and wonder, “Why didn’t I think of that?”

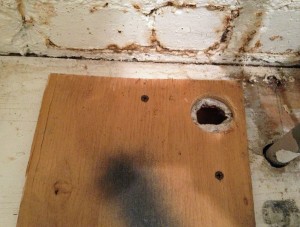
I have a hole in this plywood deck, but the new tubing that needs to go through it is bigger than the old one. How can I make the hole bigger without making a huge mess? (For demonstration purposes I drilled the hole in the top plywood first.
Joe says if you have a hole in a board or piece of plywood that you need to be larger, rather than “booger up” the board using my technique, or take a jig saw to the hole to enlarge it, start by attaching a piece of plywood to the original board with the too-small hole. You can attach it with screws if the screw holes won’t show, or use double-stick carpet tape. If the exact location of the hole doesn’t matter you can just approximate the center of the original hole, drill a pilot hole, change to the hole saw, and start drilling. The guide bit on your hole saw will lead the hole saw into your attached plywood and straight through both pieces.
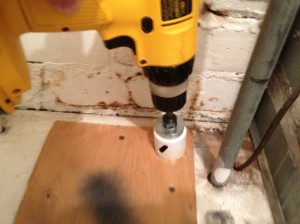
If, on the other hand, your hole has to be exactly concentric with the original hole, you have two options: Option One, you can outline the old hole’s circumference onto the new plywood with a pencil or marking knife, separate the two boards, and then find the center of the marked hole on the plywood and drill the pilot hole. Option Two is a little harder but potentially more accurate. Attach the two boards to each other, then find the center of the original hole. The first technique may introduce error because you may not get the intact plywood back onto the target in exactly the same position it was in when you marked the circle. If you’re dealing with a fixed stand, as I am in the accompanying photos, you need to lie on your back to mark the circle and find the center, then drill a tiny pilot hole from underneath (make sure you are wearing proper eye protection since the accompanying drill-bit shavings will be falling onto you). Next, from the top, use the pilot hole you just drilled to guide your hole saw through both pieces. This same technique will work if you use a spade bit to enlarge an existing hole.

Almost there! In no time the hole saw is through the plywood and into the decking with a nice, neat new hole!
—
Jim Randolph is a veterinarian in Long Beach, Mississippi. His earlier careers as lawn mower, dairy farmer, automobile mechanic, microwave communications electronics instructor and journeyman carpenter all influence his approach to woodworking. His favorite projects are furniture built for his wife, Brenda, and for their children and grandchildren. His and Brenda’s home, nicknamed Sticks-In-The-Mud, is built on pilings (sticks) near the wetlands (mud) on a bayou off Jourdan River. His shop is in the lower level of their home. Questions and comments on woodworking may be written below in the comments section. Questions about pet care should be directed to his blog on pet care, www.MyPetsDoctor.com. We regret that, because of high volume, not all inquiries can be answered personally.


Why can’t you simply drill a hole of the required size all the way through the top piece, place it where it’s needed, and then let the sides of that hole guide the hole saw?
I believe that would work, Chris, in the first scenario, in which the EXACT position of the hole didn’t matter. The other factor, though, is that I believe having the guide bit stabilize the drilling would make the process a lot more stable. For my little plywood stand, it doesn’t need to look all that great, but if you were making a passageway for cables in a fine-furniture desk, you wouldn’t want the saw “walking” and making wobbly marks all over your pretty wood. I believe that is more likely to happen with the latter method. Thanks for writing, Chris, and thanks for reading Wood News Online! Jim
You could make a circular template and fasten it to one side with clamps and turn it over and use a flush bit in your router. If it is a lot, maybe trim it some with a jig saw before using the router.
You can match the centers by drawing center lines at 90 degrees on the old hole and extend them longer than the added board. Draw 90 degree center lines on the new board and align the new board over the old center lines. The centers will be the same.